|
|
|
|
| 2-4 players, 45-60 minutes, 14 years and older |
| Author | John D. Clair (JohnDClair) |
| Published by | Alderac Entertainment Group
Pegasus |
| Online since | 2018-03-03 |
| Developed by | (BloodyMary) |
| Boardgamegeek | 194607 |
| Yucata.de owns a license for the online version of this game. A big "thank you" to the copyright owners (publisher and/or author and illustrator) who make it possible to have this game for free online here! |
| Note: This online implementation uses slightly changed rules! |
|
|
|
|
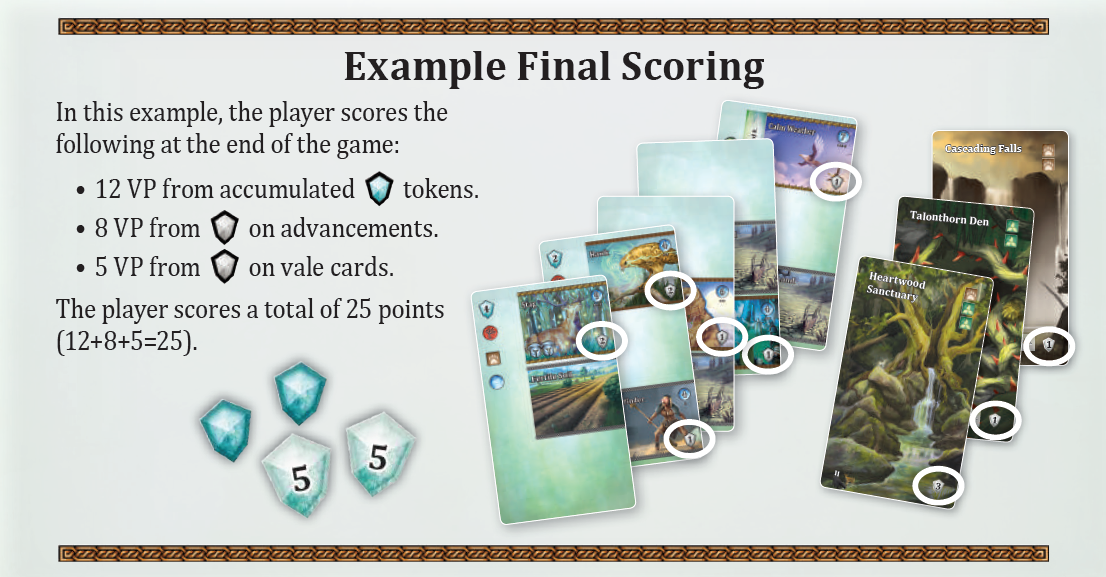
If you are reading these rules for the first time, ignore the text along the right hand side. These rules serve as a summary to help you quickly familiarize yourself with the game.
Show
→ summary only
→ detailed version only
→ both summary and detailed version

Mystic Vale
On Yucata the following deviations from the rules apply:
-
In the German rules a player has the option to prematurely stop the Prepare Phase if he has cards with more
than 2
 . This possibility does not exist in the English Rules and
it is not implemented on Yucata. . This possibility does not exist in the English Rules and
it is not implemented on Yucata.
-
In the German rules during the Harvest Phase a player has the option to exchange any 3 spirit symbols for
1
 . This possibility does not exist in the English rules, but is
implemented on Yucata. . This possibility does not exist in the English rules, but is
implemented on Yucata.
-
In the German rules the game ends also if the last Level 2 vale card is put into the commons during a Discard phase.
This game end condition does not exist in the English Rules, but is implemented on Yucata.
-
For the vale card Aether Tree (Expansion 1) the description says "any card in your field", but the accompanying example refers to
the on-deck card which in a strict sense is not part of the field. The rules have been amended to clarify that the ability
applies to any card in the field or the on-deck card.
Introduction
Centuries ago, a dying, wicked king pleaded for help from the druids of Gaia. Knowing that to heal him
would only bring more suffering, the druids refused.
Infuriated, with his final breath the king pronounced a dire curse that desolated the fertile Valley of Life.
Empowered by the dark ruler’s spiteful vengeance, the king’s spell spread pestilence and blight over the land.
The Valley of Life had been sacred to Gaia, a birthplace for vital spirits of nature. These spirits
cried out for aid as the land slowly withered. Worse still, some of the spirits grew corrupt and twisted
by the blight. Left unchecked, this corruption would consume every spirit in the valley and irrevocably
destroy a portion of Gaia’s power forever.
In response, the Druid Council dispatched druids into the valley to restore its verdant beauty. Gaia
herself blessed this mission, and the spirits welcomed the druids’ much-needed assistance. Into the cursed
valley the druids came, prepared to nurture and heal the land with their life-giving powers. The spirits
pledged to ally with the druids and bring forth new life into the valley’s glens and groves.
Although Gaia’s blessings beget life, the cursed blight fights back, and careless druids may be thwarted
by its evil and falter on their mission. Attempting to restore too much, too quickly can backfire
and impede the road to recovery. To remove the desecration and return the Valley of Life to nature’s
bounty will require courage and caution in equal measure.
Game Overview
Players take on the role of druidic clans attempting to restore the cursed lands to their former vitality.
The cards in your deck represent the parts of the valley that you are tasked with revitalizing, and
each advancement you add to the cards represents new life and vitality you have brought to that land.
Your power is tied to the land, and as more life grows in your valleys and groves, so too does your
power, and with it the spirits of nature to revive the miraculous vales.
Each turn you play cards into your field to gain powerful advancements and valuable vale cards.
But you must be careful not to overuse your power or it will result in decay and end your turn. During
the game you will be able to build up your cards by adding powerful advancements. Crafting your
cards with advancements and buying vale cards at the right time will help you bring back the most
miraculous portion of the Mystic Vale to life, and to achieve victory!
Goal
The player with the most  (victory points) at the end of the game wins. (victory points) at the end of the game wins.
Game Components
Your game of Mystic Vale should include the following. If it does not, contact [email protected] for assistance.
| Base game: |
| 80 |
Starting cards divided into 4 identical decks consisting of:
– Beastbrothers deck (20 cards)
– Dawnseekers deck (20 cards)
– Lifewardens deck (20 cards)
– Waveguards deck (20 cards)
|
| 96 |
Advancements consisting of:
– 33 Level 1
– 30 Level 2
– 33 Level 3
|
| 18 | Fertile Soil advancements |
| 36 |
Vale Cards consisting of:
– 18 Level 1
– 18 Level 2
|
| 4 | Reference cards |
| 44 | 1-point VP tokens |
| 10 | 5-point VP tokens |
| 4 | Mana tokens |
| 100 | card sleeves (20 of the sleeves are extra in case replacements are required) |
| 1 | Rulebook |
| |
| Expansion 1 - Vale of Magic: |
| 54 |
Advancements consisting of:
– 18 Level 1
– 21 Level 2
– 15 Level 3
|
| 18 |
Vale Cards consisting of:
– 9 Level 1
– 9 Level 2
|
| 1 | Rulebook |
For the First Game
Before playing the first game, each starting card should be placed in a clear plastic sleeve. Once
placed, starting cards should remain in the sleeves since there is no purpose in the game to remove
them. Vale cards are not sleeved. Also note that the game includes 20 additional plastic sleeves in
case replacements are required.
We also recommend that new players take a reference card in order to review the phases during their turn.
Playing with the Vale of Magic expansion
If you're playing with the expansion, simply shuffle the new advancements and vale cards into their
corresponding decks. Then follow the standard setup rules for the base game. There are no new rules
required to play with the Vale of Magic expansion.
Setup
1. Player Decks
Each player should shuffle their deck and place it face down in front of them.
1. Player Decks
Each player takes a deck of 20 sleeved starting cards (cards belonging to a specific deck are denoted by their
card back). Each player’s deck should have 9 Cursed Land, 3 Fertile Soil, and 8 blank cards. Each player should
shuffle their deck and place it face down in front of them.
2. The Commons
Take out all the Fertile Soil advancements and place them in a separate deck.
Separate all the other advancements into decks denoted by their level symbols.
Shuffle all of the level 1 advancements and count out a number of
advancements into a deck based on the number of players:
- players – count out 12 advancements.
- players – count out 15 advancements.
- players – count out 18 advancements.
Then turn over the first 3 advancements of the level 1, 2 and 3 deck .
2. The Commons
The commons is a set of 9 advancements available to buy during the game in the center
of the table. To set this up, you first take out all the Fertile Soil advancements and place them
in a separate deck. Then separate all the other advancements into decks denoted by their
level symbols (see "Card Anatomy").
Level 1 Advancements:
Shuffle all of the level 1 advancements together. Then count out a number of
advancements into a deck face down and put the rest back in the box. The number of
advancements in the deck is based on the number of players in the game, which is
listed below:
- 2 players – count out 12 advancements and leave the rest in the box.
- 3 players – count out 15 advancements and leave the rest in the box.
- 4 players – count out 18 advancements and leave the rest in the box.
Then turn over the first 3 advancements of the deck as shown in the setup diagram.
Level 2 Advancements:
Use all of the level 2 advancements, then turn over the first 3 advancements of the deck.
Level 3 Advancements:
Use all of the level 3 advancements, then turn over the first 3 advancements of the deck.
3. Vale Cards
Shuffle both vale decks, then turn over 4 cards face up from each deck.
3. Vale Cards
Separate the vale cards into a level 1 deck and a level 2 deck. Shuffle the level
1 deck and turn over 4 cards face up, then do the same with the level 2 deck.
5. Setup Fields
Each player makes their starting field until they have two Cursed Lands in their field
and a third one on-deck.
5. Setup Fields
During the game you will always have 20 cards. Your cards will be in one of four locations: your
deck, your field, your discard pile, and you will have one on-deck card.
During setup, players will create their starting field and on-deck card.
Each player makes their starting field using the following steps:
- Shuffle your 20 card deck and place it face down in front of you.
- Turn over the top card of your deck and place it back on top of your deck face up. This is your on-deck card.
- Place your on-deck card in your play area, creating the start of your field, then turn over a new on-deck card.
- Repeat step C until you have two Cursed Lands in your field and a third one on-deck.
6. Determine Starting Player
Place the  tokens so that their
active side is face up and shuffle them. Each player takes one token at random and turns it over
so the spent side is face up. The player with the starting player symbol will be the starting
player for this game. tokens so that their
active side is face up and shuffle them. Each player takes one token at random and turns it over
so the spent side is face up. The player with the starting player symbol will be the starting
player for this game.
6. Determine Starting Player
Take a number of (mana) tokens
equal to the number of players and be sure to include the token with the starting player symbol.
Place the tokens so that their
active side is face up and shuffle them. Each player takes one token at random and turns it over
so the spent side is face up. The player with the starting player symbol will be the starting
player for this game.
Players are now ready to begin the game!
Players are now ready to begin the game!
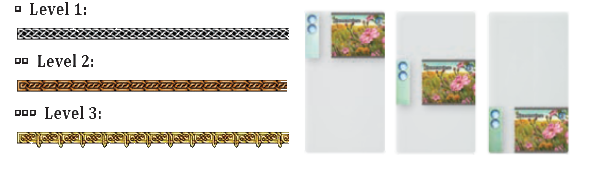
Card Anatomy
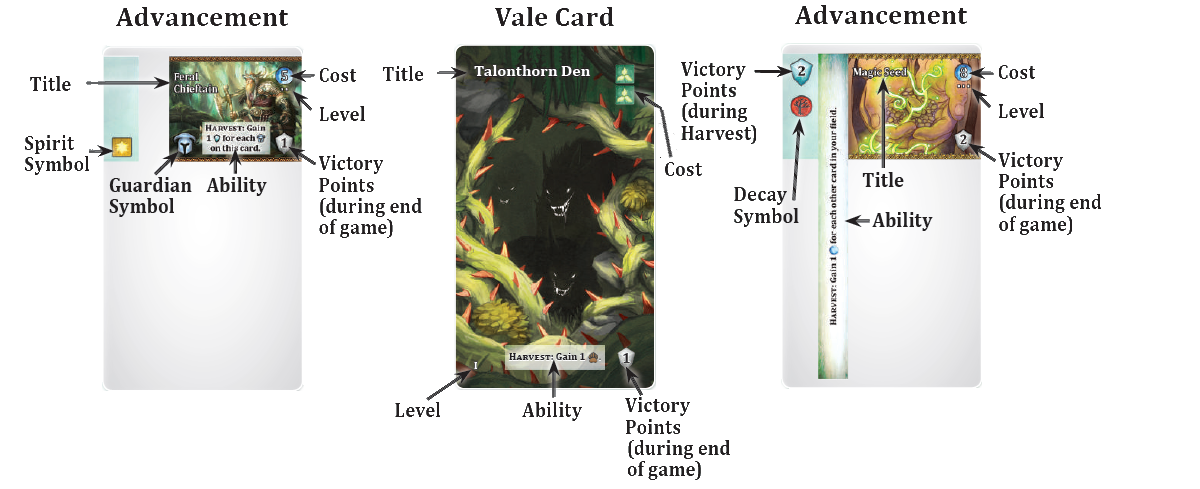
Each advancement exists in three versions, one each with picture in the top, middle
and bottom area of the card.
The level of each advancement is indicated by the number of pips
below its cost. The border on the top and bottom of the advancement also
indicates its level as shown below.
How To Play
The starting player takes the first turn of the game.
When a player finishes their Discard Phase, the next player clockwise around the table takes a
turn. Players continue taking turns until the end of the game.
Taking a Turn
Taking a Turn
Take the following phases in order.
When a player is taking a turn, they are considered the active player. During your turn, you must take
the following phases in order:
- Planting Phase
- Harvest Phase
- Discard Phase
- Prep Phase
1) Planting Phase
1) Planting Phase
Resolve the following steps:
- You must choose to either pass or push. If you pass, skip immediately to your Harvest Phase.
-
If you chose to push, place your on-deck card into
your field, to the right of any previously played card. Resolve "When Played"
abilities on that card (if any), then turn over the top card of your deck and
place it back on top of your deck face up as your new on-deck card.
- Determine if you have Spoiled.
- If you have not Spoiled, go back to step A and repeat.
You resolve your Planting Phase using the following steps:
- You must choose to either pass or push. If you pass, skip immediately to your Harvest Phase.
-
If you chose to push, place your on-deck card into
your field, to the right of any previously played card. Resolve "When Played"
abilities on that card (if any), then turn over the top card of your deck and
place it back on top of your deck face up as your new on-deck card.
- Determine if you have Spoiled.
- If you have not Spoiled, go back to step A and repeat.
In this manner, you continue until you either pass or Spoil. Whenever your deck is empty and you
need to reveal a new on-deck card, shuffle your discard pile; it becomes your draw deck. If all of
your cards are in your field, then you must pass.
Spoiling
Some cards have
(decay) symbols on the left side of the card.
If at any time during your Planting Phase or Prep Phase you have 4 or more
revealed, then you Spoil.
are counted on cards in
your field as well as your on-deck card. When you Spoil, you immediately skip your
Harvest Phase and jump straight to your Discard Phase. You also turn over your
token to the active
side as a consolation for Spoiling.
Some cards have  (growth) symbols on the left side of the card.
Each you have revealed
in your field, your on-deck card, and from any other abilities cancels 1
. Meaning, for example,
if you have 1 , then
you Spoil only if you have 5
revealed instead of the normal 4.
2) Harvest Phase
If you chose to end your Planting Phase before Spoiling, you now complete your Harvest Phase
(again, only if you did not Spoil).
The Harvest Phase is when you count up your
and spirit symbols
( , ,
 , ,
 , ,
 ), resolve
"Harvest" abilities on cards in your field,
score ,
buy vale cards, and buy advancements. ), resolve
"Harvest" abilities on cards in your field,
score ,
buy vale cards, and buy advancements.
All of this can be done in any order.
You could for example buy an advancement, then resolve a "Harvest" ability on one of your
cards, then buy a vale card, then buy another advancement.
Turn Tip
While you may resolve your various actions during the Harvest Phase in any
order you wish, we recommend that you generally follow the order below so that
your resources and abilities are easier to manage:
- Count up your and spirit symbols.
- Resolve "Harvest" abilities on cards in your field.
- Score .
- Buy vale cards.
- Buy advancements.
Resolve Harvest Abilities
You must resolve "Harvest" abilities on cards in your field (do not count your on-deck
card) unless it specifically states otherwise. However, you may use the ability at any time
during your Harvest Phase.
Each "Harvest" ability on an advancement can only be used once each Harvest Phase.
Score VP
Any card in your field (do not count your on-deck card) showing a
(victory point)
symbol on the left side of the card means that you must gain that many
tokens from the pool.
Important: You do not gain
tokens from gray
 symbols
on the right side of cards. Vale cards and advancements with a gray
symbol
on the right side of the card are added to your
total at the end
of the game (see "End of the Game"). symbols
on the right side of cards. Vale cards and advancements with a gray
symbol
on the right side of the card are added to your
total at the end
of the game (see "End of the Game").
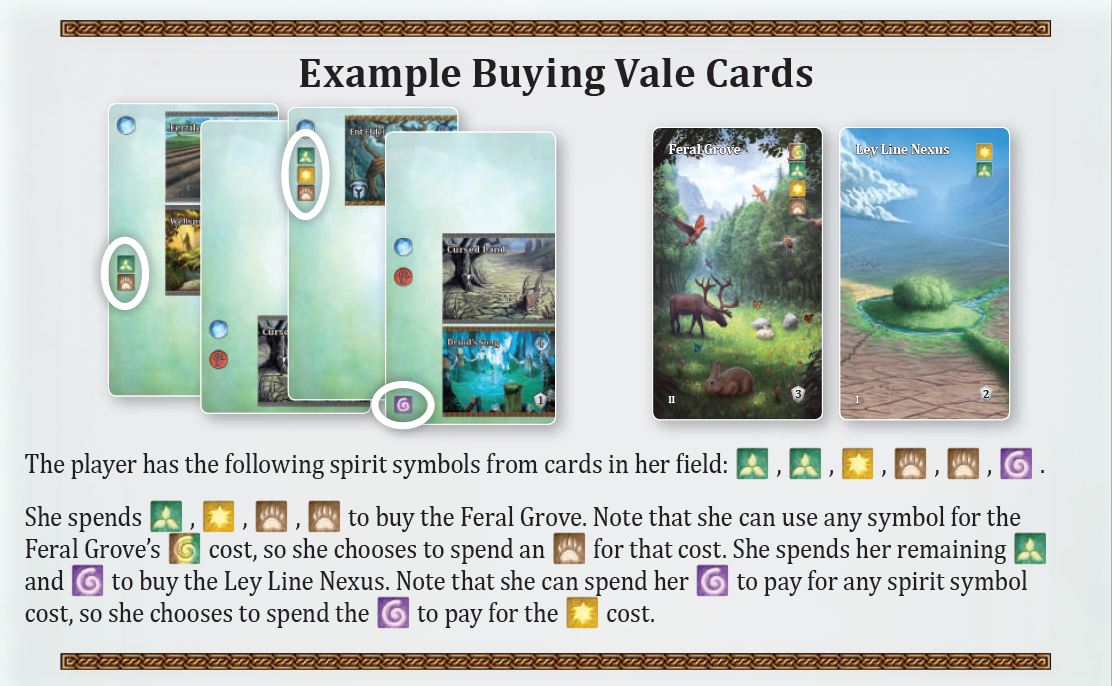
Buy Vale Cards
You will not be able to buy vale cards for your first few turns since you need
to have spirit symbols and none of your starting cards have any.
There are 4 spirit symbols in the game:
|
|
|
|
Animal
Spirit |
Forest
Spirit |
Sky
Spirit |
Wild
Spirit |
You will put these symbols on your cards by adding advancements. If you have the
right spirit symbols on the cards in your field (do not count your
on-deck card) to match one of the eight revealed vale cards, then you may buy
that card.
You may buy up to two vale cards per turn. When you buy a vale card,
place it face up in your play area.
A symbol used to buy one vale card may not be used to buy another. For example,
if you want to buy two different vale cards and they each have an
in
their cost, then you must have two different
symbols in your field.
Some vale cards feature an ability that you can use during the turns after you buy the card.
Vale cards with a gray
symbol on the right side of the card add to your
total at the end of the game.
If a vale card shows a  in its cost, you may use any spirit symbol to pay that cost.
Important: Abilities on vale cards may not be used during the turn that you buy them.
Tip: In order to help track which vale cards you have used during your turn,
you can simply rotate them 90 degrees. When you buy a vale card, immediately rotate
it to indicate that you cannot use the card during this turn. At the end of your turn,
rotate all of your used vale cards counterclockwise so they are ready to use next turn.
Exchange surplus spirit symbols into VP:
If after buying vale cards you have unused spirit symbols left on your cards
or advancements, you are allowed to exchange them 3 spirit symbols into 1
.
Important:
For this exchange you use
tokens from the reserve in the box, not from the limited supply!
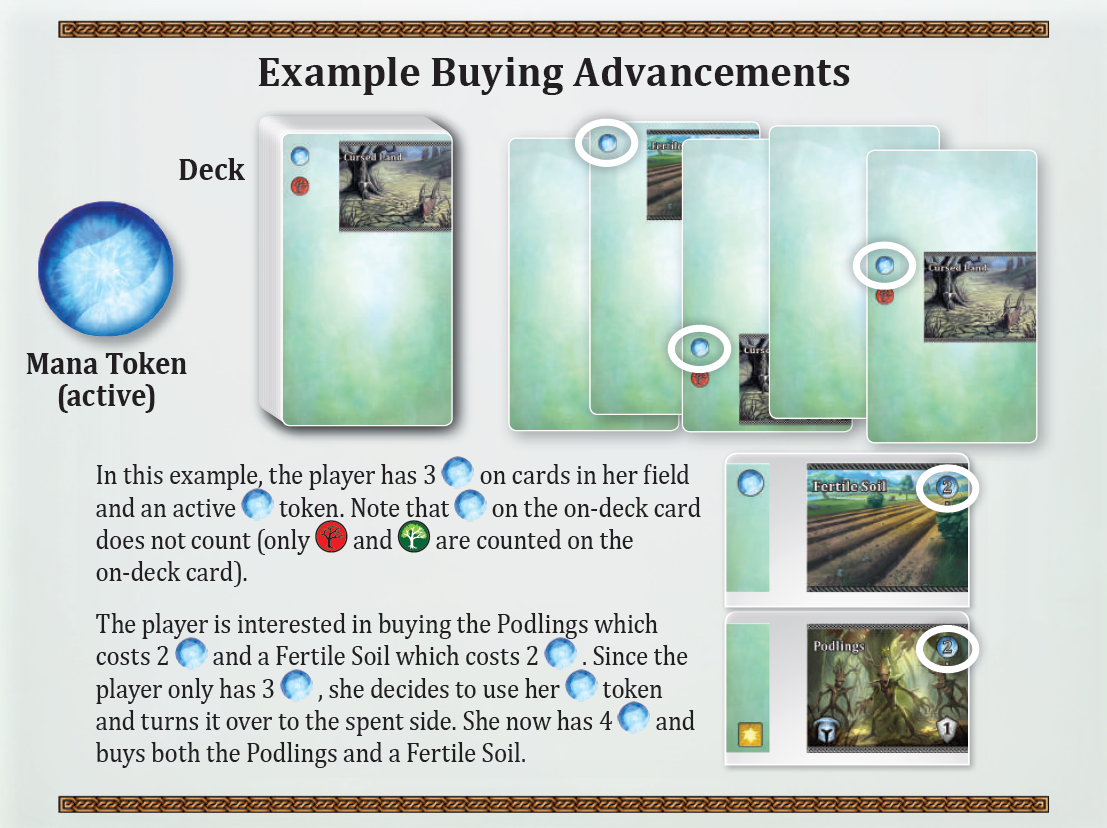
Buy Advancements
With the you
have in your field (do not count your on-deck card) you may buy up to
two advancements per turn, which includes Fertile Soil and any of the
9 advancements available in the commons. The cost of each advancement is shown
in the top right of each advancement. When buying a Fertile Soil, you may buy
any one you want.
If your token
is on the active side, you may spend it by turning the token over to the spent
side. You then gain 1 additional
to spend during that Harvest Phase.
Any that you did
not spend is lost at the end of your Harvest Phase. However, if you choose not to
spend your active
token it will remain active for your next turn.
Advancements that you buy are not sleeved until your Discard Phase. Abilities
and symbols on advancements that are not sleeved cannot be used.
Note: You are not allowed to buy an advancement if you do not have a
legal place to sleeve it on a card in your field.
3) Discard Phase
3) Discard Phase
Sleeve each advancement you bought (if any), then replenish vale cards and
advancements in the commons.
The next player may now begin their turn.
You must first sleeve each advancement you bought during your Harvest Phase (if any),
then replenish vale cards and advancements in the commons.
Sleeve Advancements
For each advancement you bought, choose a card in your field (you cannot choose
your on-deck card) and sleeve the advancement on the card.
You may not sleeve an advancement if it will cover another advancement already
on the card (including advancements on starting cards). There is one exception
to this rule. Some advancements have abilities that run long-wise down the card.
You may sleeve an advancement such that one long-wise ability is covering another
long-wise ability. Whichever ability gets covered is no longer active and is ignored.
Tip: Avoid crafting a card with 2 or more
.
After your advancements are sleeved (if any), put all cards in your field off to
the side in your own personal discard pile face down.
Don’t discard your on-deck card.
Replenish Vales
Replace any vale cards you bought by drawing vale cards from the top of the
respective deck. If the deck of level 1 vale cards runs out, replace bought
level 1 vale cards with cards from the level 2 deck.
Replenish Advancements
Any advancements you bought from the commons are replaced with new advancements
of the same level from the top of the corresponding deck(s). If the deck of
level 1 advancements runs out, replace bought level 1 advancements with advancements
from the level 2 deck. Likewise if the level 2 deck runs out and you need to
replace a level 2 advancement, instead replace it with a level 3 advancement.
The next player may now begin their turn.
4) Prep Phase
4) Prep Phase
While your opponent is beginning their turn, prep your field until you have three or more
showing (in your field and your on-deck card).
End of the Game
End of the Game
When the tokens
in the pool run out, or the last Level 2 vale card is put into the commons during
a Discard phase, finish playing the current round so that each player gets
an equal number of turns, then the game ends.
Count your .
The player with the most total points is the winner. If two or more players are tied,
the player with the most combined level 3 advancements and level 2 vale cards is the
winner. If there is still a tie, then players share the win.
The game may end in two possible scenarios:
A) When the tokens
in the pool run out, finish playing the current round so that each player gets
an equal number of turns, then the game ends. If
tokens in the pool run out and a player would still gain
, take them from
the tokens that were left in the box.
B) When the last Level 2 vale card is put into the commons during a Discard phase,
finish playing the current round so that each player gets an equal number of turns,
then the game ends.
Should the vale cards not be worth any VP
anymore, players can of course exchange all their spirit symbols 3:1 into
which are
taken from the tokens that were left in the box.
Players now count their points.
You may have accumulated
tokens from cards that give you tokens each time you play them.
Some advancements are worth points at the end of the game, which is indicated by
the gray
symbol on the right side of the card. You should go through all of your cards and
count up all the
you have on advancements.
Many vale cards are also worth points at the end of the game, which is indicated
by the gray
symbol on the right side of the card.
The player with the most total points is the winner. If two or more players are tied,
the player with the most combined level 3 advancements and level 2 vale cards is the
winner. If there is still a tie, then players share the win.
Additional Rules
This section covers additional explanations beyond the basic rules required to play.
Mana Token
You may only spend your active
token during
your Harvest Phase.
If you choose not to spend your active
token, it will
remain active for your next turns until you spend it.
If your token is
already active and you Spoil, the
token remains active but you don’t receive any other reward.
Guardian Symbol
 Some cards have one or more
(guardian symbol).
Some cards have one or more
(guardian symbol).
These symbols have no effect unless an ability on a card references them.
Wild Spirit Symbol
The
(wild spirit symbol) is considered any of the spirit symbols:
,
,
,
.
If a vale card shows a
in its
cost, you may use any spirit symbol to pay that cost.
If a card or ability gives you a
,
you may use it to pay for any spirit symbol on a vale card’s cost.
On-deck Card
Your on-deck card is not considered to be in your deck or in your field. Abilities
that reference your deck, like "search your deck", do not include your on-deck card.
The only symbols that count on your on-deck card are
and
symbols.
You must play the card into your field to get any other symbols on the card.
"Harvest" and "When Played" abilities cannot be used on your on-deck card. "Ongoing"
abilities however, continually affect the card even when it is your on-deck card.
Using Abilities
If an ability specifically contradicts the rules, the ability takes precedence.
Each ability on an advancement or vale card can only be used once per turn
unless it specifically states otherwise.
Most abilities list when they can be used at the start of their text, like "Harvest"
or "When Played" for example, otherwise the ability describes when it can be used.
If two or more abilities would resolve at the same time, like two "Harvest"
abilities for example, the active player chooses the order they are resolved.
"When Played" abilities are resolved when they are played into your field,
before revealing a new on-deck card; they are not resolved when they are
revealed as your on-deck card.
"Harvest" abilities in your field are resolved during your Harvest Phase;
they are not resolved while they are your on-deck card.
"Ongoing" abilities continually affect the card whether that card is
on-deck, in your field, in your discard pile, or in your deck. These effects
have no trigger, as they are always active.
With the Vale of Magic expansion, there are two more types of abilities:
"Discard" abilities are resolved during your Discard Phase.
"When Bought" abilities are resolved the moment the card is bought
and then can be ignored for the rest of the game.
Planting Your Field
New cards that are added into your field must always be placed to the right of
any cards previously placed in your field. The cards are designed such that those
without text effects can be overlapped and only the left half of each card
needs to be seen. Try not to overlap cards with "Ongoing" or "Harvest" abilities,
or you may miss them.
Open and Hidden Information
You may not look at any cards in a deck unless an ability allows you to do so.
You may always look at any cards in your own discard pile. You may not look at
cards in other players’ discard piles unless an ability allows you to do so.
When you gain
tokens they are placed in your play area and are open information to all players.
Decay
You can only Spoil during your Planting Phase and Prep Phase. If you have 4 or
more revealed
during your Harvest Phase or Discard Phase, you do not Spoil and there is no effect.
Card vs. Advancement
A card is comprised of everything in its sleeve, including the starting card
itself and any advancements that are placed in the sleeve.
An advancement is one of the three "slots" that make up a card; advancements are
not counted as individual cards. Advancements that are printed on starting cards
are still considered an advancement in regards to rules and abilities.
The "blank" starting card is not considered an advancement.
Card Clarifications
This section covers additional explanations for advancements and vale cards that
may be referenced during play.
Advancements
Aurora
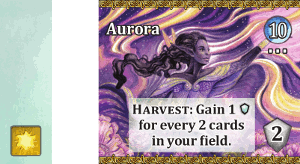 This is a "Harvest" ability, meaning if it’s in your field, it resolves during your
Harvest Phase. You cannot resolve this ability if you Spoil. Count up the number
of cards in your field (don’t count your on-deck card). A "card" means everything
in a single sleeve - advancements are not counted as individual cards.
This is a "Harvest" ability, meaning if it’s in your field, it resolves during your
Harvest Phase. You cannot resolve this ability if you Spoil. Count up the number
of cards in your field (don’t count your on-deck card). A "card" means everything
in a single sleeve - advancements are not counted as individual cards.
For every 2 cards, rounded down, gain 1 .
For example, if there 9 cards in your field, you gain 4
.
Calm Weather
This is a "When Played" ability, meaning it resolves when it goes from being your
on-deck card to being placed into your field. It resolves before you turn over
your next on-deck card. This ability means you look at the top card of your deck
(which is about to be your on-deck card). Then either discard it or put it back
on top of your deck. Regardless, you then turn over a new on-deck card.
Cleansing Rain
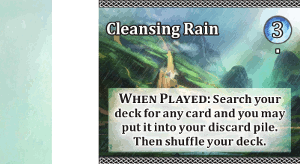 This is a "When Played" ability, meaning it resolves when it goes from being your
on-deck card to being placed into your field. It resolves before you turn over
your next on-deck card. Search your deck for any card and you may put it into your
discard pile (you’ll probably want to choose a Cursed Land), then shuffle your
deck (don’t shuffle your discard pile into your deck) and reveal your next on-deck
card. If you choose not to discard the card, you must still shuffle your deck.
This is a "When Played" ability, meaning it resolves when it goes from being your
on-deck card to being placed into your field. It resolves before you turn over
your next on-deck card. Search your deck for any card and you may put it into your
discard pile (you’ll probably want to choose a Cursed Land), then shuffle your
deck (don’t shuffle your discard pile into your deck) and reveal your next on-deck
card. If you choose not to discard the card, you must still shuffle your deck.
If Cleansing Rain was the bottom card of your deck, such that when you play it
there are no cards in your deck, first shuffle your discard pile to create a
new deck, then resolve Cleansing Rain’s ability.
Deadwood Harvester
This is a "When Played" ability, meaning it resolves when it goes from being your
on-deck card to being placed into your field. It resolves before you turn over
your next on-deck card. This ability means you may discard any other card which was
already placed in your field (typically a Cursed Land). If Deadwood Harvester is
the first card placed into your field its effect does nothing.
Earthchant Chorus
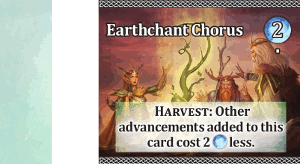 During your Harvest Phase (when you buy advancements), if Earthchant Chorus is
on a card in your field and that card has one or two open slots to sleeve a new
advancement, you may declare that you are purchasing an advancement that will be
sleeved on the same card as Earthchant Chorus (it must be able to fit an open
slot on the card). If you do, that advancement costs 2 less
to buy (to a
minimum of zero), and during your Discard Phase you must sleeve it where you
said you would. Note that during the turn you buy and sleeve Earthchant Chorus
its effect is not active and should be ignored.
During your Harvest Phase (when you buy advancements), if Earthchant Chorus is
on a card in your field and that card has one or two open slots to sleeve a new
advancement, you may declare that you are purchasing an advancement that will be
sleeved on the same card as Earthchant Chorus (it must be able to fit an open
slot on the card). If you do, that advancement costs 2 less
to buy (to a
minimum of zero), and during your Discard Phase you must sleeve it where you
said you would. Note that during the turn you buy and sleeve Earthchant Chorus
its effect is not active and should be ignored.
This ability is considered as ongoing ability and therefore may be used more than once per turn.
Gaia’s Chosen
This is an effect that only matters when counting total points at the end of the
game. The advancement gives you 2 end of the game
as normal,
but it also gives you an additional 1
for every
,
,
,
,
,
,
and on the card.
However, these are only counted after ignoring text effects.
For example, if Gaia’s Chosen is sleeved together on the same card as both Stag
and Dawnsinger, this ability would give you 6
(3 for the
, 2 for
the
and , and
1 for the ,
but 0 from Dawnsinger’s ability because text effects are ignored).
For example, if Gaia’s Chosen is sleeved together on the same card as both Stag
and Lifebringer Seed, this ability would give you 4
(2 for the
, 1 for
the ,
and 1 for the .
Even though Lifebringer Seed has an "Ongoing" ability that cancels the
, Gaia's
Chosen specifically says to ignore text effects, so the
is still
worth 1 ).
Grovetender
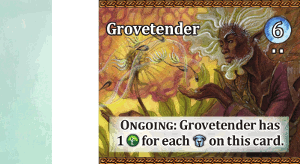 This is an "Ongoing" ability, meaning if Grovetender is sleeved on a card,
thereafter, whether that card is on-deck, in your field, in your discard pile,
or in your deck, Grovetender’s ability is in effect. For each
on the
card (
on advancements in the same sleeve), Grovetender is considered to have +1
. For
example, if Grovetender and Stag were sleeved together on the same card,
Grovetender would be considered to have 2
.
You still, of course, only get these
while
Grovetender is in your field or on-deck.
This is an "Ongoing" ability, meaning if Grovetender is sleeved on a card,
thereafter, whether that card is on-deck, in your field, in your discard pile,
or in your deck, Grovetender’s ability is in effect. For each
on the
card (
on advancements in the same sleeve), Grovetender is considered to have +1
. For
example, if Grovetender and Stag were sleeved together on the same card,
Grovetender would be considered to have 2
.
You still, of course, only get these
while
Grovetender is in your field or on-deck.
Lifebringer Seed
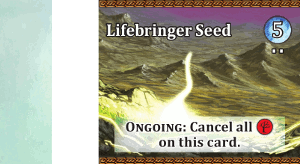 This is an "Ongoing" ability, meaning if Lifebringer Seed is sleeved on a card,
thereafter, whether that card is on-deck, in your field, in your discard pile,
or in your deck, it is considered to have no
on it.
This is an "Ongoing" ability, meaning if Lifebringer Seed is sleeved on a card,
thereafter, whether that card is on-deck, in your field, in your discard pile,
or in your deck, it is considered to have no
on it.
Magic Seed
This is a "Harvest" ability, meaning if it’s in your field, it resolves during
your Harvest Phase. You cannot resolve this ability if you Spoil. Count up the
number of other cards in your field (don’t count your on-deck card or the card
that Magic Seed is sleeved on). You gain that much additional
to spend
this turn.
Mindful Owl
This is a "When Played" ability, meaning it resolves when it goes from being your
on-deck card to being placed into your field. It resolves before you turn over
your next on-deck card. This ability means you may discard any other card which
was already placed in your field (typically a Cursed Land). If Mindful Owl is
the first card placed into your field, then its effect does nothing.
Peacekeeper Druid
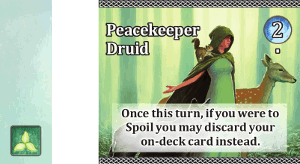 If Peacekeeper Druid is in your field, its ability is available for use during
your Planting Phase (or, more rarely, your Prep Phase). During your Planting
Phase, if you push and the new on-deck card you reveal would result in you
Spoiling, instead of Spoiling, you may use Peacekeeper Druid’s ability and
discard your current on-deck card. Then reveal a new on-deck card.
If Peacekeeper Druid is in your field, its ability is available for use during
your Planting Phase (or, more rarely, your Prep Phase). During your Planting
Phase, if you push and the new on-deck card you reveal would result in you
Spoiling, instead of Spoiling, you may use Peacekeeper Druid’s ability and
discard your current on-deck card. Then reveal a new on-deck card.
You may not use the ability more than once during your turn. For example, if you
were to Spoil but you use Peacekeeper Druid’s ability to discard your on-deck
card and reveal a new on-deck card, which also results in you Spoiling, then too
bad, you Spoil anyway.
In the rare case of Spoiling during your Prep Phase, if Peacekeeper Druid is in
your field, you may use its ability once then as well, but then you cannot use
the ability again during your next Planting Phase.
Seedling
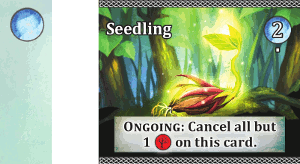 This is an "Ongoing" ability, meaning if Seedling is sleeved on a card, thereafter,
whether that card is on-deck, in your field, in your discard pile, or in your deck,
that card is considered to have no more than 1
on it. For
example, if Seedling is sleeved on a Cursed Soil with no other advancement, its
ability effectively does nothing. However, if you also sleeve an advancement with
on it on the
same card, like Hulking Thornhide, then Seedling’s ability cancel’s the second
so the card
is considered to have only 1
on it.
This is an "Ongoing" ability, meaning if Seedling is sleeved on a card, thereafter,
whether that card is on-deck, in your field, in your discard pile, or in your deck,
that card is considered to have no more than 1
on it. For
example, if Seedling is sleeved on a Cursed Soil with no other advancement, its
ability effectively does nothing. However, if you also sleeve an advancement with
on it on the
same card, like Hulking Thornhide, then Seedling’s ability cancel’s the second
so the card
is considered to have only 1
on it.
Advancements Expansion 1
Canopy Explorer
This is a "Harvest" ability, meaning, if it’s in your field, it resolves during
your Harvest Phase. You cannot resolve this ability if you Spoil. For each
on this card you may take the top card of your deck (this is the first face down
card beneath your current on-deck card), and place it face up into your field as
the rightmost card. So for example, if there were 2
on the
card, you would take the top 2 cards that are face down beneath your on-deck card
and place them at the end of your field (you must take exactly 2 cards).
Note: You only resolve this effect during your Harvest Phase, meaning
you’ve already passed and cannot Spoil. If this effect causes you to have more
than 3 , you
don’t Spoil; just continue your Harvest Phase as normal.
Likewise, "When Played" effects and
are only
beneficial during your Planting and Prep Phase, and if placed into your field
via Canopy Explorer, are useless.
If you don’t have enough cards in your deck to fully resolve this effect, shuffle
your discard pile and it becomes your deck, then complete the effect.
Goldenwing Gryphon
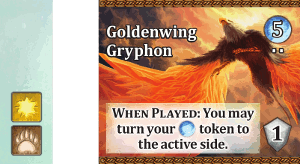 This is a "When Played" ability, meaning it resolves when it goes from being your
on-deck card to being placed in your field. If your
token is face
down (the token you turn face up when you Spoil) you may now turn it face up so
the active side is revealed.
This is a "When Played" ability, meaning it resolves when it goes from being your
on-deck card to being placed in your field. If your
token is face
down (the token you turn face up when you Spoil) you may now turn it face up so
the active side is revealed.
Hatchery
 This is a "Discard" ability, meaning it triggers during your Discard Phase. If
Hatchery’s card is the "first" card in your field (i.e. the leftmost card) then
you discard it as normal with all the other cards in your field. However, if it
is in any position other than first, you may choose to not discard it. In this
case, you would discard all the other cards in your field, place Hatchery’s card
as the "first" (leftmost) card in your field, then during your Planting Phase,
play cards to the right as the second card, third card, fourth card, etc..
This effect essentially allows you, under most circumstances, to keep a card in
your field for an extra turn.
This is a "Discard" ability, meaning it triggers during your Discard Phase. If
Hatchery’s card is the "first" card in your field (i.e. the leftmost card) then
you discard it as normal with all the other cards in your field. However, if it
is in any position other than first, you may choose to not discard it. In this
case, you would discard all the other cards in your field, place Hatchery’s card
as the "first" (leftmost) card in your field, then during your Planting Phase,
play cards to the right as the second card, third card, fourth card, etc..
This effect essentially allows you, under most circumstances, to keep a card in
your field for an extra turn.
If you manage to get two or more cards with Hatchery in your field at the same time,
you may choose what order to resolve them in, resulting in one card being in the
first spot in your field, and other card in the second spot; meaning the other
card will actually get to stay in your field for two extra turns.
Lifetap Oracle
This is a "When Played" ability, meaning it resolves when it goes from being your
on-deck card to being placed in your field. It resolves before you turn over your
next on-deck card. For each
on this card, you search your deck for any card and you may put it into your
discard pile (you’ll probably want to choose a Cursed Land), then shuffle the
cards in your deck (don’t shuffle your discard pile into your deck) and reveal
your next on-deck card. If Lifetap Oracle was the bottom card of your deck, such
that when you play it there are no cards in your deck, first shuffle your discard
pile to create a new deck, then resolve Lifetap Oracle’s ability.
Ley Line Overflow
 This is a "Harvest" ability, meaning, if it’s in your field, it resolves during
your Harvest Phase. You cannot resolve this ability if you Spoil. You may
resolve Harvest abilities whenever you choose to during your Harvest phase.
Typically, this ability you want to resolve last.
This is a "Harvest" ability, meaning, if it’s in your field, it resolves during
your Harvest Phase. You cannot resolve this ability if you Spoil. You may
resolve Harvest abilities whenever you choose to during your Harvest phase.
Typically, this ability you want to resolve last.
For example, you’ll typically want to count up all regular
(mana) you get
from your cards, gain a
from your token if desired/possible, gain
from Harvest
effects on your cards and your vales. Then, lastly use Ley Line Overflow’s ability
to double whatever that total
was.
If you have multiple Ley Line Overflows, you resolve one after the other. Meaning,
for example, with two Ley Line Overflows you would be able to quadruple your total
.
Sporeling Reclaimer
This is an effect that only matters when counting total points at the end of the game.
This effect gives you 1
for each
on cards in your deck. The term "deck" doesn’t mean just the cards remaining in
your draw deck at the end of the game, it means all of the advancements you own.
Vales Expansion 1
Aether Tree
 This ability is available for use during your Planting Phase (or, more rarely,
your Prep Phase). During your Planting Phase, if you "push", and the new on-deck
card you reveal would result in you Spoiling, instead of Spoiling, you may discard
Aether Tree (put it back in the game box and it’s considered out of the game).
This ability is available for use during your Planting Phase (or, more rarely,
your Prep Phase). During your Planting Phase, if you "push", and the new on-deck
card you reveal would result in you Spoiling, instead of Spoiling, you may discard
Aether Tree (put it back in the game box and it’s considered out of the game).
If you do, choose a card in your field or the on-deck card; all
on that card,
other than
from a Cursed Land, is canceled. If that results in you no longer Spoiling, then
you now continue your turn as normal by choosing to either pass or push.
In the rare case of Spoiling during your Prep Phase, you may also use Aether Tree
at that time to cancel
until your
next Prep Phase.
If you discard your Aether Tree, you also lose the 1
.
Example: It’s your Planting Phase and you have just Spoiled! Your on-deck card has
2 on it,
1 from a Cursed
Land, and 1
from a different advancement. You may discard Aether Tree to cancel the second
that is not from the
Cursed land (that
is now canceled until your next Prep Phase). If this prevented you from Spoiling,
then you continue your current Planting Phase as normal by choosing to pass or push.
Fauna Hollow
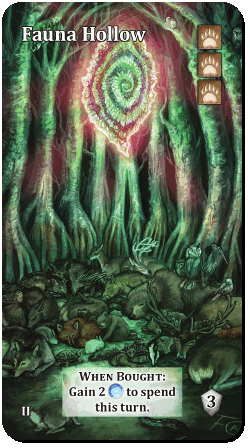 This is a "When Bought" effect, meaning it triggers the moment the card is bought
and then can be ignored for the rest of the game. You gain an extra 2
to spend this
turn on buying advancements (or resolving other effects if possible).
This is a "When Bought" effect, meaning it triggers the moment the card is bought
and then can be ignored for the rest of the game. You gain an extra 2
to spend this
turn on buying advancements (or resolving other effects if possible).
Sunwell Temple
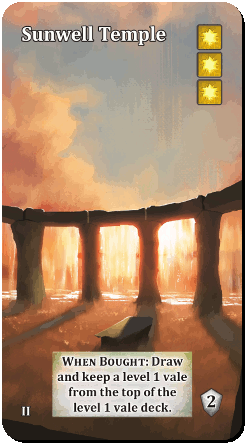 This is a "When Bought" effect, meaning it triggers the moment the card is bought
and then can be ignored for the rest of the game. Take the top card of the level
1 vale deck and add it to the vales you own. If the card has a text effect, you
may not use the effect this turn. If the card has a "When Bought" effect, you do
not gain the benefit.
This is a "When Bought" effect, meaning it triggers the moment the card is bought
and then can be ignored for the rest of the game. Take the top card of the level
1 vale deck and add it to the vales you own. If the card has a text effect, you
may not use the effect this turn. If the card has a "When Bought" effect, you do
not gain the benefit.
Vale of Magic
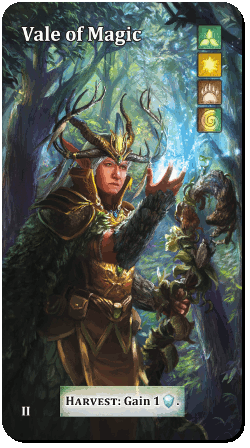 This ability means that once every Harvest Phase you must gain 1
which is
taken from the counted out VP pool.
This ability means that once every Harvest Phase you must gain 1
which is
taken from the counted out VP pool.
Wood Sprite Hoard
 This is a "When Bought" effect, meaning it triggers the moment the card is bought
and then can be ignored for the rest of the game. Look at the top three face down
cards of your deck (your on-deck card is not considered part of your deck so it
is not one of the three cards). You may put any of those three cards into your
discard pile. The rest should be put back, face down, in the same order you drew them.
This is a "When Bought" effect, meaning it triggers the moment the card is bought
and then can be ignored for the rest of the game. Look at the top three face down
cards of your deck (your on-deck card is not considered part of your deck so it
is not one of the three cards). You may put any of those three cards into your
discard pile. The rest should be put back, face down, in the same order you drew them.
Note if there are only 0, 1 or 2 cards left in your deck, look at all of them,
and discard any of your choice.
Druidic Clans
There are many druidic clans devoted to nurturing and guarding the Valley of Life. Each
clan focuses on a certain aspect based on the primal forces of nature. This aspect shapes
the clan’s rituals, which grants them different powers and blessings from Gaia. When the
spirits of nature cried out for aid, the Druid Council first sent the four most prominent clans:
Beastbrothers, Lifewardens, Dawnseekers, and Waveguards.

Beastbrothers
Druids belonging to the circle of animals are called Beastbrothers. These
druids form lasting bonds with all forms of animal life. Beastbrothers are
often considered barbaric, preferring to lair in caves and dark forests.
Beastbrothers honor and respect the ways of animals, including the nature
of predator and prey.

Lifewardens
Some druids join a circle dedicated to plant life, the power of growth, and
harmony of nature. These druids are known as Lifewardens. They are
gardeners and caretakers, nurturing life that comes from the earth. Plants,
trees, farms, and gardens are where they roam. Lifewardens catalogue
every plant they encounter, memorizing the uses of herbs, roots, and other
growing things, making them excellent healers.

Dawnseekers
The light of the sun marks the passage of the seasons, and druids who
venerate this process are known as Dawnseekers. This circle of druids
mark the calendar, preferring to make their homes amongst the plains and
savannas where the sun is clearly seen throughout the day. Dawnseekers
rise early, hence their name, though some amongst their number prefer to
remain awake until midnight to mark the end of another day.

Waveguards
Wherever the rivers flow, you can find druids who honor the rushing
waters. These druids are sometimes called Waveguards, and they travel
along stony riverbeds, frost-lined coasts, and into the icy mountains.
Waveguards understand the majesty and power of water like no others,
able to divine weather patterns from a single drop of rain and predict the
tides with uncanny accuracy.
List of advancements
Each advancement exists in three versions, one each with picture in the top, middle and bottom area of the card.
The starting player has the Mana token with the star   .
The first row of the player info of each player contains some useful views.
If you click on the single card back  , the whole deck of that player is shown.
For the player himself these cards are marked at the top: with a blank card if the card is the current on-deck card (red border) or is part of the field (green border) and with a card back in case the card is currently discarded.
If you click on the symbol for the field view  , the current player area of that player
is shown in the bottom of the screen. The number on the left card denotes the number of cards in the draw pile (incl. on-deck card) and the number on the right card denotes the current number of cards in the player's discard pile.
If you click on the vale card back  , the vale cards of that player are shown.
The ability of vale cards bought this turn are not available, so those cards are shown turned around 90° and are given as +X in the number of cards.
Vale cards whose ability has already been used have a small red cross on their ability. That only affects abilities you explicitly have to chose using.
The second player info row shows the values for the current field of that player. Ongoing abilities of advancements and
vale cards are always automatically included and shown.
The list of the player's spirit symbols contains, apart from the symbols
,
,
and
,
another symbol
, which you can also find as cost on the vale cards.
Here it is shown how many unspecified symbols you already used during your Harvest Phase,
so you don't have to decide at the time of paying which of your symbols you'll use for the unspecified cost.
If you want to calculate your currently available spirit symbols, you have to deduct the number beside that symbol.
Vale cards whose ability is not used automatically you can choose as soon as the ability becomes usable.
In this case a clickable card back will be shown beside the vale card display. If you click this, you get a popup where you can choose the respective vale card.
Specifically the usage of the "Conclave of Ents" is only offered if the field has actually been spoiled.
Advancements whose ability is not used automatically you can choose as soon as the ability becomes usable.
In this case the usable ability will be shown with a red frame.
To prevent clicks which cannot be undone, you usually need 2 clicks to play your on-deck card during your Planting Phase: one click to play the on-deck card
and another one to reveal the next one in the stack.
Usually the Prep Phase is executed automatically. But if there are usable abilities (usually "When Played" abilities), you explicitly have
to click on the deck to reveal the next card. This enables you to undo use of the ability.
Therefore you always have to conclude the Prep Phase explicitly with the "Finish Turn" button.
Usually in the bottom of the window the playing area of the player currently on turn is shown, so you can easily follow what that player is currently doing.
If you want to look at your own (or a different player's) field instead without being disturbed by the current player's actions, you can freeze the current
field view with the pin in the upper right corner of the field.
Usually you have to click on your deck to reveal the next on-deck card. But the player on turn may perform this action automatically with
3 or less decay in his display. To accomplish this, just activate the checkbox below the draw pile ( < 3 ).
Attention: If you have cards with 2 or more active decay, this option may cause your field to be spoiled. In that case
it is better to un-check that option.
Vale of Magic expansion:
As usual, abilities are used automatically if no choice is needed by the player:
For the vale card Manadew Meadow, the card in the field with the most guardian symbols is chosen automatically as target; Conclave of Ents is being considered in that choice.
Amberwood, Direwolf Burrow and Shimmercliff Rookery:
In case the player's mana token is face down, it is turned face up.
If it is face up already, the system assumes that the mana token is turned face down first before buying the vale card, and adds the appropriate amount of mana to the mana pool before turning it face up again.
Sunwell Temple:
Since the additional vale card is not available in the same turn, it is shown turned around 90° as any other just bought vale card.
Wood Sprite Hoard:
The revealed and not discarded cards are marked in the deck overview. The symbol is a card's backside with a number which shows the order of the card in the remaining deck.
Aether Tree + Seedling
If the Aether Tree is used on a card with a Seedling, it is assumed that the Seedling first cancels all decay from Cursed Lands
and the last decay left is one from another advancement, if such exists, which could then be cancelled by the Aether Tree.
The Hatchery cannot be used in the same turn in which it was bought, despite it being a Discard Ability.
This was clarified by the Author on bgg.
Possible settings:
show animations: device dependent, standard: checked
If this option is checked your browser will animate all actions.
Pin playing area when opening window: device dependent, standard: unchecked
This option will check the pin to freeze the field view to a player.
Planting phase: Reveal on-deck card automatically with less than 3 decay: device dependent, standard: unchecked
With this one checked the option for automatically revealing cards in planting phase with less than 3 decay on display will be checked.
| |