If you are reading these rules for the first time, ignore the text along the right hand side. These rules serve as a summary to help you quickly familiarize yourself with the game.
Show
→ summary only
→ detailed version only
→ both summary and detailed version
Lost Ruins of Arnak
Day 3 – After two fruitless days of searching empty
ocean, a smudge on the horizon, barely discernible among
the sparkling waves, gave me a glimmer of hope. As we
drew nearer, a flock of brilliant scarlet birds flew toward
our vessel, chirping and whistling as though in welcome.
Consulting her charts, our navigator assured us that
the island was indeed as yet uncharted. Her words supported
a hypothesis we all silently shared – those rugged plateaus,
that verdant jungle!
– this could be Arnak!
Game Components
1
main board, Bird Temple side (Snake Temple on other side)
1
double-sided supply board
4
double-sided player boards
4
basic cards in each color
19
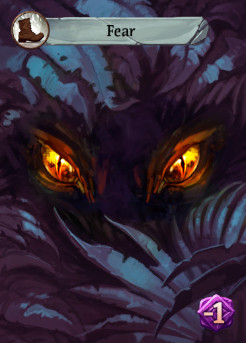
Fear cards
40
item cards
35
artifact cards
15
guardian tiles
10
level 1 site tiles
6
level 2 site tiles
12
assistant tiles
16
idol tiles
24
temple tiles
1
moon staff
1
starting player marker
1
pad of scoring sheets
27
coin tokens
27
compass tokens
2
research tokens (1 notebook and 1 magnifying glass) in each color
16
tablet tokens
12
arrowhead tokens
9
jewel tokens
5
blocking tiles
2
archaeologist figures in each color
18
research bonus tiles
10
reserve tiles
Main Board
Use the side with the Bird Temple for your first game.
The Snake Temple side follows
special rules which are
explained
here.
Card Row
The card row offers items and artifacts
you can get during play. Be sure they are
divided into separate decks. They have
the same backs, but they can be easily
distinguished by their faces and by the
icon in the upper right corner.
-
 Artifacts: Shuffle the artifacts
deck face down and place it on the
marked space.
Artifacts: Shuffle the artifacts
deck face down and place it on the
marked space.
-
 Fear: Place the Fear cards on
the marked space. They are all the
same, so place them face up.
Fear: Place the Fear cards on
the marked space. They are all the
same, so place them face up.
-
 Items: Shuffle the items deck
face down and place it on the
marked space.
Items: Shuffle the items deck
face down and place it on the
marked space.
-
Moon Staff: Place the moon
staff in the card row, as shown,
indicating it is round I.
-
Deal 1 artifact to the card row,
face up, to the left (on Yucata: above) of the moon
staff.
-
Deal 5 items to the card row, face
up, to the right of (on Yucata: below) the moon staff.
Island
 Idol Tiles: Mix these up and randomly assign them to sites.
-
Level
 sites: Each site in region
gets one face-up idol.
sites: Each site in region
gets one face-up idol.
-
Level
 Sites: Each site in region
gets one face-up idol and one face-down idol,
as depicted on the board.
Sites: Each site in region
gets one face-up idol and one face-down idol,
as depicted on the board.
 Blocking Tiles:
-
Some action spaces may need to be blocked depending on the number of players.
Treat blocked spaces as though they were not printed on the board. They will be
unavailable for the entire game.
In a four-player game do not use the blocking tiles. (This page illustrates a three-player game.)
In a three-player game, block 3  spaces. Mix up the blocking tiles face down
and flip over 3 at random.
spaces. Mix up the blocking tiles face down
and flip over 3 at random.
Each corresponds to one  site.
site.


Use the 3 tiles to block the
space at each of those 3 sites. (On the board, place
them face down.) Return the 2 unused tiles to the box.
In a two-player game block all 5 spaces. Each site will have space for only
one archaeologist.
Research Track
-
 Temple Tiles: Make stacks
of temple tiles on the
temple. Each stack has as
many tiles as there are
players. As shown, 11-point tiles have
one stack at the top, 6-point tiles have
two stacks in the middle, 2-point tiles
have three stacks at the bottom. Return
unused tiles to the box.
Temple Tiles: Make stacks
of temple tiles on the
temple. Each stack has as
many tiles as there are
players. As shown, 11-point tiles have
one stack at the top, 6-point tiles have
two stacks in the middle, 2-point tiles
have three stacks at the bottom. Return
unused tiles to the box.

Research Bonus Tiles: Shuffle the tiles face down and deal them to:
-
„Lost Temple“-Bonus Stack:
Make a stack with as many research bonus tiles as there are
players. Place this stack face down at the top of the research
track.
-
Bonus Tile Spaces. Most spaces on the research track get 1 bonus tile:
 Spaces marked like this get a tile only in a four-player game.
 These spaces get a tile only in a three- or four-player game.
Distribute research bonus tiles randomly to the appropriate spaces, then turn
them face up. Return unused tiles to the box.
Supply Board
-
Resources: Place all resource
tokens on the supply board.
-
Level Site tiles :
Shuffle the site tiles marked and place them
face down on the supply board.
-
 Guardian Tiles: Shuffle the
guardians and place them face down
on the supply board.
Guardian Tiles: Shuffle the
guardians and place them face down
on the supply board.
-
Level Site tiles :
Shuffle the site tiles marked and place them
face down on the supply board.
-
Assistant Tiles: Turn all assistants silver
side up. Shuffle them into 3 random stacks
of 4 tiles each. Place them on the supply
board.
-
Research Tokens: Players’ research tokens
also go on the supply board, as will be
explained on the next page.
Day 6 – We found a good place to pitch our tents, with fresh water nearby.
Our quartermaster has ensured we will be well supplied. For the fortnight, this shall be our home.
Each player should choose a color and take the player board, research tokens, 2 archaeologist figures, and 4 basic cards in that color.
Player Board
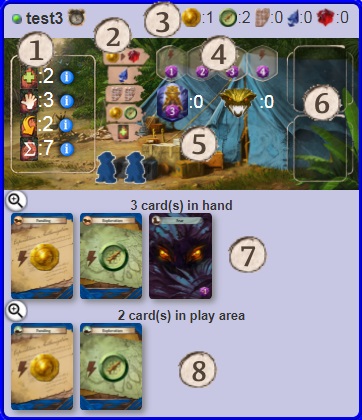
Keep your player board in front of you and
set the archaeologist figures on it.
-
Your cards: cards deck, cards in hand, played cards and your full deck.
A click on the info icon opens a popup showing the actual cards.
-
Rewards you can get from using idols
-
Your resources
-
Spaces for using idols you discover
-
Your archaeologists
-
Spaces for recruited Assistants
-
Cards in your hand
-
Cards you played (play area)
Research Tokens
Your research tokens go on a starting
space below the research track. The first
time you research, you will use your
magnifying glass, so place it atop the
notebook.
Your Starting Deck
Each player has their own deck, and all decks start the same. Your deck should have the 4 basic cards in your color, plus 2 Fear cards.
Shuffle your deck and place it face down on your player board.
Play Order

The starting player is the one who most
recently traveled to a place they had never
visited before. Give this player the starting
player marker. Play will proceed clockwise.
Starting Resources
Starting resources depend on play order, as shown
Player 1:

Player 2:

Player 3:
Player 4:
Day 7 – How strange it is to be here, to finally see what we have strived so long to find!
I feel, sometimes, as though we are encamped on sacred ground. What wonders lie ahead? What dangers? We have
no inkling of the secrets this island holds, but we vowed to unveil them, and that we shall do!
Goal of the Game
Your task is to lead an expedition to explore the uncharted island of Arnak and discover the secrets of a vanished civilization.
You will equip your expedition with useful items, search the jungles for mysterious artifacts and intriguing archaeological sites, struggle
to overcome the guardians of those sites, and – perhaps most importantly – piece together the fragments of Arnak’s ruins into a coherent
body of research that could lead to the discovery of the Lost Temple.
 Your expedition’s various accomplishments are worth points which will be added up at the end of the game to determine which player
has led the most successful expedition.
Your expedition’s various accomplishments are worth points which will be added up at the end of the game to determine which player
has led the most successful expedition.
The game is played over 5 rounds.
Each round proceeds as follows:
-
Draw: All players draw from their decks until they have a hand of 5 cards.
-
Take turns: Players take turns clockwise around the table. You are limited to one main action on
your turn, plus an unlimited number of free actions.
-
Pass: On your turn, you may pass to indicate you are done playing for the
remainder of the round. The other players continue taking turns until all
players have passed.
-
Set up for the next round: All cards in your play area are shuffled and
returned to the bottom of your deck. The board is set up for the next
round.
Move the moon staff: At the end of each round, move the
moon staff to mark the passage of time.
The starting player marker is passed to the left.
Players take turns choosing various actions that help them uncover the secrets
of the island. Over the course of the game, more of the island will be explored
and more actions will become available. Actions can earn you resources,
opportunities, and points.
Each round proceeds as follows:
-
Draw: All players draw from their decks until they have a hand of 5 cards.
-
Take turns: The player with the starting player marker starts. Players take
turns clockwise around the table. You are limited to one main action on
your turn, plus an unlimited number of free actions.
-
Pass: On your turn, you may pass to indicate you are done playing for the
remainder of the round. The other players continue taking turns until all
players have passed.
-
Set up for the next round: All cards in your play area are shuffled and
returned to the bottom of your deck. The board is set up for the next
round.
Move the moon staff: At the end of each round, move the
moon staff to mark the passage of time.
As the moon waxes, the expeditions explore the island, acquire
useful items and artifacts, and research the legends of Arnak.
After 5 rounds, the moon is full and it is time to see who led
the most successful expedition
The starting player marker is passed to the left.
Resources
Coins represent funding for your
expedition. They are used to buy items.
Compasses represent time and energy
spent exploring the island. Thus, they
are used to discover artifacts and new
archaeological sites.
 Tablets represent ancient texts you can
decipher. These texts might teach you
how to use the artifacts you find.
Tablets represent ancient texts you can
decipher. These texts might teach you
how to use the artifacts you find.
Artefacts represent remnants of
weapons you discover. They are often
necessary for overcoming the guardians
of the island.
 jewels are mysterious talismans of the
bird god Ara-Anu. They are hard to find,
but often essential for completing your
research into the mysteries of Arnak.
jewels are mysterious talismans of the
bird god Ara-Anu. They are hard to find,
but often essential for completing your
research into the mysteries of Arnak.
Day 8 – Though our eagerness to begin is mixed with a certain amount of trepidation, now is not the time to let
our courage fail. If there are dangers, well, we came here to confront them. To the jungle then, and no delay!
On your turn, you have several options. Your choices will depend on the cards in your hand and the situation on the game board.
Dig at a Site
Discover a New Site
Overcome a Guardian
Buy a Card
Play a Card
Research
Passing
Free Actions 
During your turn, you may perform any number of free actions
before, during, or after your main action.
You may have the following free actions available:
-
All card effects marked with the symbol are free actions.
-
Putting an idol in a slot is a free action.
-
Using a guardian’s boon is a free action.
-
Using an assistant’s effect is a free action, except for the
assistant that lets you buy a card with a discount.
Day 9 – We brought a ladder to the site and climbed to get a better look at the carvings. As we had hoped, it was
writing! If such wonders lie so close to camp, who knows what we shall find once we truly begin to explore!
As your main action for your turn, you can send one of your archaeologists to dig at
any of the 5
sites. You will also be able to dig at
and
-Orte graben,
sites after they have been discovered.
To Dig at a Site
-
Pay the travel cost depicted on the space to which you want to send your
archaeologist. The space must be unoccupied.
-
Move your archaeologist from your player board to that space.
-
Resolve the effect depicted at the site.
Note: If both your archaeologists are already on sites, you cannot take this action.
-
Pay the travel cost depicted on the space to which you want to send your
archaeologist. The space must be unoccupied. (That is, it must have no archaeologist
figure on it, and in a 2- or 3-player game, it must have no blocking tile.)
-
Move your archaeologist from your player board to that space.
-
Resolve the effect depicted at the site.
Note: If both your archaeologists are already on sites, you cannot take this action.
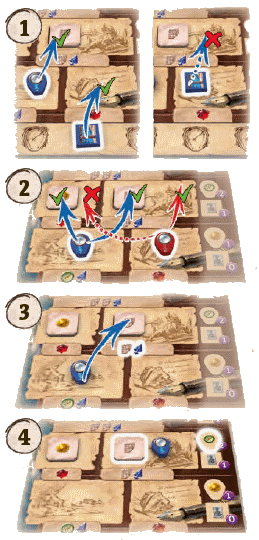
 Example:
 Red spends a card with a

,
to send her archaeologist to the site
illustrated here. She places her figure on the
-Feld
space and takes two
. The next player to use the site this round will need to cover a cost of
. Even
Red could do this, on a later turn, despite having one archaeologist already there.
If both spaces are occupied, no one else can be sent to dig there this round.
Take a card from your hand with the required travel icon and put it face up into your
play area, ignoring its effect. You can also pay
with higher travel values, as shown in the Travel Hierarchy
Two Icons
If a cost requires two icons, you can cover it with travel values from two sources.
It’s also possible that you have a card that gives you two icons all by itself.
Such a card can also cover a one-icon cost, but in that case, the extra icon will
probably be wasted. It does not carry over to your next turn.
Hiring a Pilot
You can always spend two coins to generate
a plane which can be used to pay for any travel
icon, as shown in the Travel Hierarchy below.
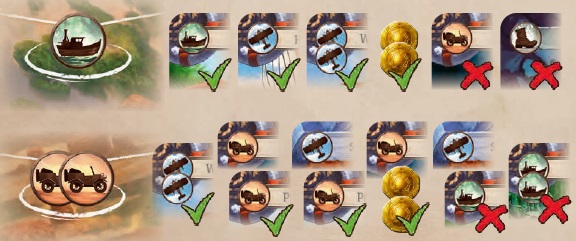
Travel Hierarchy

 pays for anything.
 cannot pay for

and vice versa.
Any travel value pays for 
As you would expect, you can pay a cost of by spending a card with the
icon -
take the card from your hand, and put it face up into your
play area, ignoring its effect. You can also pay
with higher travel values, as shown in the Travel Hierarchy on this page.
Two Icons
If a cost requires two icons, you can cover it with travel values from two sources.
It’s also possible that you have a card that gives you two icons all by itself.
Such a card can also cover a one-icon cost, but in that case, the extra icon will
probably be wasted. It does not carry over to your next turn.
Hiring a Pilot
You can always spend two coins to generate
a plane which can be used to pay for any travel
icon, as shown in the Travel Hierarchy below.
Examples:
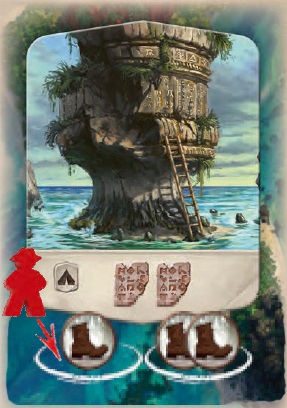
Discover a New Site
Day 10 – Our archaeology team returned with fantastic tales of dwellings in the cliffs adorned with lapidary
masterpieces still intact. Yet their joy at their discovery was mingled with dread of the monster that lurked above.
At the beginning of the game, only 5 sites are available
for digging. But during play, you can find new ones. You
can discover any or
site that does not yet have
a site tile.
-
Traverse the wilderness:
Decide whether you want
to discover a site or a
site.
Check the board and
pay the depicted cost.
. Choose an undiscovered site in that region and
pay the travel cost to move your archaeologist
space.
-
Take the idol: Immediately resolve the idol’s
effect. If the site has two idols, you take them
both, but use only the effect of the face-up one.
-
Discover the site: Take the top tile from the stack
that matches the site – or
. Place it on the
board face up. The site has now been discovered
and you immediately resolve its effect.
-
Awaken the guardian: Draw the top tile from
the guardian stack and place it face up on the
site tile.
At the end of the round you will gain a Fear card when
you take your archaeologist back from a site that has
a guardian on it.
You may try to overcome the guardian instead.
Once your archaeologist is gone
the discovered site is another place
archaeologists can be sent to dig
Idols
You find idols when you discover new sites.
Each idol will be worth 3 points at the end of the game.
Idol Slots
The four slots at the top of your board give you access to useful
effects. On your turn, you may
put an idol in a slot as a free action.
But use the idol’s power wisely! Each of the four slots will be worth
a certain number of points if it is still empty at the end of the game.
An idol in a slot cannot be moved, so each slot can be used only
once per game.
-
Traverse the wilderness:
Traverse the wilderness.
Decide whether you want
to discover a site or a
site. Check the board,
and
pay the depicted cost.
. Then choose an
undiscovered site in that
region and
pay the travel cost to move your archaeologist
from your board to that site’s
space.
-
Take the idol: Immediately resolve the idol’s
effect. If the site has two idols, you take them
both, but use only the effect of the face-up one.
Keep your idols on your player board face down
on the illustrated supply crates.
-
Discover the site: Take the top tile from the stack
that matches the site – or
. Place it on the
board face up. The site has now been discovered
and you immediately resolve its effect.
-
Awaken the guardian: Draw the top tile from
the guardian stack and place it face up on the
site tile.
The guardian does not affect you immediately. However,
at the end of the round you will gain a Fear card when
you take your archaeologist back from a site that has
a guardian on it
(s. Setup for the Next Round).
To avoid this, you may try to overcome the guardian as
an action on a later turn. (See the facing page.) Or you
might be able to escape the guardian with the help of
certain cards that allow you to move your archaeologist
or the guardian.
Once your archaeologist is gone (for example, in
a later round)
the discovered site is another place archaeologists can be sent to dig
. The cost printed
on the board applies only when you discover these sites,
not when you dig. You can send an archaeologist to dig
at a site that still has a guardian; returning from such
a site at the end of the round gives you a Fear card, even
if you were not the one who awoke the guardian.
Idols
You find idols when you discover new sites. When you get an idol,
keep it on the supply crates on your player board. Idols should be
face down because the discovery reward is no longer relevant.
Each idol will be worth 3 points at the end of the game.
Idol Slots
The four slots at the top of your board give you access to useful
effects. On your turn, you may
put an idol in a slot as a free action:
-
Move the idol from your supply crates to the leftmost unoccupied
slot on your player board.
-
Choose one effect from the five depicted options.
But use the idol’s power wisely! Each of the four slots will be worth
a certain number of points if it is still empty at the end of the game.
An idol in a slot cannot be moved, so each slot can be used only
once per game. (Unless you find an artifact that allows you to bend
this rule.)
Day 11 – We fought the monstrous creature hand to hand, knife to claw! The beast went down!
But none could strike the death blow. We stood in awe. The beast bowed its head, acknowledging us.
And we realized, then, that this was no monster. No, this creature was one of Arnak’s legendary guardians.
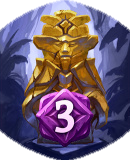
Guardians
A guardian appears whenever a player discovers a new site.
At the end of the round, you gain a Fear card for each archaeologist returning from a site
that still has a guardian.
Guardians remain on the board until they are overcome.
Mysterious creatures guard the ruins on the island. A guardian appears whenever
a player discovers a new site. The guardian has no immediate effect. However, at the
end of the round, you gain a Fear card for each archaeologist returning from a site
that still has a guardian. (see Setup for Next Round).
Guardians remain on the board until they are overcome.
They do not prevent
archaeologists from digging at their sites.
To Overcome a Guardian
-
You must have an archaeologist on the guardian’s site.
-
Pay the cost depicted at the bottom of the guardian tile.
 This effect allows you to overcome a guardian on a site where you
have an archaeologist without paying the cost.
This effect allows you to overcome a guardian on a site where you
have an archaeologist without paying the cost.
As your turn’s main action, you may overcome a guardian. You must have an
archaeologist on the guardian’s site.
-
Pay the cost depicted at the bottom of the guardian tile.
-
Remove the guardian from the board and keep it by your player board.
This effect allows you to overcome a guardian on a site where you
have an archaeologist without paying the cost. (However, the
effect itself may have a cost, which you must pay.) Guardians
overcome in this way still go beside your player board.
Tip: In some situations, it can be very important
to overcome a guardian and avoid its Fear card.
In other situations, you can get more points
by saving those resources for research. Don’t
feel compelled to overcome every guardian you
awaken.
Using a Guardian’s Boon
The boon depicted in the upper right corner can be used once during the game, on any of your turns.
The guardian will be worth
5 points at the end of the
game whether you use its
boon or not.
Having overcome the guardian, you have earned its respect, and it can grant you the boon depicted in the upper right corner. The boon
can be used once during the game, on any of your turns. After using the boon, turn the guardian face down to show that the boon
cannot be used again.

Some boons are travel
values that can be used to
pay a travel cost, just like
spending cards from your
hand.
Other boons are free
actions, which can be
used at any time during
any of your turns.

The guardian will be worth
5 points at the end of the
game whether you use its
boon or not.
Day 12 – I climbed a rock and cleared some branches to gain a better view of the path ahead.
When I climbed down, the rock was now in sunlight, and I saw it was actually a priceless artifact.
You improve your deck by buying artifacts and items from the card row.
Card Row Overview
The card row is divided into two parts by the moon staff:
Artifacts are on the top; items are on the bottom. Each round, the moon staff moves one space to the bottom, so each round has more
artifacts and fewer items. As the expeditions explore deeper and deeper into the heart of the island, they discover more artifacts, while
diminishing the support they can get from the mainland
You can buy useful items to equip your
expedition. An item you buy goes to the bottom of your deck, which means it
will usually show up in your hand at the
beginning of the next round.
To Buy an Item
-
Pay the cost depicted at the bottom of the card.
-
Put the item face down on the bottom of your deck.
-
Choose an item in the card row.
-
Pay the cost depicted at the bottom of the card.
-
Put the item face down on the bottom of your deck.
-
Refill the card row.
Day 13 – Ruby is a jaunty bird and I am glad we have her.
She finds the most interesting things.
To Play a Card
-
Play the card from your hand face up into your play area
-
Resolve the card’s effect.
The card remains face up in your play area for the remainder of the
round.
An effect with this icon is a free action. That means playing the card
does not count as your main action for the turn.
When you play an artifact, you also have to pay a special  cost, as
explained in the box on this page. That rule does not apply to items.
cost, as
explained in the box on this page. That rule does not apply to items.
-
Play the card from your hand face up into your play area
-
Resolve the card’s effect.
The card remains face up in your play area for the remainder of the
round (unless you get a chance to exile it, as explained
here ).
An effect with this icon is a free action. That means playing the card
does not count as your main action for the turn. Your Funding and
Exploration cards have effects that are free actions, and some item
effects are free actions, too.
On the other hand, if the effect is not marked as a free action, it is the main action for your turn. All
artifact effects are main actions
as are some item effects, like the one on the Parrot.
When you play an artifact, you also have to pay a special cost, as
explained in the box on this page. That rule does not apply to items.
Reminder: A card in hand can either be spent for its travel value or
played for its effect. Not both.
Day 14 – A shattered spear. Some lines of text. Each lends meaning to the other.
I take the time to contemplate these clues to Arnak’s past.
-
Decide which research token to move.
Your notebook must never move to a row above your magnifying glass
-
You can only move up into a space that is connected to your current space.
-
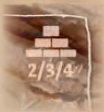
The cost is printed on the bridge connecting your old space with your new space.
-
Gain the results of your research:
-
Take a bonus tile if the space has a face-up research bonus tile.
-
You always resolve the row’s effect. which depends on whether you
moved your magnifying glass or your notebook.
You are allowed to resolve the row’s effect before using the bonus tile, if you want.
A research action moves one of your research tokens up to the next row of the research
track:
-
Decide which research token to move. If your notebook
 is below your magnifying glass
  , you may move either token. However, your notebook must never move to a row above your magnifying glass
(This is easy to remember: First you discover something; then you write it down.)
, you may move either token. However, your notebook must never move to a row above your magnifying glass
(This is easy to remember: First you discover something; then you write it down.)
-
Choose a space to move into. You can only move up into a space that is connected to your current space.
Sometimes this leaves you with only one choice. Don’t worry about other research tokens – multiple tokens can share the same space.
-
Pay the cost and move into the space. The cost is printed on the bridge connecting
your old space with your new space.
-
Gain the results of your research:
-
Take a bonus tile? If the space has a face-up research bonus tile, immediately
gain the depicted bonus and remove the bonus tile from the game. Only the
first player to reach that space gets the bonus.
-
You always resolve the row’s effect. The effect depends on whether you
moved your magnifying glass or your notebook, as depicted on the end of the
row. (Ignore the points for now. Those points will be scored at the end of the
game, based on where your tokens end up.)
You are allowed to resolve the row’s effect before using the bonus tile, if you want.
Note: Costs must be paid before any rewards are gained.
-
When your magnifying glass reaches the top row of the research track, you have discovered the
Lost Temple! You get more points if you get here earlier.
-
Take a bonus tile by looking through the stack of face-down tiles and choose one.
Note: It is not possible to move your notebook token to the Lost Temple row.
If you choose to research with your magnifying glass when it
is already in the Lost Temple, instead of paying to advance
the token, you pay to take 1 temple tile from any one of the
stacks.
Each stack of tiles has a particular combination of costs.
When your magnifying glass reaches the top row of the research track, you have discovered the
Lost Temple! Unlike the other rows, you get more points if you get here earlier.
Place your magnifying glass on the remaining empty space worth the most points.
Then take a bonus tile. Look through the stack of face-down tiles and choose one. Return the
others. There are just enough for everyone
Note: It is not possible to move your notebook token to the Lost Temple row.
Exploring the Lost Temple
combination of costs for this stack
3 different costs
Once you have found the Lost Temple, you can use later research actions to discover Arnak’s stories!
If you choose to research with your magnifying glass when it
is already in the Lost Temple, instead of paying to advance
the token, you pay to take 1 temple tile from any one of the
stacks
At the bottom of the temple are three different costs you
can pay. Each stack of tiles has a particular combination of
costs, as illustrated on the right.
Example: the 6-point stack on the left requires you to
pay the two costs on the left. The 6-point stack on the right
requires you to pay the two costs on the right. The 11-point
stack at the top requires you to pay all three costs.
Tiles in each stack are limited. You can’t buy tiles from
a stack that is empty.
Recruiting Assistants
When you move your
notebook to a row with this
symbol, choose one of the assistants
available on the supply board.
Using Assistants
Assistants have various effects. If the effect is a free action, you have the
option to use it immediately, or you can save it for later
In general, you can use an assistant’s effect only once per
round, after that it's exhausted.
At the end of the round, all assistants are refreshed.
However, certain card effects might refresh an assistant during the
round, allowing it to be used again, perhaps even immediately.
Upgrading Assistants
When you move your notebook to a row with this symbol,
upgrade one of your assistants to the gold level – that is,
you flip it over to its gold side. At this time,
the assistant is
refreshed
even if its silver-level effect was used earlier in
the round.
Assistants are people who have
come to join your expedition. Each
assistant has two levels – silver and
gold. The gold side has the stronger
effect. The research track will give
you silver assistants when you move
your notebook token to certain
rows.
Recruiting Assistants
When you move your
notebook to a row with this
symbol, choose one of the assistants
available on the
supply board. (Usually, there are 3; however, some of the
stacks might be empty later in the game.)
Note: Assistants not on top are supposed to be kept hidden so that no one
knows what they are until the assistant above them has been taken.
Set the assistant on one of the assistant squares on your player board. The
silver side should be face up.
Assistants have various effects. If the effect is a free action, you have the
option to use it immediately, or you can save it for later
Using Assistants
To use your assistant, turn it sideways, as shown.
A sideways assistant is exhausted and not available for
use.
In general, you can use an assistant’s effect only once per
round. At the end of the round, all assistants are refreshed – turned right
way up again.
 However, certain card effects might refresh an assistant during the
round, allowing it to be used again, perhaps even immediately.
However, certain card effects might refresh an assistant during the
round, allowing it to be used again, perhaps even immediately.
Upgrading Assistants
When you move your notebook to a row with this symbol,
upgrade one of your assistants to the gold level – that is,
you flip it over to its gold side. At this time,
the assistant is
refreshed
even if its silver-level effect was used earlier in
the round.
We have discovered such wonders today! Who knows what we shall find tomorrow?
Passing counts as your main action for the turn. At this time, you should also use up
any free actions you still have available.
If you take no other main action, then you must pass. It is not legal to take a turn with only free
actions and no main action.
Once you have passed, you get no more turns for the rest of the round.
The round ends when all players have passed.
On your turn, you can choose to pass – inform the other players that you will take no more turns
this round. Passing counts as your main action for the turn. At this time, you should also use up
any free actions you still have available.
If you take no other main action, then you must pass. It is not legal to take a turn with only free
actions and no main action.
Once you have passed, you get no more turns for the rest of the round. The flow of play continues
clockwise, but it skips over you. And conversely, if you are the only player left who has not yet
passed, then you can take multiple turns in a row.
The round ends when all players have passed.
At the end of rounds I-IV prepare the following round as follows:
-
Return both of your archaeologists to your player board. When leaving
a site
with a guardian, add 1 Fear card
to your play area.
-
If you have cards left, each card can be discarded to your play area or saved for the next round.
-
Gather all cards in your play area, shuffle them thoroughly, and put
them face down on the bottom of your deck.
-
Refresh your assistants.
-
Exile the two cards on either side of the moon staff.
-
Move the moon staff to the bottom , to indicate the number of the next
round.
-
Refill the card row
-
The starting player marker moves one place to the left.
-
Start the new round by drawing until you have a full hand of 5 cards.
At the end of round V, all players take back their archaeologists and
gain
Fear from guardians
. Skip all the other steps and proceed to final scoring.
If it is not the end of round V, you end the round by setting up for the next
one.
All players simultaneously do the following:
-
Return both of your archaeologists to your player board. Each time
you take back an
archaeologist from a site with a guardian, add 1 Fear card
to your play area.
-
Usually your hand will be empty. But if you have cards left,
each card
can be discarded to your play area or saved for the next round.
.
Tip: Use all your cards during your turn, if you can. Keeping a card in
your hand for next round is useful only in rare cases.
-
Gather all cards in your play area, shuffle them thoroughly, and put
them face down on the bottom of your deck.
Note: Items you bought during the round will now be above all the
cards you just shuffled.
-
Refresh your assistants. (Turn them right way up again.)
The card row should be adjusted as follows:
-
Exile the two cards on either side of the moon staff.
(This gets rid of 1 artifact and 1 item. Exile is explained here.)
-
Move the moon staff to the bottom , to indicate the number of the next
round.
-
Refill the card row (as explained here).
Start the new round:
The starting player marker moves one place to the left – there will be
a new starting player in the new round.
Start the new round by drawing until you have a full hand of 5 cards.
If your deck does not have enough cards to make a full hand, just draw
them all.
End of Round V
At the end of round V, all players take back their archaeologists and
gain
Fear from guardians
. Skip all the other steps and proceed to final scoring.
Day 18 — I feel like this island still holds many secrets, but the time has come to return home
and share our findings.
Our ship was

nothing left.
We tried to
but I fear that even here it shall find us!
The first expedition to Arnak went rather poorly. No one has heard
from them in quite some time. While you explore the island, keep
your eye out for any survivors.
Different board
The Snake Temple side has sites with different travel costs and
a different research track.
Assistant Rescue
This space in the middle of the research
track has survivors from the first
expedition.
During setup, deal 1 assistant per player to this space. These
assistants should be selected randomly. The assistant on top of the
stack is public knowledge, but the identities of those underneath
should be unknown to players who have not yet reached that row.
The supply board will get three stacks of assistants, as usual. Two of
the stacks will have three assistants, and the third stack will have
all remaining assistants.
To advance a research token across this bridge,
you must
pay 1 idol. The idol must come
from your supply crates – it can’t be one of those in
a slot. Remove the idol tile from the game.
This magnifying glass effect lets you
rescue 1 assistant
from those on the research track. Look through the stack
secretly and take one.
Unlike assistants from the supply board, the assistant you rescue is
exhausted. You won’t be able to use it this round unless an effect
refreshes it.
This effect allows you to upgrade an assistant from silver
to gold. The assistant is refreshed.
This space in the middle of the research
track has survivors from the first
expedition. You might be able to rescue
one of them if you explore the island’s
ruins.
During setup, deal 1 assistant per player to this space. These
assistants should be selected randomly. The assistant on top of the
stack is public knowledge, but the identities of those underneath
should be unknown to players who have not yet reached that row.
The supply board will get three stacks of assistants, as usual. Two of
the stacks will have three assistants, and the third stack will have
all remaining assistants.
To advance a research token across this bridge,
you must
pay 1 idol. The idol must come
from your supply crates – it can’t be one of those in
a slot. Remove the idol tile from the game.
This magnifying glass effect lets you
rescue 1 assistant
from those on the research track. Look through the stack
secretly and take one. Keep the remaining assistants in
the same order and return the stack to the research track.
Unlike assistants from the supply board, the assistant you rescue is
exhausted. You won’t be able to use it this round unless an effect
refreshes it
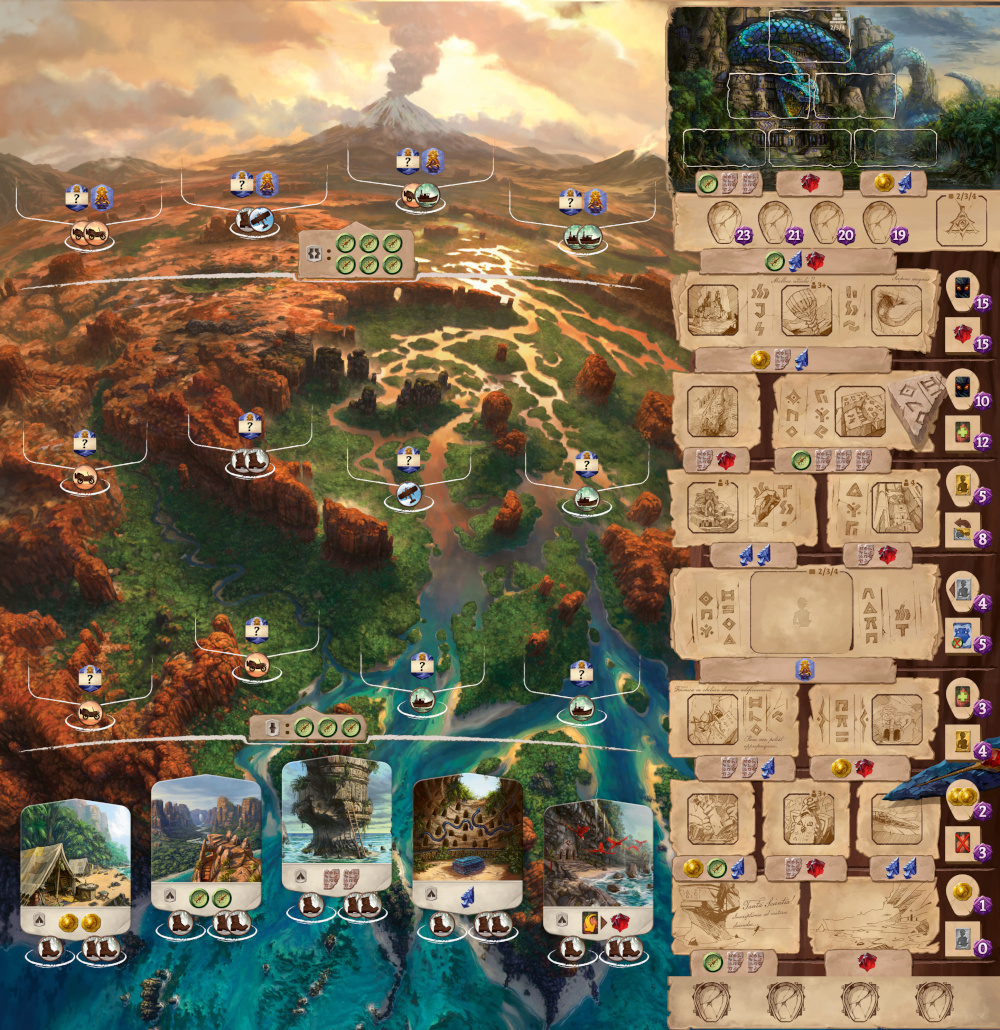
Example: Red wants to advance her magnifying glass to the assistant
rescue space.
-
She removes an idol from her supply crates and returns it to the box.
-
She advances her magnifying glass.
-
She looks through the stack of assistants and selects the sea captain.
-
The sea captain is exhausted from being marooned on Arnak so
long. Red will not be able to use his ability until he is refreshed.
This effect allows you to upgrade an assistant from silver
to gold. (On the other side of the board, you could do this
only when moving your notebook.) If you have two silver
assistants, you can upgrade either one – you don’t have to keep
track of which assistant is the one you rescued.
As usual, an exhausted assistant is refreshed when it is upgraded.
Dreadful Tales!
At first, we dismissed his stories as hallucinations
resulting from the traumatic experience of being stranded
for so long, but as we uncovered more secrets of Arnak …
This magnifying glass effect means you
gain a Fear
card
! Place it face up in your play area, ignoring its
travel value.
During setup, you dealt 2 or 3 bonus tiles to this row of the research
track. When you move a research token there – magnifying glass
or notebook – you
choose one of the tiles. Only the tile you choose
is removed.
Appendix

Unlike a normal card-buying action, you
can do this even if you can’t afford any
card in the card row. Reveal the top card of the relevant deck. It is
one of the cards you can buy. You can also decide to buy no card and
turn it face down again. If you choose to buy a different card, the
top card goes into the row when you refill it, as usual.
You can use the trap on a site with or without your
archaeologist. The restriction is that no one else can
be there. (It’s a safety precaution.)
This card applies only to your notebook, not your
magnifying glass. Don’t forget that your notebook
cannot move above your magnifying glass.
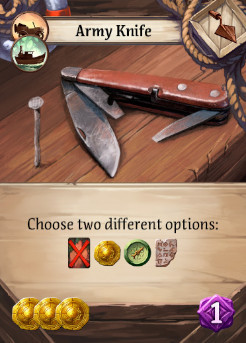
You choose two of the four benefits depicted. You are
not allowed to choose only one and take it twice.
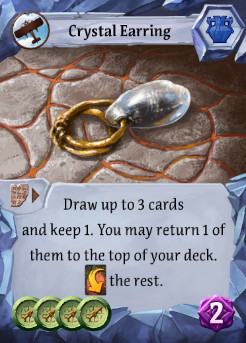
First decide how many cards to draw, then draw that
many. Of those, keep one in your hand. If you drew
more than one, one may be returned to the top of your
deck. Any remaining cards that you drew must then be
placed in your play area with no effect.
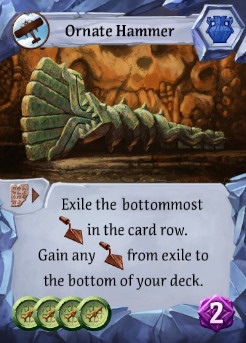
Take the bottommost item in the card row and put it in
the pile for exiled items. Then you may take one item
from the pile of exiled items. You do not pay its cost.
Put it on the bottom of your deck. At the end of your
turn, refill the card row.
First you decide whether to draw 1 or 2 cards, then you
draw that many from the bottom of your deck. If you
draw 1, it goes to your hand. If you draw 2, look at them,
put one in your hand, and put the other into your play
area, face up, ignoring its effect and travel value.
This discount can be applied to buying
a temple tile.
The artifact’s effect counts as your main
action for the turn, even if the assistant’s
effect is a free action. The assistant is not
exhausted after being used on the supply board. If you use this to
generate a travel value, that value is wasted unless you use it in a
free action before the end of your turn. Note that the effect cannot
be applied to an assistant on the assistant rescue space of the Snake
Temple research track.
If you exchange a silver assistant, your new assistant
is also silver. If you exchange a gold assistant, you flip
your new assistant to its gold side. The assistant you
put on the supply board should be set to its silver side.
This artifact cannot move a guardian to a site that
has not been discovered. An unoccupied site is one
with no archaeologists. If any of the spaces on a site is
occupied, the entire site is considered occupied.
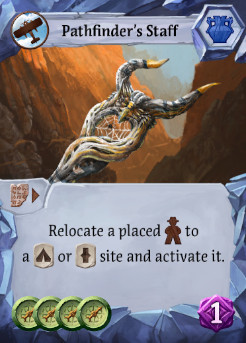
Your archaeologist can be relocated from
any site. The effect only restricts the types
of sites it can be relocated to.
Don’t Forget!
-
You can always pay
to buy a
.
-
You can’t advance your
token above your
token.
-
Every row of the research track has an effect. You resolve the
effect regardless of whether you take a bonus tile.
-
When you upgrade your assistant, you also refresh it.
-
When you use the
 effect, you can exile a card from your hand or your play area.
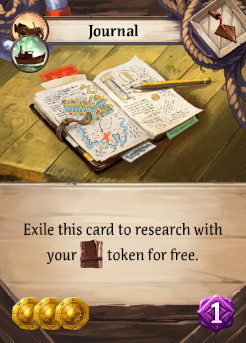
-
Gain fear, then shuffle. At the end of the round, you take your
archaeologists back – and potentially gain Fear cards from
guardians – before shuffling the cards in your play area.
-
Shuffled cards go to the bottom of your deck. And only at the
end of the round – you shouldn’t be shuffling cards at any other
time.
-
When you buy an item, it goes to the bottom of your deck. This means
it will be above all those cards you shuffle at the end of the round.
-
Can I have more than 5 cards in my hand?
Yes. The hand limit
applies only when drawing cards at the beginning of a round.
-
Is there a way to buy an item and use it later in the same
round?
Yes. When you buy an item it goes to the bottom of your
deck. Certain card-drawing effects might allow you to draw it.
Once it’s in your hand, you can use it on any turn.
-
Can I shuffle my deck during play?
No. You shuffle your deck
only at the beginning of the game. At the end of each round, you
shuffle all cards in your play area and put them at the bottom of
your deck. No other shuffling is allowed.
-
But what if my deck runs out of cards?
If your deck is out of
cards, you can’t draw any more. The cards in your play area will
not return to your deck until the end of the round. If you buy an
item, just put it on the space for your deck – that item is now on
the bottom (and the top) of your deck.
-
What’s the difference between the
 effect and “relocate”?
The two are completely different. The
effect follows the
rules of an action, either Dig at a Site or Discover a New Site. It
requires you to use an archaeologist from your player board, and
you must pay the travel cost unless the card says otherwise. By
contrast, you can relocate an archaeologist only if it is already
on a site, and it can’t go to an undiscovered site.
You don’t pay
a travel cost to relocate
-
Does this card let me move another player’s archaeologist?
No. There are no effects in the game that would allow you to
affect another player’s cards, figures, or tokens.
Many effects simply depict the tokens you gain:
Gain the indicated tokens.

Gain the indicated tokens.

Pay the cost to choose one of the two tokens.
On an artifact card, this is a reminder that the effect
costs 1
.
However, this cost applies only when you play it
from your hand, not when you buy it.


You pay this cost by putting one of the cards in your
hand face up into your play area, ignoring the card’s travel
value and effect. If you have no cards left in your hand, you
cannot pay this cost, and thus cannot gain the benefit of
the effect.

You may draw a card. If your deck is empty, then this
has no effect
You may choose a card in your hand or in your play area
and send it to exile.
You may draw a card. Then you may exile a card in
your hand or in your play area. Note that each part of the
effect is optional.
You may draw a card. Then you must put a card in
your hand face up into your play area, ignoring its travel
value and its effect.

You may refresh one of your assistants.
This icon denotes that the effect does not count as your
main action for the turn. You can play as many free actions
as you want before, after, and even during your main action.
The effects below allow you to perform an action.
Normally it would be the main action of your turn,
but here it is considered simply part of the effect.
You may immediately take a Dig at a Site
or Discover a New Site action, if you have an
archaeologist on your player board. The effect may
specify special benefits or limitations.
You may immediately overcome a guardian
without paying the cost depicted on the guardian
tile. This effect applies only to a guardian on a site
where you have an archaeologist.
 You may
immediately buy an artifact
or item from the card row.
The price is reduced by the
amount indicated.
You may
immediately buy an artifact
or item from the card row.
The price is reduced by the
amount indicated.
 Perform the Buy an Artifact
action, skipping the step where
you pay its cost, but do resolve
its effect.
Perform the Buy an Artifact
action, skipping the step where
you pay its cost, but do resolve
its effect.
 Perform the Buy an Item
action, skipping the step where
you pay its cost.
Perform the Buy an Item
action, skipping the step where
you pay its cost.
Activate a site: When you activate a site, you use the site’s effect. You
do not need an archaeologist there and other players’ archaeologists do
not block you from activating the site, unless the card says otherwise.
You do not pay any travel cost. You cannot activate a site that has not
been discovered yet.
Activate a site tile: Two cards allow you to activate the top site tile in one
of the stacks. Simply resolve the tile’s effect, as when activating a site.
Occupied by you: You occupy a site if you have an archaeologist figure
there.
Gain :
When you gain an item, it means you do not pay the cost.
Unless otherwise stated, this is identical to the Buy a Card action, except
you skip the step in which the cost is paid.
Unoccupied site: A site is unoccupied if no one has an archaeologist figure
there. (Guardian tiles do not count as occupying a site.) An occupied
site might still have
an unoccupied space even though the site is considered “occupied”.
Pass to gain: To gain the benefit, you must pass. You will get no more
turns for the remainder of the round.
Discount: Resolve the effect as though you had the tokens or
travel value depicted in the discount. For example, a discount of
means that a cost of
is reduced to . A discount
of means that one icon in a travel cost is covered.
(A discount of
however, has no effect on travel costs that don’t have  .) Discounts will
not reduce a cost below zero and they will not carry over to other actions.
.) Discounts will
not reduce a cost below zero and they will not carry over to other actions.
Exile this card to: When you play the card for its effect, it goes to exile
instead of your play area.
Exile: Send the card to exile, as explained here.
Alternatively, an effect might specify that you take a card from exile.
Relocate: Without paying a travel cost, pick up one of your archaeologists
that is already on a site and move it to an unoccupied space at a different
site that has already been discovered. The effect might specify additional
restrictions.
Certain actions require to pay something in order to obtain the benefits. You can't activate those actions without having the required cost to pay. Consider using free actions before in order to obtain the resources to pay.
If you are granted a travel discount while playing an item, you will see these travel icons on your player board near your tents. You can apply the discount at your choice while
paying the travel cost while you
Dig at a Site or
Discover a New Site.
If you spend more travel icons than needed, you are allowed to use the remaining
during the same turn. Remaining travel icons are indicated with a yellow glow around, just like the round indicator.
You can consult which artefacts or items are exiled from the game by clicking on the
sign next to corresponding deck on the left side of the game.