Order of the Gilded Compass - General game info
Order of the Gilded Compass
2-5 players, 30-60 minutes, 10 years and older
AuthorsJeffrey Allers (DesignerJeff)
Bernd Eisenstein (Eisenstein)
IllustratorDesign/Main
Published byGrey Fox Games
Online since 2023-06-03
Developed byJim Thompson (StCharles)
Boardgamegeek200924
Yucata.de owns a license for the online version of this game. A big "thank you" to the copyright owners (publisher and/or author and illustrator) who make it possible to have this game for free online here!
Order of the Gilded Compass - Rules
If you are reading these rules for the first time, ignore the text along the right hand side. These rules serve as a summary to help you quickly familiarize yourself with the game.

Show → summary only → detailed version only → both summary and detailed version

Order of the Gilded Compass

Overview

Order of the Gilded Compass is a dice assignment game for 2-5 players. In this game, each player takes on the role of a treasure hunter seeking invitation to join the most prestigious of archeological secret societies. Players will scour the globe to unearth fantastic and valuable artifacts. By assigning their archaeologist dice to the right locations at the right time, players will acquire treasure maps and specialists to follow them, dive for sunken treasure, acquire rare finds at the Auction House, and even enlist the help of the Illuminati. The player who has the most treasure at the end of the game earns an invitation to The Order of the Gilded Compass and is the winner of the game.

Setup

Order of the Gilded Compass uses a variable setup in order to create fresh and interesting gameplay experiences. Each game will use all three of the “A” buildings, and then a players’ choice of one “B” building and one “C” building. This process of selecting and setting up the game for each play is described in detail below.

  1. The University, Archives, and Library buildings are called “A” buildings and must be used every game. Set these buildings in the middle of the table as shown below. The University should be assembled based on the number of players. Put the pieces together to create a 4-space University with two players, a 5-space University with three players, a 6-space University with four players, and a 7-space University with five players. Next, shuffle the specialist tiles face down and place them in a pile to the left of the University. Then, shuffle the Ancient Map tiles and place them face down above the Archives. Finally, place the knowledge tokens next to the Library.
  2. Choose a “B” building (either the Treasure Hunters’ Guild or the Auction House) and place it to the left of the Archives as shown below.
  3. Choose a “C” building (the Hidden Temple, the Illuminati, the Sunken Galleon, or the Treasure Tower) and place it to the right of the Archives.
  4. Set up each of the buildings in play as described in the building descriptions. Return any unused buildings and their associated tiles to the box.
  5. Give each player eight dice of his chosen color to be placed in his play area along with one knowledge token.
  6. Give the start player marker to the player who has most recently found something valuable. (Alternatively, players may randomly determine the start player.)

You are now ready to begin playing.

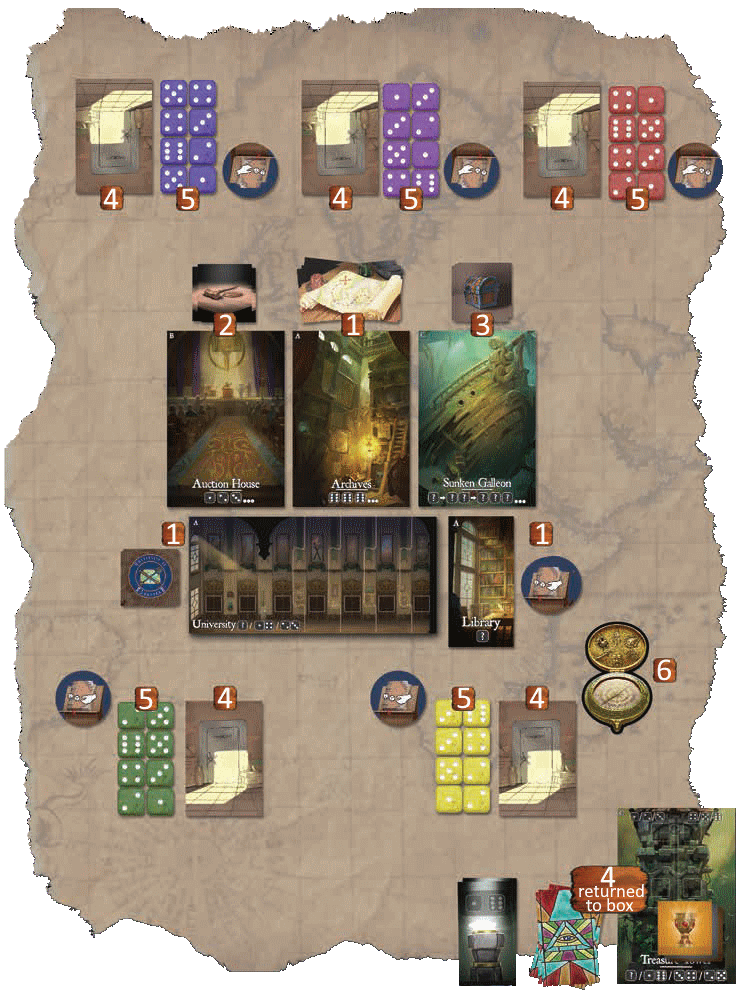
In the above setup, each player has a private collection tile as they are playing with the Auction House. In a setup without the Auction House, players would have no such tile at the beginning of the game and would instead simply begin with dice of their color.

How to Play

  • Play 6 rounds if 2-3 players, 5 rounds if 4-5 players.
  • Players take turns in clockwise order. A turn consists of rolling all of one's unplaced dice then placing one or more of them on a single building.
  • A round ends when at least one player has placed all of his dice and all players have taken the same number of turns.
  • At the end of a round, unplayed dice are moved to the Library and buildings are resolved one at a time. Buildings give various rewards to the player(s) who best meet their conditions.
  • After all buildings have been resolved, players retrieve their dice and the next player in clockwise order starts the next round.
  • All scoring is done after the last round. The player with the most gold (points) wins.

Order of the Gilded Compass is played over six rounds with 2-3 players or five rounds with 4-5 players. At the beginning of a round, the player with the start player marker takes the first turn. A turn consists of rolling all of one's unplaced dice then placing one or more of them on a single building where they will remain for the rest of the round. Each building has unique rules governing the placement of dice as described later in these rules.

After the first player has placed his dice on a building, the next player in clockwise order takes his turn by rolling and placing dice. (Note that a player rolls all of his unplaced dice at the beginning of each of his turns, not only his first turn of a round.) Continue taking turns in clockwise order until the end of the round.

Once a player has placed all of his dice, the round will end when all players have taken the same number of turns. I.e., the round ends when the player to the right of the start player completes his turn and at least one player has placed all of his dice.

At the end of a round, players move any unplayed dice they have to the Library. Then the buildings are resolved one at a time, left to right and top to bottom. The player(s) who best meet the conditions of each building will gain that building’s rewards. These conditions and rewards are described later in these rules.

After all buildings have been resolved, players retrieve their dice and the start player marker is passed one player clockwise. Then, a new round begins. This is repeated until either five or six rounds have been played depending on the number of players. Then, players proceed to game end and final scoring.

After final scoring, the player with the most gold is declared the winner!

Buildings

"A" Buildings

Archives

Send your archaeologists to the Archives to uncover ancient treasure maps to locations such as: Temple of Pompeii, Lost City of Atlantis, Jungle Ruins, Pharaoh’s Tomb, Tower of the Gods, and The Dark Temple.

Setup

At the beginning of each round, draw four Ancient Map tiles from the stack and place them face up to the right of the Archives.

At the start of the game, shuffle the Ancient Map tiles and stack them face down above the Archives. At the beginning of each game round, draw four tiles from the stack and place them to the right of the Archives. (When playing with the neutral player variant, these tiles should be drawn one at a time and placed from top to bottom.)

How it Works

  • Dice are placed in the Archives in sets of equal pip value.
  • On a turn, a player may add dice to one of his sets or create a new set.
  • Identical sets are not allowed.

Dice are placed here in sets (singles, doubles, triples, etc.) Each turn, a player may assign only dice of a single value to the Archives. There is no limit to the number of dice a player may assign, as long as all dice have the same value. A player may assign a single die to the Archives. A player can place additional dice in the Archives on a later turn to either add to an existing set or to create a new set. However, a player may not place or create a set that has the same value and the same number of dice as another set. There can be any number of sets of dice in the Archives but never more than one set with the same number of dice and same value. Each player may have multiple sets as long as these rules are followed.

How it Resolves

  • Sets are ranked first by the number of dice and secondly by the pip value of the dice.
  • Set owners in rank order take an Ancient Map and remove the set.
  • Continue until all four Ancient Maps have been taken or no sets of dice remain.
  • Any remaining sets of dice are moved to the Library.

Sets are ranked first by the number of dice and secondly by the value of the dice. The player who has the highest ranked set takes a face up Ancient Map of his choice from the Archives, places it face up in his player area, and removes the set. Next, the player with the second highest ranked set does the same thing. Note that one player may end up going twice in a row. Players continue to take tiles in this way until all of the Ancient Maps have been taken or there are no more sets of dice in the Archives. Any remaining tiles are removed from the game but left face up above the Archives for reference. Any remaining sets are moved to the Library.

How it Scores

Ancient Map tiles have two values printed on them. If one or more specialists are assigned to the Ancient Map then at game end score the greater value. If not then score the smaller value.

Ancient Map tiles have two values printed on them. The greater value is the number of gold scored at game end if one or more specialists are assigned to the Ancient Map. The smaller value is the number of gold scored at game end if no specialists are assigned to the Ancient Map. Each Ancient Map can have one cartographer and one excavator assigned to it, and they must be of the same color as the Ancient Map. Specialist tiles are described in detail in the University section below.

University

Send your archaeologists to the University to hire specialists (cartographers and excavators) who have knowledge of particular dig sites. Cartographers are designated with a compass icon, and excavators with a shovel icon. Choose the specialists who are uniquely qualified to help with your treasure hunt.

Setup

At the beginning of each round, draw a number of specialist tiles equal to the number of University entrances (two plus the number of players) and place them beneath the University face up.

At the start of the game, shuffle the specialist tiles face down and place them to the left of the University. At the beginning of each round, draw a number of specialist tiles equal to the number of University entrances and place them beneath the University face up. (The number of entrances is two plus the number of players.) (When playing with the neutral player variant, these tiles should be drawn one at a time and placed from left to right.)

How it Works

  • On a turn, a player may add a single die, a 1 & 4 pair, or a 2 & 3 pair to the University.
  • Dice are placed in ascending order of pips from left to right.
  • Dice of equal or greater value are pushed to the right.
  • If the rightmost die is pushed off the University then it is moved to the Library.

At the University, players may assign either any single die or exactly two dice which together show a total of 5 pips (1 & 4 or 2 & 3 - combos are placed in two spaces). On subsequent turns, players may place additional dice there following the same rules. Dice played in the University are placed in ascending order of pips from left to right, with each die in one of the entrances. Dice are always placed in the leftmost legal space. If the die to be placed has the same number of pips as a die or dice already assigned there, the latter die or dice are moved right as necessary to accommodate the new die. When there is no room remaining to accommodate the far rightmost die, that die is moved to the Library.

If the University is full then a die with a higher pip value than the rightmost die cannot be placed on the University. If a player places a 1 & 4 or 2 & 3 pair then the higher die is placed before the lower die.

How it Resolves

Die owners from left to right take a specialist.

Beginning with the player who has the leftmost die, players claim specialist tiles. The player who has the die next furthest to the left selects next and so on. Any remaining cartographers or excavators are removed from the game but are left face up to the left of the University for reference. Specialists will provide a player with 1-3 gold at game end, provided they are assigned to an Ancient Map of the same color.

Note: A map can be assigned at most one specialist of each type. (E.g., the green Jungle Ruins Ancient Map can have at most one green cartographer and one green excavator assigned to it.)

How it Scores

At game end assign specialists to Ancient Maps of the same color. Assigned specialists are worth 1-3 gold. Unassigned specialists are worth 0 gold.

Specialists are worth 1-3 gold if they are assigned to an Ancient Map. If a specialist is assigned to a map, it is worth the number of gold printed on its tile. If a specialist is not assigned to a map, it is worth 0 gold. You assign specialists to Ancient Maps at the game end. You do not need to commit them to a particular Ancient Map until it is time for final scoring.

Abandoned Dig Sites - You may assign specialists of any color to these Ancient Maps with the restriction that two specialists assigned to the same Abandoned Dig Site must be the same color. Abandoned Dig Sites are considered to be grey when evaluating the Scour The Globe mission.

Library

The Library is a place where archaeologists can go to do private research, learn random facts, or exchange ideas with one another. Archaeologists sent here gain knowledge in the form of knowledge tokens.

Setup

At the start of the game, place the knowledge tokens in a pile next to the Library.

At the start of the game, place the knowledge tokens in a pile next to the Library.

How it Works

On a turn, a player may add a single die to the Library. A player must do so if he cannot legally assign a die to another building.

When a player cannot legally assign a die to a building (though this is a rare occurrence,) he must place a die in the Library. Additionally, all dice pushed from the right side of the University (or from the top of the Treasure Tower) are moved to the Library. Any dice that do not yield any reward when buildings are resolved and dice that were not placed on a building are also moved here. A player may choose to assign a single die to the Library for his turn if he prefers not to place dice on another building, though this is generally not a good move.

Since the values of dice assigned to the Library do not matter, when a player chooses the Library, on Yucata his lowest die is automatically selected. Also, the number of dice each player has assigned to the Library is displayed rather than the dice themselves.

How it Resolves

Each player takes one knowledge token for each of his dice on the Library. Knowledge tokens can be used in later rounds to reroll dice.

The Library is always the last building to be resolved. Each player removes all of his dice from the Library and gains a knowledge token for each removed die. Knowledge tokens can be used by players in later game rounds to reroll dice. To use a knowledge token, the player must return one token to the supply and then may reroll as many of his unassigned dice (including neutral dice) as he wants. Aside from the number of tokens a player has available to use, there is no limit to the number of times a player can reroll.

How it Scores

At game end score one gold for every two knowledge tokens (rounded down).

At game end, a player earns one gold for every two knowledge tokens in his possession (rounded down).

"B" Buildings

Auction House

Send your archaeologists to the Auction House to gain artifacts for your private collection. Certain artifacts retrieved from the Auction House will be especially desirable to you, while others may not be quite as impressive to your personal tastes.

Setup

At the start of the game each player takes a secret private collection tile, which indicates how much he will score for the different types of artifacts.

At the start of the game, shuffle the private collection tiles and give one to every player. These tiles are kept secret from other players. Private collection tiles display your two preferred artifact types. Shuffle the artifact tiles face down and place them in a pile above the Auction House. (There are 6 different types of artifacts – Desert, Jungle, Water, Fire, Holy, and Dark – and 6 of each type.)

How it Works

  • Dice are placed in the Auction House in sequential runs (straights).
  • On a turn, a player may add dice to one of his sequences or create a new sequence.
  • Identical sequences are not allowed.

Players assign dice in sequential runs (straights), (e.g., 2-3, 1-2-3, 5-6). A player may not place or create a sequence that is exactly the same as another sequence, and no player may have more than one sequence in the Auction House. A player may place a single die as that is a sequence of one. If a player already has a sequence in the Auction House, he may add to it on a later turn by extending it at one or both ends as long as it does not become exactly the same as another sequence. Two sequences can overlap, but there can never be two identical sequences in the Auction House at the same time and each player may have only one sequence of dice in this building.

As recommended by the designers, on Yucata a player may have more than one sequence.

How it Resolves

  • Sequences are ranked first by the number of dice and secondly by the pip value of the highest die.
  • The player with the highest sequence draws three artifact tiles and keeps two.
  • The player with the second highest sequence draws two artifact tiles and keeps one.
  • The player with the third highest sequence draws and keeps one artifact tile.
  • The dice in any other sequences are moved to the Library.

Sequences are ranked first by the number of dice and secondly by the value of the highest die. E.g., 1-2-3-4 beats 4-5-6 which beats 5-6. The two players with the highest sequences receive artifacts from the Auction House. The player with the highest sequence draws three artifact tiles and chooses two to keep. The player with the second highest sequence draws two artifact tiles and chooses one to keep. Unselected tiles are discarded face-up above the Auction House. Any dice which were not in a winning sequence are moved to the Library.

Note: In a 5-player game, the player with the third highest sequence in the Auction House each round draws one artifact tile from the supply and keeps it.

As recommended by the designers, on Yucata the player with the third highest sequence in the Auction House each round draws one artifact tile from the supply and keeps it regardless of the number of players.

How it Scores

At game end each artifact scores 4, 2 or 1 gold according to its owner's private collection tile.

Artifacts are worth a variable amount of gold at the end of the game. Each player scores according to his own private collection tile. The most desirable artifacts are worth 4 gold each, the preferred artifacts are worth 2 gold each, and all other artifacts not depicted on the player’s private collection tile are worth 1 gold each.

Treasure Hunters’ Guild

Send your archaeologists to the Treasure Hunters’ Guild to gain inside information in the form of secret missions which can score you more value from your treasure hunts.

Setup

At the start of the game, shuffle the mission tiles and place them in a stack face down.

At the start of the game, shuffle the mission tiles and place them in a stack face down above the Treasure Hunters’ Guild.

How it Works

The Treasure Hunters’ Guild works the same way as the Auction House.

The Treasure Hunters’ Guild works the same way as the Auction House.

How it Resolves

  • Sequences are ranked first by the number of dice and secondly by the pip value of the highest die.
  • The player with the highest sequence draws three mission tiles, keeps one, and then passes the remaining two to the player with the second highest sequence.
  • The player with the second highest sequence keeps one of the two passed mission tiles and passes the other to the player with the third highest sequence.
  • The player with the third highest sequence keeps the mission tile passed to him.
  • The dice in any other sequences are moved to the Library.

Sequences are ranked first by the number of dice and secondly by the value of the highest die. E.g., 1-2-3-4 beats 4-5-6 which beats 5-6. The two players with the highest sequences receive a secret mission tile from the Treasure Hunters’ Guild. The player with the highest sequence draws three mission tiles, selects and keeps one, and then passes the remaining two to the player with the second highest sequence. The latter player selects one tile to keep and returns the other to the bottom of the tile stack. Any dice which were not in a winning sequence are moved to the Library.

Note: In a 5-player game, the player with the third highest sequence in the Treasure Hunters’ Guild each round receives the third tile (instead of it being returned to the supply).

As recommended by the designers, on Yucata the player with the third highest sequence in the Treasure Hunters’ Guild each round receives the third tile regardless of the number of players.

How it Scores

The missions are worth a variable amount of gold at the end of the game as described later in these rules.

The missions are worth a variable amount of gold at the end of the game, assuming the player has met the mission’s conditions. All mission tiles are described in detail later in these rules.

"C" Buildings

Hidden Temple

Send your archeologists to the Hidden Temple in search of magical items to help your specialists find more treasure!

Setup

At the beginning of each round, draw the appropriate number (number of players with a maximum of four) of Magical Item tiles and place them face down next to the Hidden Temple.

At the start of the game, shuffle the Magical Item tiles and stack them above the Hidden Temple. At the beginning of each round, move the appropriate number of Magical Item tiles to the indicated locations next to the Hidden Temple board without looking at them. The number varies based on the number of players – two tiles in a 2-player game, three tiles in a 3-player game, and four tiles in a 4- or 5-player game.

How it Works

On a turn a player assigns the two indicated dice (1 & 6 or 2 & 5) to a single magical item tile that has no assigned dice.

Players assign the two required dice to a single magical item tile. The tile shows which two dice are required. These two dice must be assigned at the same time and to the same tile. Players may not be bumped off these tiles by any means and will claim them during building resolution.

How it Resolves

Players take the Magical Item tiles to which they have assigned dice, keeping them secret until the end of the game.

Players simultaneously take and look at the Magical Item tiles to which their dice were assigned. These tiles should be kept secret from opponents until the end of the game. Any tile(s) with no dice assigned to them are discarded above the Hidden Temple face up.

How it Scores

  • At the end of the game Magical Items are assigned to specialists of the same color and type that have been assigned to maps.
  • A specialist with a Magical Item scores double its value.
  • A map with two specialists both of which have a Magical Item scores double its value.

Magical Items are color matched to the specialists, and are specific to either cartographers or excavators. Cartographers need compasses while excavators need tools. At the end of the game Magical Items are assigned to specialists matching the color and type of the Magical Items. A specialist with a Magical Item scores double its value, as long as it is assigned to an Ancient Map. If an Ancient Map has two specialists assigned, and each has a Magical Item, the Ancient Map value is also doubled! Each specialist may be assigned only one Magical Item.

On Yucata if three specialists are assigned to an Ancient Map via the Second Opinion mission, the Ancient Map value is doubled if Magical Items are assigned to any two of the specialists. Also, the Magical Item scoring rules apply to specialists assigned to a Dual Map or Secret Map mission as well as those assigned to an Ancient Map.

Illuminati

Send your archaeologists to the hallowed halls of the Illuminati to seek special help in the form of unique abilities. These abilities can be used in future rounds to give you an edge over the other players and help you get the most treasure.

Setup

At the beginning of each round, draw three Special Ability tiles and place them face up beside the Illuminati.

At the start of the game, shuffle the Special Ability tiles and stack them face down above the Illuminati. At the beginning of each game round, draw three Special Ability tiles and place them face up beside the Illuminati. (When playing with the neutral player variant, these tiles should be drawn one at a time and placed from top to bottom.)

How it Works

  • Players can have at most one set in the Illuminati.
  • The first player to assign a die to the Illuminati may assign any one die.
  • Thereafter, a player must assign dice which make his set contain exactly the dice in the current longest set plus any one die.

Players assign dice to the Illuminati based on previous dice assigned there. The first die assigned must be a single die. Each assignment thereafter must be the previous combination plus one additional die. The first player to assign a die to the Illuminati may assign one die of any value. The second player to assign there must assign the die the previous player assigned and a second die of any value. The third player must assign the two previously played dice and a third die of any value and so on. Only the two players with the most dice assigned to the Illuminati will receive Special Ability tiles. Dice that are not in the two longest sets are moved to the Library. A player cannot have more than one set of dice at the Illuminati but he may add to an existing set. He may do so even if he already has the longest set. A player adding to an existing set can never add more dice than required to beat the current leader. The current leader may only add one die to his set.

How it Resolves

  • The player with the longest set takes one of the three face up Special Ability tiles.
  • The player with the second longest set takes one of the remaining two face up Special Ability tiles.
  • The player with the longest set takes the remaining face up Special Ability tile.
  • The dice in any other sets are moved to the Library.

The two players with the most dice in the Illuminati will gain Special Ability tiles. The player with the most dice assigned to the Illuminati chooses one of the three Special Ability tiles on display. The player who has the second most dice assigned to the Illuminati chooses one Special Ability tile from the remaining two. The player with the most dice then claims the remaining Special Ability tile. Any dice that are not in the two longest sets are moved to the Library. Special Ability tiles can be discarded in future rounds to activate their abilities.

If there is only one set in the Illuminati, its owner takes any two of the face up Special Ability tiles.

How it Scores

Unused Special Ability tiles are worth one gold each at the end of the game.

Unused Special Ability tiles are worth one gold each at the end of the game, though you will find that using their abilities effectively during the game is worth significantly higher value or more points.

Special Ability Tiles

A Timely Gift (x5):

Take an additional turn after the round ends if you have at least one non-neutral die. (Use after round ends. If multiple players have “A Timely Gift”, the choice to use them begins with the start player and goes clockwise.) Multiple players may use “A Timely Gift” during the same round. A player may use only one “A Timely Gift” per round.

The Will to Win (x5):

Place an identical set of dice, creating a tie, in the Archives, Auction House or Treasure Hunters’ Guild. Then move one of your opponent's dice from the tied set to the Library. Removing the opponent's die must not create a set that is not unique or, in the cases of the Auction House or Treasure Hunters’ Guild, a set that is not a sequence.

On Yucata the "opponent" can be the neutral player, and The Will to Win can be used when placing neutral dice.

A Little Help (x5):

Gain 2 extra dice. (Use at start of your first turn of a round. Only one player per round may use this ability.)

A Compelling Power (x5):

Set two of your dice to your desired results. (Use immediately after rolling.) A player may use only one “A Compelling Power” per turn.

On Yucata one or two of the dice can be neutral dice.

Sunken Galleon

Send your archaeologists diving into the wreck of the Sunken Galleon to recover sunken chests. Their value is variable, so it is best to find as many as you can.

Setup

At the start of the game, shuffle the Sunken Chest tiles face down.

At the start of the game, shuffle the Sunken Chest tiles face down and place them in a pile above the Sunken Galleon.

How it Works

  • Players can have at most one set in the Sunken Galleon.
  • The first player to assign a die to the Sunken Galleon may assign any one die.
  • Thereafter, a player must assign dice which make his set contain exactly one more die than the current longest set and have a higher total pip value than that of the current longest set.
  • For each die a player assigns to the Sunken Galleon he draws a Sunken Chest tile, looks at it, and places it face down.

Dice are assigned to the Sunken Galleon based on their sum. The first player to assign dice to the Sunken Galleon places exactly 1 die of any value. Then, that player retrieves one Sunken Chest tile, looks at it secretly, and places it face down in front of himself. The second player to assign dice to the Sunken Galleon places exactly two dice, but the sum of the pip values of these two dice must be higher than the pip value of the first die placed there. After placing two dice, the player takes two Sunken Chest tiles, looks at them secretly, and then places them face down in his play area. The third player must place three dice with a higher total than the two dice before, take three Sunken Chest tiles, and so forth. Note that players who already placed dice in the Sunken Galleon may place more dice there on a later turn. The player must place a number of dice that brings the number of dice in his set to the exact number needed, and the sum of the pip values of the dice in the set must be greater than sum of the previous longest set. Then, that player will draw Sunken Chest tiles equal to the number of dice he just played.

Note: In a 5-player game it is possible to run out of Sunken Chest tiles during the fifth round.

How it Resolves

The player who has the longest set keeps two of the Sunken Chest tiles he acquired during the round, turns them face up, and discards the other tiles he acquired during the round face up. All other players who have a set in the Sunken Galleon do the same things but keep only one of their Sunken Chest tiles instead of two.

The player who has the most dice on the Sunken Galleon selects two of the Sunken Chest tiles he acquired during the round to keep, places them face up in his play area, and returns the rest face up near the Sunken Galleon. Each other player with at least one die in the Sunken Galleon selects one of his tiles acquired, places it face up in front of himself, and then returns the rest face up near the Sunken Galleon. When the supply of face down Sunken Galleon tiles is exhausted, shuffle the face up tiles face down to replenish the supply.

On Yucata players' highest value Sunken Chests are automatically selected.

Note: If only one die was assigned to the Sunken Galleon during a round, that player wins and keeps the one tile he took and turns it face up. Then, that player takes a random face down Sunken Chest tile and places it face up in his play area.

How it Scores

Each Sunken Chest tile is worth 1-3 gold at game end.

Each Sunken Chest tile is worth 1-3 gold. Players score the gold values printed on their Sunken Chest tiles at the end of the game.

TreasureTower

Send your archeologists to the unstable Treasure Tower to acquire valuable treasure – depending on how clever and daring you are. Try to get to the top floors of the towers but don’t let other players’ archeologists knock you out.

Setup

At the start of the game, shuffle each of the three types of treasure tokens separately face down.

At the start of the game, shuffle each of the three types of treasure tokens and place them in stacks face down beside the appropriate level of the Treasure Tower. Bronze tokens are placed by the first floor of the Treasure Tower, silver tokens by the second floor, and gold tokens by the third floor.

How it Works

  • On a turn, a player may add a single die or two dice with a total value of 7 to the Treasure Tower.
  • Dice of values 1 to 3 and dice of values 4 to 6 are added to the first floor of the left and right towers, respectively.
  • An added die pushes dice that were on the first or second floor of the same tower to the next higher floor. A die that was on the third floor of the same tower is moved to the Library.

Players may assign any one die to the Treasure Tower, or two dice with a total of 7 pips on them. Dice with 1-3 pips are placed on the first floor of the left tower while dice with 4-6 pips are placed on the first floor of the right tower. A die added to the left or right tower pushes dice that were on the first or second floor of that tower to the next higher floor. A die that was on the third floor of that tower falls from the Treasure Tower and is moved to the Library. Play continues in this manner until the end of the round.

How it Resolves

At the end of a round players receive a bronze, silver or gold treasure for each of their dice on the first, second or third floor, respectively.

Any player with dice remaining in the Treasure Tower at the end of a round will receive one treasure per die. Treasures are associated with the level on which the player’s dice ended. Players receive bronze treasures for dice on the first floor, silver treasures for dice on the second floor, and gold treasures for dice on the third floor. (E.g., if a player has two dice on the first floor and one die on the third floor, that player receives two bronze treasures and one gold treasure.) Treasures received from the Treasure Tower are kept face down until the end of the game.

How it Scores

At game end treasures are worth between 0 and 3 gold.

The Treasure Tower treasures are worth a variable amount of Gold depending on their type. Bronze treasures are worth 0-2 gold, silver treasures are worth 1-3 gold, and gold treasures are worth 1-3 gold. The higher floors of the tower provide better odds of scoring high value treasure.

1 x 0 Gold
10 x 1 Gold
1 x 2 Gold

5 x 1 Gold
6 x 2 Gold
1 x 3 Gold

1 x 1 Gold
6 x 2 Gold
5 x 3 Gold

End of Game Scoring

After the fifth round of play (sixth in a 2-3 player game,) players proceed to final scoring. Each player scores all of the following and adds his gold values together. The player with the most gold joins the Order of the Gilded Compass and wins the game! If there is a tie then the tied player with the highest value of unassigned specialists wins.

Ancient Maps - Score the greater value if at least one specialist is assigned to the Ancient Map. Score the smaller value if no specialists are assigned to the Ancient Map.

Specialists – Score 1-3 gold (as indicated on the tile) if the specialist is assigned to an Ancient Map of the same color (or a Secret Map or Dual Map mission tile.) If a specialist is not assigned to a map, it is worth 0 gold at the end of the game. Only one cartographer and one excavator can be assigned to each map.

Knowledge Tokens – Score one gold for every two knowledge tokens in your possession (rounded down).

Artifacts - Score 1, 2, or 4 Gold for artifacts according to your private collection tile. Your most desired artifacts are worth four gold each, your preferred artifacts are worth two gold each, and all other artifacts not shown on your tile are worth one gold each.

Mission - Missions are worth a variable amount of gold at the end of the game, assuming you have met the mission’s conditions. All missions are described in detail in the mission appendix.

Magical Items - Assign Magical Items to specialists with a matching color and type at the end of the game. A specialist to which a magical item is assigned scores double its value. (Note that the value of an unassigned specialist is zero.) If both specialists assigned to a map have been assigned Magical Items, the value of the map is also doubled.

Special Abilities - Unused Special Ability tiles are worth one gold each.

Sunken Chests - Each Sunken Chest is worth 1-3 gold according to the gold value printed on it.

Treasures - Each treasure is worth 0-3 gold according to the gold value printed on it.

Special Rules for 2-3 Players

When playing Order of the Gilded Compass with 2-3 players, a slight change must be made in order to keep competition for rewards competitive. You may use either of the variants below, but they should not be used together.

As recommended by the designers, on Yucata the "Neutral Player" variant is always used for 2- and 3-player games. The "Fewer Buildings" variant is never used.

Variant 1 - Fewer Buildings

This variant leads to less conflict and allows for less variety in buildings.

During game setup, players should not select a C building. The game plays as normal but with one fewer building option.

Variant 2 - The Neutral Player

This variant allows for use of more variety in buildings and sometimes increases direct interaction between players.

At the start of the game, designate one color of dice as “The Neutral Player”. Give each human player two dice of the neutral player’s color to be added to his own. On a player’s turn, he rolls all of his dice (including neutral dice). A player may place one or more of his neutral dice in a building during a turn before or after placing his own dice. Neutral dice must follow the normal placement rules, i.e., they may only be placed in a single building per turn and must follow the rules of the building they are placed in. A player may choose not to place neutral dice during a turn.

The neutral dice act as a single extra player, meaning that in subsequent turns any player may add dice to a neutral set already in a building.

A player is considered to have used all of his dice (and triggered the end of the round) when all of his own dice have been placed whether or not he still has any neutral dice.

When the neutral player wins a building reward, the reward is discarded. When a choice is required, the neutral player takes the highest value reward with ties being broken top to bottom and left to right. If a reward would generally be kept secret, it is treated as though no one claimed that reward. The specific rules for the various buildings are as follows:

"A" Buildings

Archives:

Neutral Winner: Discard the highest value Ancient Map tile remaining. Ties are broken top to bottom.

Library:

Neutral Winner: No effect.

Since placing a neutral die in the Library can never benefit a player, doing so is not allowed on Yucata. Neutral dice that would otherwise be moved from another building to the Library are discarded.

University:

Neutral Winner: Discard the highest value specialist tile remaining. Ties are broken left to right.

"B" Buildings

Auction House:

Neutral First Place Winner: Discard four random tiles face up.

On Yucata discard three random tiles face up rather then four.

Neutral Second Place Winner: Discard two random tiles face up.

Neutral Third Place Winner: Discard one random tile face up.

Treasure Hunters’ Guild:

Neutral First Place Winner: Second place winner draws only two tiles.

Neutral Second Place Winner: Randomly choose and discard one of the two passed tiles face down.

Neutral Third Place Winner: Discard the passed tile face down.

"C" Buildings

Hidden Temple:

Neutral Winner: Tile is returned face down to the supply.

Illuminati:

Neutral First Place Winner: Discard the topmost tile. The second place winner chooses one of the remaining tiles to keep and discards the other.

Neutral Second Place Winner: The first place winner takes one tile, discards the topmost remaining tile, and takes the final tile.

Sunken Galleon:

Neutral First Place Winner: All players with a set keep one tile.

Neutral Other Place Winner: No effect.

(Note: These Sunken Galleon rules are a correction by the designers to the published rules.)

Treasure Tower:

Neutral Winner: No tiles are drawn for the neutral player.

Appendix

Mission Tiles

A Dual Map (x6):

Each Dual Map shows a combination of two different colors. At the end of the game, the player may assign either one specialist tile that matches either color or one cartographer and one excavator - each of a different color shown. If two specialists are assigned, the map scores three gold. If not then it scores zero gold. Any assigned specialists score their value regardless of whether the map scores three or zero gold.

A Secret Map (x2):

Each Secret Map may be assigned two Specialist tiles following the normal rules (one cartographer and one excavator of the same color). The player receives one gold for the Secret Map if at least one specialist is assigned to it and zero gold if no specialists are assigned to it.

Broaden Your Expertise:

The player receives one gold for each different color specialist he has assigned to an Ancient Map or mission map. Unassigned specialists do not count.

Congregate Cartographers:

The player receives one gold for every cartographer he has assigned to an Ancient Map or mission map.

Dive for Doubloons:

The player scores one gold for this mission plus an additional two gold for every three Sunken Chests in his possession at the end of the game.

Embrace the Guild:

The player receives one gold for this mission plus an additional gold for every mission he has including Embrace the Guild. (E.g. If a player has only Embrace the Guild and no other missions, the player will receive a total of two gold.)

Find the Maps:

The player receives one gold for this mission plus an additional gold for every two Ancient Maps he has whether they have specialists assigned to them or not. Note: A Secret Map and A Dual Map do NOT count.

Gather the Excavators:

The player receives one gold for every excavator he has assigned to an Ancient Map or mission map.

Hire the Right Hunters:

The player receives one gold for every Ancient Map tile he has that has at least one Sspecialist assigned to it. Note: A Secret Map and A Dual Map do NOT count.

Join the Illuminati:

The player receives one gold for every Special Ability tile in his possession at the end of the game. This is in addition to the one gold provided by each of those tiles.

Loot the Tower:

The player receives one gold for every three treasures in his possession at the end of the game. They may be any combination of bronze, silver and gold.

Raid the Temple:

This tile is worth one gold plus one additional gold for every two assigned or unassigned Magical Items the player has in his possession at the end of the game.

Recruit Specialists:

The player receives one gold for every two assigned specialists he has Unassigned Specialists do not count. Specialists assigned to A Secret Map or A Dual Map do count.

Scour the Globe:

The player receives one gold for every different colored map he possesses, whether there are specialists assigned to them or not. Note: A Secret Map counts as the color of the specialist(s) assigned to it. If it is empty it counts as grey. A Dual Map counts as both depicted colors. An Abandoned Dig Site always counts as grey.

Second Opinion:

The player may assign a third Specialist of a matching color to his maps. Note: This can be applied to A Secret Map and A Dual Map. For Dual Maps, either color is allowed.

Unite the Specialists:

The player receives one gold for this mission plus an additional Gold for each set of cartographers and excavators assigned to the same map. Note: Specialists assigned to A Secret Map and A Dual Map count.

Promo Tiles

Coveted Artifacts

With only eight in the world, the Coveted Artifacts are highly sought after by all. Regardless of what is depicted on your private collection tile, these artifacts have the potential to score high values.

Setup:

Mix the eight Coveted Artifact tiles in with the artifact tiles.

Gameplay:

Coveted Artifacts are collected in the same way as other artifacts. At game end they are worth a total of the square of the number of Coveted Artifacts the player has collected.

An Ally Inside

Agents of the Illuminati are everywhere. Befriending those in key locations could prove to be a huge advantage.

Setup:

Mix the four “An Ally Inside” tiles in with the other Special Ability tiles.

Gameplay:

The “An Ally Inside” tiles are collected in the same way as other Special Ability tiles. They can be used at the end of a round in order to improve the resolution position of one of your Archives sets by one.

For example, if you have the second highest set, you may spend your “An Ally Inside” tile to treat it as the first highest set and therefore pick an Ancient Map first. Similarly, if your set was 5th, you can move it to 4th).

This Special Ability may be used at the end of a round before the Archives begins to be resolved. If multiple players have “An Ally Inside”, the choice to use them begins with the start player and goes clockwise.

Multiple players may use “An Ally Inside” during the same round. A player may use only one “An Ally Inside” per round.

Tools of Power

Deep in the hidden temple lie four magical items so powerful that anyone can use them to maximize their riches. Find them and you too can make use of their power.

Setup:

Mix the four Tools of Power in with the other Magical Item tiles.

Gameplay:

Tools of Power Magical Items are collected in the same way as other Magical Items. They function identically to other Magical Items except that they are not color specific. Rather, they may be assigned to a specialist of any color of the matching type in order to double its value (assuming that the specialist is assigned to a map).

Treasure Fragments

Rumors have surfaced about valuable goblets in the Treasure Tower split and scattered. Find both halves of one of these legendary treasures and greater wealth will follow.

Setup:

Remove two of each of type of treasure tile at random (2 bronze, 2 silver, 2 gold) and return them to the box without looking at them. Then, mix the treasure fragment tiles in with the remaining treasures according to their backs.

Gameplay:

Treasure fragments are collected just like other treasures. Each unmatched fragment is worth its printed value (0, 1 or 2) in gold at the end of the game. However, if you collect a matching pair of treasure fragments (e.g. both silver treasure fragments) they instead score as a pair as follows: a bronze pair scores three gold, a silver pair scores five gold, and a gold pair scores 7 gold. For example, if at the end of the game you have 1 bronze fragment, 2 silver fragments and one gold fragment, they are worth seven gold (zero gold for the single bronze, five gold for the silver pair, and two gold for the single gold).

Hints for handling

If the Auction House or the Treasure Hunters' Guild contains more than eight sets of dice then only the low die and the high die of each set is displayed. If a set contains only one die then only that die is displayed.
If the Archives contains more than eight sets of dice or if any set contains more than six dice then each set is displayed as a single die preceded by the number of dice in the set.
At the end of a game using the Auction House, the optimal assignments of specialists to maps and Magical Items to specialists are made automatically. For a game using the Treasure Hunters' Guild, players must make the assignments themselves.
 
Privacy statement | Editorial | FAQ To Top YST: 00:00:00 |