Welcome to the 5th century B.C., in which the poleis (city states
of ancient Greece, centres of cultural and political life) blossom
into new splendour. Progress and destruction, blood and glory are
cornerstones of this unique historical period, in which the ambitions
of Athens and Sparta clash in a long struggle for hegemony.
Only a few years before, the Greek poleis came very close to being
defeated by the Persian Empire - a fate that would have resulted in
their loss of identity and autonomy. Threatened with such devastating
consequence, a strong Pan-Hellenic spirit emerged. Under the
leadership of the two largest poleis, Athens and Sparta, the united
poleis fiercely fought for their own survival, their iron will and
determination securing them victory over the powerful enemy.
With the Persian threat eliminated, the viewpoints of Athens and
Sparta regarding government, economy, the military and other
aspects of society, clash violently. A fierce struggle for power and
influence begins, which will culminate in the Peloponnesian Wars.
It is also a period of great beauty and progress in which philosophy,
culture, and art prosper and flourish - especially in Athens,
under the reign of Pericles. But the continuous struggle between
the two poleis repeatedly results in violent confrontations, and
by the end of the Second Peloponnesian War both city-states
have suffered vast losses. When Athens finally surrenders, both
poleis have been seriously weakened by the war.
In Polis: Fight for the Hegemony, each player will take on the
role of either Athens or Sparta, striving to expand his power
and influence (either by diplomatic means or by force). But the
growing alliance must be managed sensibly, and neither trade
or expansion, nor scarce resources or military strength can be
ignored. The poleis (plural of polis) need to flourish, and
prestige must increase in order to achieve victory in this struggle
for hegemony. Have fun!
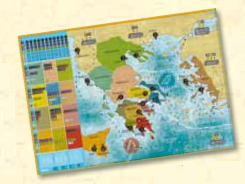
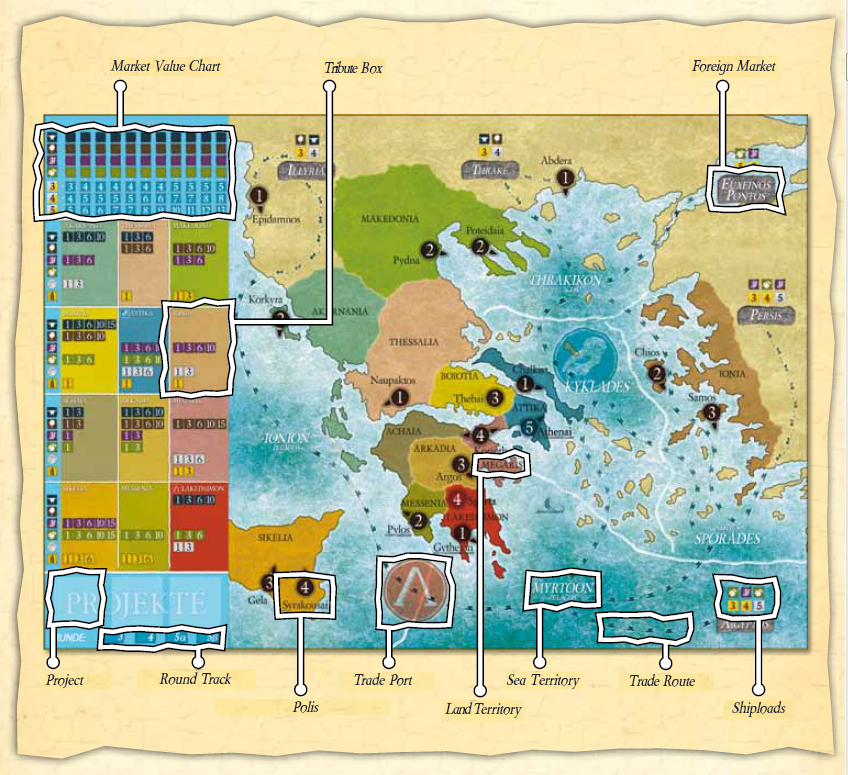
1 game board: Containing the
map with the various territories,
a chart showing the market
value of different goods, 12
Tribute Boxes, the round track,
and spaces for the placement of
current projects.
To keep the load time small, the game board is displayed with a low resolution image.
A higher resolution image, which shows more details when using the browser zoom, can be requested by clicking the HD icon in the upper right corner.
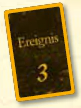
40 Event cards: To be drawn at the beginning
of each round (its back matching the current
round – 3, 4, 5α or 5β)

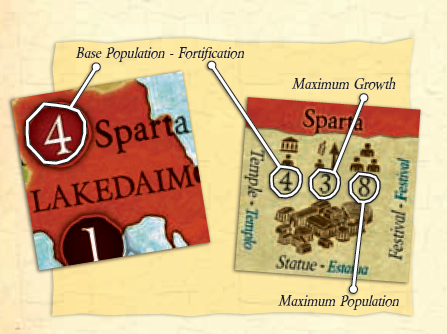
18 Polis Tiles: To represent the different poleis
(neutral, or affiliated with one player), with
their Base Population (and Fortification value),
Maximum Growth and Population Maximum.

14 Project Tiles: The different projects (erecting
buildings, hosting events or hiring personalities)
a polis can undertake.

24 Combat Cards: used in land and sea battles.

1 four-sided die: To determine changing market
values and the outcome of a siege.
|

Wooden cubes in blue and red (45 each): To
represent Population, hoplites, and galleys. 7 are
used to mark the current amount of resources
and Prestige on the player boards.

Wooden cubes in black (5): Four are needed to
indicate the current value of tradeable goods, and
one to mark the current round.

Wooden discs in blue and red (25 each): To
represent ownership of a specific polis on the
game board and to indicate when tribute has
been collected in a territory.

Wooden ships in blue and red (8 each): The
merchants of both players.

1 blue and 1 red pawn: Representing the Proxenos
of each player.
2 player boards: To keep track of a player's
resources in storage and his Prestige.
On yucata the player boards are not used. The players' resources are displayed on the left and the right of the game board.
2 player aids: These give a short summary of the game rules.
On yucata the player aid can be opened via the  icon. icon.
|
Population and Prestige are the two most important
aspects of Polis: Fight for the Hegemony. A player’s final
score, at the end of the 4th round, is based on the sum of
both values. Therefore, a player should keep a close eye
on these two aspects, as well as the various other facets of
the game.
The key to success is the ability to correctly assess situations
on the board: when to expand without taxing one’s own
resources too much, and when to forgo expansion without
being too passive.
The Population lives in the poleis. Throughout the game,
both players will compete for control over these 18
possible allies, and try to bring more of them (ideally the
more valuable ones) to their league than their opponent.
However, if unable to supply their poleis with enough
food at the end of each round, the players suffer Prestige
loss or may even lose some of their allies.
Every polis is represented by a circle on the game board.
The number inside the circle indicates the Base Population
of the city (as long as it is neutral, i.e. not owned by a
player), as well as its Fortification value. The higher the
number, the harder it is to successfully besiege it, and add
it to your city league.
Once a polis is controlled by a player, its current Population
can vary between 1 and its Maximum Population (the
right number on the polis tile). Every round, the Population
can be increased, up to its Maximum Growth (the
number in the middle).
The Population of a player’s polis is represented by a
matching amount of his wooden cubes, placed next to the
tile on his side of the table. These cubes can later be converted
to hoplites, galleys, or merchants, if the player has
enough resources to pay for it.
On yucata the tiles can be inspected via the  icon.
Additionally, the current population is displayed directly on the polis, together with its base population value.
A Polis with a population of 4 and a base population of 3 will be labeled with 4/3.
icon.
Additionally, the current population is displayed directly on the polis, together with its base population value.
A Polis with a population of 4 and a base population of 3 will be labeled with 4/3.
In doing so a player will decrease his Population (and
thereby reduce his victory points). However, all three unit
types are necessary to perform important actions, such
as Collecting Tribute, Trading, or Besieging a Polis.
Hoplites are military land units represented by a player’s
cubes in the different land territories. If a player has more
hoplites in a territory than his opponent, he controls it.
Controlling a land territory blocks the opponent’s hoplite
movement through it.
Galleys are military sea units represented by a player’s
cubes in the different sea territories. If one player has more
galleys in a territory, he controls it, blocking movement of
his opponent’s hoplites, galleys, or merchants through it.
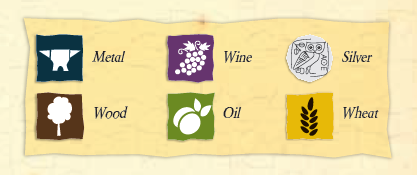
Merchants enable a player to procure the two most valuable
resources: silver (which can be acquired by trading metal,
wood, wine or oil), and wheat (which can either be acquired
by trading, or can be bought with silver). A player may not
trade with a Foreign Market if the trade route is blocked.
After his turn a player must check for any territories with
a total of 8 or more units (hoplites or galleys). In these
territories, a battle will take place, and the Combat Cards
will be needed. Both players play 2 cards each round,
alternating as attacker and defender. The battle lasts until
either the Combat deck runs out, one player has less than
two units in the territory, or one player withdraws.
Additionally, each player controls a Proxenos - an
influential diplomat who will attempt to reach his goals
through bribery and manipulation rather than violence.
Even blocked territories cannot obstruct his movement.
 Prestige points are not only important for
undertaking winning - they are essential for
undertaking any military action. They can be
gained for successful sieges, completing a project,
conducting impressive manoeuvres in battle, or
controlling prospering poleis.
Prestige points are not only important for
undertaking winning - they are essential for
undertaking any military action. They can be
gained for successful sieges, completing a project,
conducting impressive manoeuvres in battle, or
controlling prospering poleis.
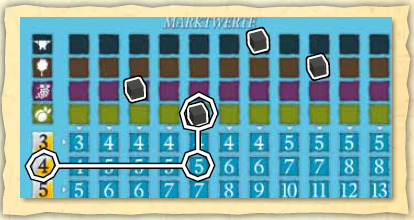
The image depicts the
two parts of the game board. In
the column to the left is the Market
Value Chart for the four tradeable
goods, the Tribute Boxes (indicating
the resources produced in the
different territories), three spaces
where the currently available project
tiles are placed, and the round track.
The map to the right shows the
12 land and 5 sea territories, the
18 poleis, the 5 Foreign Markets,
the 2 Trade Ports, and the various
trade routes.
The game is played over the course of 4 rounds (marked
3, 4, 5α and 5β on the round track), which represent the
historical period between the foundation of the Delian
League (478 BC) and the ultimate defeat of Athens at the
end of the Second Peloponnesian War (404 BC):
• The first round (3) marks a period of expanding Athenian
influence, beginning with the final victory over the Persian fleet,
which still lingers at the south-eastern coast of the Sporades. At
the same time, Sparta suffers from the scandalous trials of their
king Leotychidas II and his general Pausanias.
• The start of the second round (4) corresponds roughly to the
year 460 BC. The enmities between Athens and Sparta lead to
military skirmishes, which then result in the First Peloponnesian
War. However, it is also the period in which Pericles leads
Athens to new cultural splendour.
• During the period represented by the third round (5α),
hostilities once again erupt, beginning the Archidamian War.
Sparta repeatedly pillages Attika and the population takes refuge
behind Athens’ walls, where they suffer and die from the plague.
One of the victims was the Athenian ruler Pericles. Nevertheless, Athens
recovers, and a temporary truce (the Peace of Nikias) is declared.
• The hostilities culminate in the fourth round (5β) in which the
fickle military genius Alcibiades manages to change sides twice.
A disastrous Athenian campaign into Sicily enables Sparta, after
several victorious naval battles, to erect a successful blockade.
Athens, suffering under insufficient food supplies, is finally
defeated during the Spartan siege.
The numbers on the 4 spaces of the round track (3, 4, 5α
and 5β) define the maximum of hoplites or galleys that
each player is allowed to have in a territory (land or sea)
at any time in the corresponding round (even during
movement). Therefore, no battles can take place before the
second round of the game. Additionally, the numbers indicate
the maximum size of shiploads available in the Foreign
Markets. The symbols (α and β) are only needed to
distinguish the last two game rounds - for the purpose of
drawing event cards.
Example: During the first round (3), each player can have a
maximum of 3 hoplites or galleys in any territory (a total
maximum of 6 units). This maximum increases to 4 units each
during the second (and 5 in the third/fourth) round, giving a
total maximum of 8 (or 10) units. After the first round, battles
can take place (minimum of 8 units necessary in a territory). In
the foreign markets, only shiploads of 3 wheat will be available
during the first round. Shiploads of 4 (wheat or silver) will become
available in the second, and those of 5 in the third round.
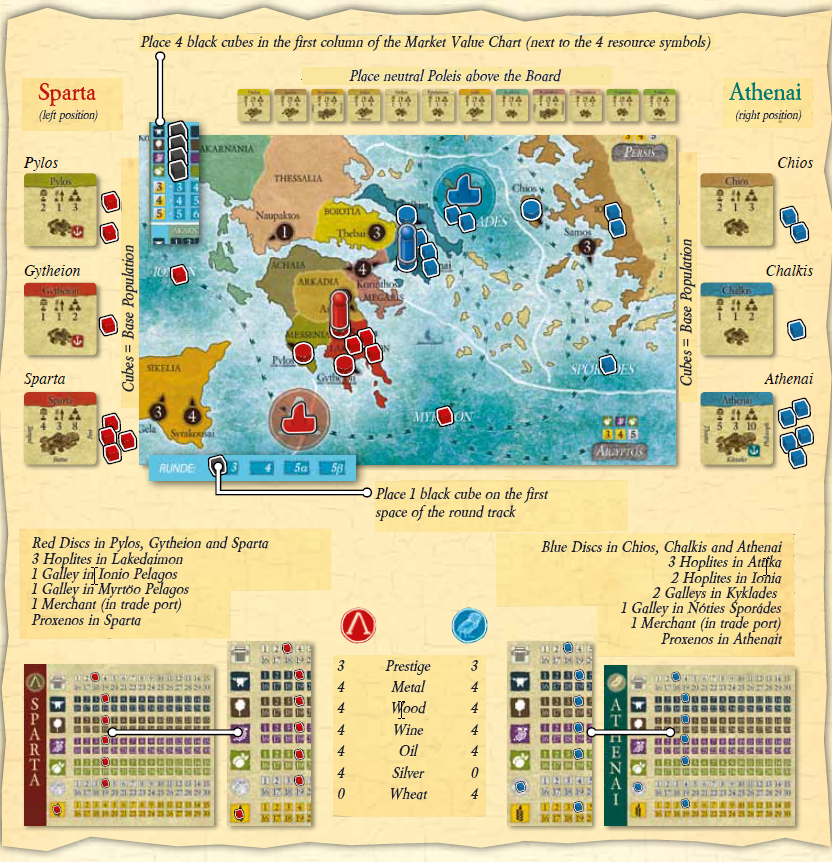
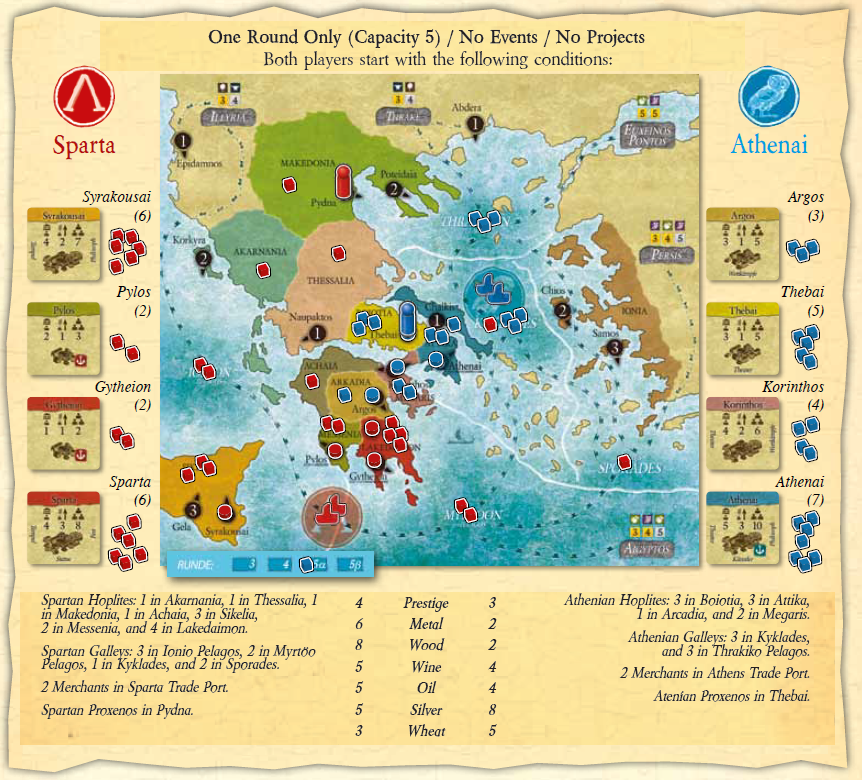
To begin the game, set up the play area as shown here.
Then shuffle the Project Tiles and place the stack face
down next to the game board. The 4 different Event Card
decks (see the back of the cards) are shuffled separately
and placed next to the board (also face down).
Draw 3 Project Tiles and put them, face up, onto the
corresponding spaces on the game board. Afterwards, draw an
Event Card of the first round (3) and place it between the
two players. These actions are repeated at the beginning of
every consecutive round.
The player with more Prestige (in case of a tie the
Athenian player) now reads out the Event Card, and applies
all effects relating to himself. His opponent then does the
same. For the sake of distinction, effects that only apply to
the Athenian player have a blue background, while those
only applying to the Spartan player have a red background.
Additionally, some cards will have effects that will need to
be applied during or at the end of the round. Both players
must take care these effects are not forgotten.
Events which do not require a player decision are applied automatically on yucata.
In the move history they may appear below the opponent's moves.
They are displayed with colored background, which makes it possible to relate them to the correct player.
After applying the Event Card, the player with less Prestige
begins with his turn (in case of a tie, the Spartan player).
He can now perform two of the 12 actions available, but
cannot perform the same action twice. Then, he must
check whether battles occur in any territory. If so, they are
resolved in the order chosen by the active player.
Afterwards, the other player takes his turn (performing
two actions), and so on.
The actions can be chosen in the view below the player board.
The currently active action is marked green.
Actions already performed in the same round are marked yellow.
After choosing an action, the move history view gives a preview of the steps to do in green color.
During the action these steps lose their green marking and show the details of the player's decisions.
Instead of choosing an action a player can always "Pass".
If choosing a military action and/or if the opponent has already passed, the player must first choose the resources to pay the action.
A game round has no fixed number of turns - it ends when
both players have passed. Turns are performed alternately,
until one player decides to pass on one or both of his
actions. His opponent may then perform as many actions
as he wants (even the same action multiple times) until he
also decides to pass. However, each of these actions will
cost an additional resource from the player’s stock (metal,
wood, wine, oil, silver or wheat), which must be paid
before the action is carried out.
It is also important to note that all components of the
game are limited. If a player runs out of cubes or ships, he
cannot perform any action that would require additional
material, until this situation changes.
The following pages explain the 12 different actions
(Development, Military and Political Actions) a player can
choose from during his turn. Keep in mind that the two
actions a player performs in a regular turn must always be
different!
This action can only be performed in a single polis during
the player’s turn. For each hoplite he wants to recruit, the
player must pay 1 metal (or 1 silver) for their equipment.
He then takes one Population Cube from the polis tile and
places it in the surrounding land territory. Hoplites can
only be placed in a territory as long as the maximum of
hoplites in that territory (depending on the round: 3, 4 or
5) has not been reached. Additionally, the last Population
Cube of a polis can never be used to create hoplites!
The number of units in different territories is likely to increase
during the game (for logistical reasons, or in order
to establish a blockade).
The poleis of Epidamnos and Abdera are not situated in
any regular territory (the colour of the surrounding area
and of the Polis Tile is neutral). In these poleis, hoplites
can neither be produced nor can hoplites be moved into
the surrounding area.
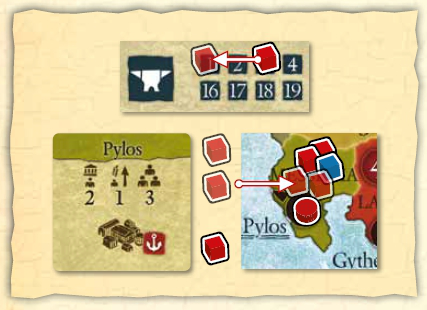
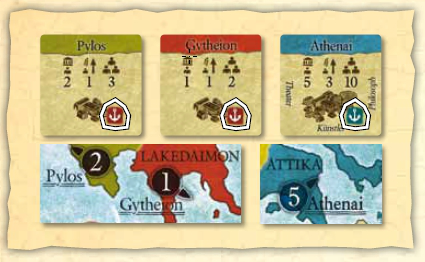
Example: The following image shows that Pylos (a polis owned
by the Spartan player) has reached its Population Maximum of
3. He decides to create hoplites in the polis, and since it is the
first round of the game he can only place two more units in
Messenia (maximum of 3 units per territory). Paying 2 metal,
he takes 2 Population Cubes from Pylos and places them in
Messenia.
This Action consists of the following steps:
- Select polis: Green pins mark the selectable poleis. After selection the chosen polis stays marked with a yellow pin.
- Pay metal (or silver): By selecting metal or silver a hoplite is automatically created in the surrounding land territory.
- The action ends automatically as soon as no more hoplites can be created. Alternatively the player can select "Finish Action" after having created at least one hoplite.
This action can only be performed in a single polis during
the player’s turn. For each galley he wants to build in his
wharf, the player has to pay 1 wood (or 1 silver) for the
hull of the ship. He then takes one Population Cube from
the polis and places it in the sea territory where the arrow
next to the polis on the board is pointing. Galleys can only
be placed in a territory as long as the maximum of galleys
in that territory (depending on the round: 3, 4 or 5) has
not been reached. Additionally, the last Population Cube
of a polis can never be used to create galleys!
With the exception of Sparta and Thebai (poleis without a
harbour - they do not have an arrow on the board),
galleys can be built in every polis. Korinthos, on the other
hand, has two arrows on the board. For each galley built
there the player can choose which of the two sea territories
he wants to put it in.
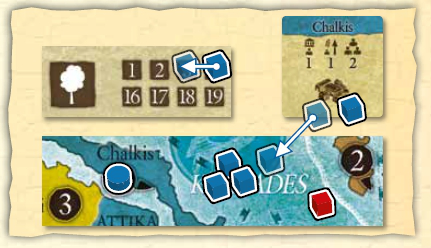
Example: The polis of Chalkis is owned by the Athenian player,
and has a Population of 2 (its maximum).
It is the second round, and the player wants to build a galley.
He pays 1 wood, takes 1 Population Cube and places the cube
in the Kyklades sea territory (where the maximum of 4 units is
then reached).
This Action consists of the following steps:
- Select polis: Green pins mark the selectable poleis. After selection the chosen polis stays marked with a yellow pin. In the case of Korinthos the player can additionally choose between the two possible sea territories (again: yellow pin = selected territory, green pin = selectable territory).
- Pay wood (or silver): By selecting wood or silver a galley is automatically created in the corresponding sea territory.
- The action ends automatically as soon as no more galleys can be created. Alternatively the player can select "Finish Action" after having created at least one galley.
This action can only be performed in the three Commercial
Cities, identified by the anchor symbol on the Polis Tile.
Additionally, only the player to whom the polis is loyal
(matching symbol colour) may build merchants there: the
Spartan player in Gytheion and Pylos, and the Athenian
player in Athens. Even if the opponent seizes the polis, he
can never build a merchant there.
For each merchant a player wants to build, the player has
to pay 1 wood (or 1 silver) for the hull of the ship. He
then removes one Population Cube and places a merchant
ship in his Trade Port. The Spartan Trade Port (red area)
is situated between Ionio Pelagos and Myrtöo Pelagos,
and the location of the Athenian Trade Port (blue area) is
in the Kyklades territory. For the creation of merchants the
last Population Cube of a polis can also never be used.
This Action consists of the following steps:
- Select polis: Green pins mark the selectable poleis. After selection the chosen polis stays marked with a yellow pin.
- Pay wood (or silver): By selecting wood or silver a merchant is automatically created in the trade port.
- The action ends automatically as soon as no more merchants can be created. Alternatively the player can select "Finish Action" after having created at least one merchant.
Projects may be undertaken in roughly two thirds of all
poleis. The project types available for a poleis are indicated
on the edges of the corresponding Polis Tile. In Abdera,
for example, statues can be erected, while Samos can organise
festivals. Each polis can only work on one project at a time
until it is completed.
In order to start a project in a poleis, a player must pay
the resources depicted on the lower left part of the Project
Tile. Each type of resource can also be completely
substituted by an equal amount of silver. When the cost is
paid, the player takes the tile and places it on top of the
polis tile (turned so that the relevant project type can be
read at the bottom edge). It is now no longer available for
the opponent. However, if the opponent manages to seize
a polis (e.g. due to a successful siege), he also seizes all of
its projects.
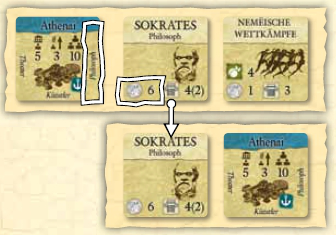
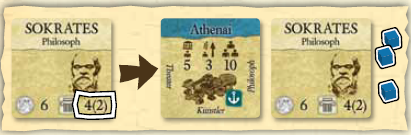
Example: The Athenian player decides to
begin a project in Athenai. Two projects
are still available this round, but only the
philosopher Socrates can be hired by the
polis!
He pays the cost of the project (6 silver,
in this case), takes the Project Tile, and
places it on the already turned polis tile
(see image).
This Action consists of the following steps:
- Select project: The available projects are displayed in bigger size below the game board.
- Select polis: Green pins mark the selectable poleis. After selection the chosen polis stays marked with a yellow pin.
- Pay resources: When selecting silver, all of the remaining cost is paid. Due to that you should first choose all other resources and finish your payment with silver.
- The action ends automatically as soon as the project has been paid.
Every project that is begun in a polis will be completed at
the end of the round. The player who then controls the polis
will get the amount of Prestige depicted in the lower right
of the Project Tile (those not in brackets). The number in
brackets is Prestige for Posterity and will be awarded only at
the end of the game.
Following the example above, when the polis
of Athenai completes its project, Socrates
will award an immediate 4 Prestige at the
end of the round and another 2 Prestige for
Posterity at the end of the game.
Whenever a polis changes its owner, the player seizing it
also takes all corresponding projects regardless of whether
or not they have already been completed. If a polis
becomes neutral again (due to a siege or insufficient food
supply), it retains all its projects even if seized again later
in the game.
There are 14 unique Project Tiles, 3 of which are available
each round. Therefore, 2 of the 14 tiles will not be used in
a game. It might be possible that this time Socrates decides to
study butterflies rather than focus on philosophy.
The 14 projects are divided into 7 different types (displayed
in the middle of the tile):
-
Philosophers (3x): These tiles each have a cost in silver in
the lower left corner which must be paid in order to for
the philosopher in question to be hired. Syrakousai and
Athenai can employ philosophers.
-
Artist (1x): Phidias will create beautiful sculptures and
design marvelous buildings if he is sufficiently paid in
silver (similar to a philosopher). He can only be hired in
Athenai, but the Athenian player has to take into account
that the Prestige he provides at the end of the round
depends on the size of the city. The amount of Prestige is
equal to half the current Population of the polis (rounded
up).
-
Temples (2x): These impressive buildings are quite
expensive due to the inordinate amount of wood and
metal that are needed to create them, as well as the wages
that have to be paid to the workers. However, they also
award a substantial amount of Prestige to any player who
constructs them in Syrakousai or Sparta.
-
Theatres (2x): More affordable, but also less prestigious,
these buildings are erected in the nearby hills of a polis.
They can be built in Korinthos, Athenai or Thebai.
-
Statues (2x): As the sculptors only need a bit of wood, and
maybe some metal for the scaffolding, these are the easiest
and cheapest projects. On the other hand, the Prestige
awarded is equally low. Statues can be erected in Abdera,
Gela, Epidamnos, and Sparta.
-
Festivals (2x): During these celebrations in honour of the
gods, inordinate amounts of wine are usually consumed
(and must be paid for). They can be organised in Sparta,
Poteidaia and Samos.
-
Games (2x): Apart from the Olympic Games, other minor
games took place in several different poleis in Greece. The
winners were bestowed with oil, and sometimes even with
wine or silver. Games can be hosted in Pydna, Argos or
Korinthos.

Every Military Action always
costs 1 Prestige Point.
Using this action, a player can move a number of hoplites
depending on the destination territory of the movement.
Neither the distance (number of territories crossed) nor
the route taken is important by itself, but a few rules have
to be followed:
- Hoplites that are moved can start in different territories,
but all units moved must end their movement in the same
territory. Therefore, the capacity of the destination territory
defines how many hoplites can be moved there. It is not
allowed to move hoplites to more than one destination
with one action.
- Hoplites can cross either land territories or sea territories,
but a combination of both is not possible!
- A hoplite moved through one or more sea territories
always has to begin by moving to a sea territory adjacent to
the starting land territory. Also, the movement has to end
by moving from a sea territory to a land territory directly
adjacent to it. It is, for example, not possible to start movement
of a hoplite in Makedonia, then move through Thrakiko Pelagos
and Kyklades, land in Attika, and then move to Megaris.
In this case, the destination has to be Attika. However, it is not
necessary for the moving player to have merchants or galleys in
any sea territory crossed.
- Hoplites can never cross a territory (land or sea) that is
controlled by the opponent. A territory is controlled if it
contains more units from one player than from his
opponent (e.g., 3 Athenian hoplites but only 1 Spartan hoplite).
It is, however, allowed to start or end the movement of a
hoplite in territories controlled by the opponent.
- Hoplites can never move through land territories whose
capacity (of the current round) has already been reached.
For example, a hoplite could (in the fourth round) not move
from Megaris through Thessalia to Makedonia if the player
already had 5 units in Thessalia. The number of a player’s
own galleys in sea territories, however, is inconsequential
for moving hoplites through it.
- Hoplites are never moved as groups, but always one
after the other! It is vital to carefully consider the order in
which hoplites are moved. By moving hoplites away from
a territory, the opponent could gain control over it, thereby
blocking all further movement through the territory.
- A player who owns the polis of Korinthos has the
option of moving hoplites directly from Kyklades to Ionio
Pelagos - or vice versa. In doing so, he moves through
the isthmus by using the diolkos (a paved track-way which
allowed ships to be transported over land).
- Areas not distinguished by background colour (around
Epidamnos and Abdera, as well as the Persian market)
may never be entered by hoplites. Additionally, Sikelia and
Ionia can only be reached by movement via sea territories.
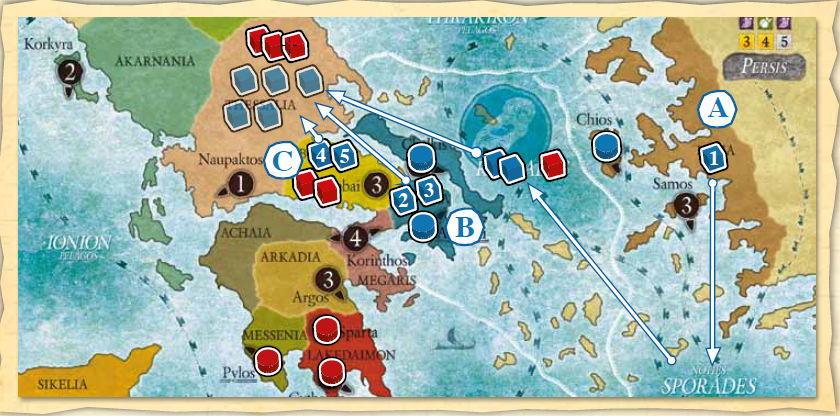
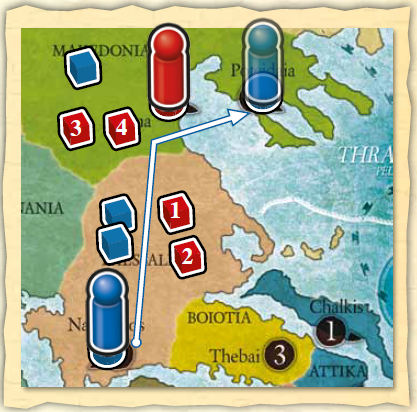
Example: The image showing the
movement of 5 hoplites during one of the last two rounds is a
perfect example of why it is important to carefully consider the
order in which hoplites are moved. Since the destination territory
has to be the same for all hoplites, the Athenian player chooses
Thessalia, where he does not have any hoplites yet. The units he
wants to move are located in three different starting territories.
A) He begins by moving the hoplite in Ionia (1). He first has to
cross Nóties Sporades, which is possible since it is not controlled
by anyone. The hoplite is then moved through Kyklades (controlled
by the Athenian player himself) and disembarks in Thessalia.
B) Two other hoplites (2 and 3) are then moved from Attika via
Boiotia (not controlled by anyone) to Thessalia, one after the
other.
C) Finally, the last two hoplites (4 and 5) are moved from
Boiotia to the directly adjacent Thessalia. After the first of these
two hoplites has left Boiotia, the Spartan player gains control
over the territory. However, hoplite 5 can still be moved since he
starts his movement in the territory, and does not cross it.
It is irrelevant at which point hoplite 1 would have been moved.
However, had the Athenian player chosen to move even one of
the hoplites 4 or 5 before he moved hoplites 2 and 3, he would
have had to look for another way to get them to Thessalia (e.g.
via Kyklades).
This Action consists of the following steps:
- Select destination territory: First the land territory (green pins) must be chosen, where all following selected hoplites will move to. This territory stays marked during the action with a yellow pin.
- Select starting territories: For each selection of a starting territory (green pins) a hoplite is moved from there to the destination territory (yellow pin). Only those starting territories can be selected from where a valid route to the destination territory exists. The exact route is irrelevant and must not be specified by the player.
- The action ends automatically as soon as no more hoplites can be moved to the destination territory. Alternatively the player can select "Finish Action" after having moved at least one hoplite.
Movement of galleys follows the same principles as movement
of hoplites. The number of galleys that can be moved is
determined by the capacity of the destination territory (3, 4
or 5, depending on the current round); galleys can start in
different territories; they have to be moved one after the
other; and territories which have reached the capacity of
the current round cannot be crossed!
It is also not allowed to cross territories controlled by the
opponent, but it is possible to start or end movement in
such territories.
A player controlling the polis of Korinthos is allowed to
move galleys directly from Kyklades to Ionio Pelagos (and
vice versa). The only difference is, of course, that galleys
can move only on the 5 different sea territories!
This Action consists of the following steps:
- Select destination territory: First the sea territory (green pins) must be chosen, where all following selected galleys will move to. This territory stays marked during the action with a yellow pin.
- Select starting territories: For each selection of a starting territory (green pins) a galley is moved from there to the destination territory (yellow pin). Only those starting territories can be selected from where a valid route to the destination territory exists. The exact route is irrelevant and must not be specified by the player.
- The action ends automatically as soon as no more galleys can be moved to the destination territory. Alternatively the player can select "Finish Action" after having moved at least one galley.
This action can only be chosen if the player already has
enough of his own hoplites in the territory in which the
polis is located.
In order to besiege a polis (neutral or owned by the
opponent) the active player must control the territory in
which the polis is located (have more hoplites than
opponent), and the number of hoplites in the territory
must be at least equal to the Fortification of the polis (the
current Population is irrelevant). The Fortification value
of a polis is written on both the game board, as well as
on the Polis Tile.
One consequence of this rule is that the poleis of
Korinthos and Syrakousai cannot be besieged during the
first round, as it is not possible to move enough hoplites
into their territories. Also, Epidamnos and Abdera may
never be besieged, as there is no surrounding territory to
which hoplites could be moved. Finally, the capitals of
both players, Athenai and Sparta, may not be sieged at
any time!
If all conditions are met, the player rolls the four-sided die. If
the result is equal to, or higher than, the Fortification of
the polis, the siege was successful. This also means that a
Fortification of 1 does not necessitate a roll of the die.
If the siege is not successful (the result was lower than the
Fortification), the besieging player loses one of
his besieging units. And if the besieged polis is owned
by the opponent, he now loses 1 of the polis’ Population
Cubes. A polis which loses its last remaining Population
Cube in this manner will revolt against their ruler. As a
result, the polis will become neutral (i.e., it is taken from
the player, including all projects, and placed next to the
other neutral poleis). Poleis which are neutral do not face any
consequences of an unsuccessful siege.
An unsuccessful siege can be repeated in subsequent turns
(once per turn) if the player still fulfils all necessary
conditions.
If the siege is successful, the player takes control of the Polis
Tile (with all of its projects, completed or not). He is then
awarded an amount of Prestige equal to the Fortification
of the polis he seized. If the opponent’s Proxenos was
present in the polis, he is taken captive (is removed from
the board), but can later be redeemed by the opponent.
The player who seized the polis then takes a number of
his cubes and places them next to the Polis Tile as its
Population. If the polis had been neutral, the number of
cubes is equal to the polis’ Base Population.
If the polis is taken from his opponent, he replaces his
opponent’s Population Cubes with an equal amount
of his own. These cubes are not taken from the hoplites
in the territory (they stay on the board).
Finally, the player takes one of his wooden discs and places
it on the polis location on the game board (replacing
the disc of his opponent, if necessary).
Example 1: The Athenian player wants to seize control of the
neutral polis of Naupaktos in the first round of the game (capacity
of 3). Two Spartan hoplites are already in Thessalia and he
decides to move three of his own hoplites to the territory (he has
to control it). Movement costs 1 Prestige, and for another point
he besieges the polis, which is automatically successful due to its
Fortification of 1. The Athenian player now takes the Naupaktos
tile and gains 1 Prestige (= Fortification value).
Example 2: Let us assume that the Athenian player wants to
besiege the neutral Polis of Thebai during the second round
(capacity of 4). There are no Spartan hoplites in Boiotia and the
Fortification of the polis is 3. The player now moves three of his
hoplites (minimum necessary) into the territory (-1 Prestige) and
besieges the polis (again -1 Prestige). However, the result is too
low (2) and the siege is unsuccessful. He therefore loses one of
his hoplites in Boiotia.
During his next turn, the Athenian player decides to move 2 more
hoplites to Boiotia, in order to try besieging the polis once again
(another -2 Prestige). This time he is in luck - the die shows a 3.
He takes the Polis Tile and receives 3 Prestige (= Fortification
value). However, had he successfully besieged the polis during
his first try, or had he moved a total of 4 hoplites to Boiotia in
his previous turn, the difference between Prestige won (+3) and
Prestige lost (-2 or -3, depending on the die roll) would have
been more favourable (either +1, or at least 0)!
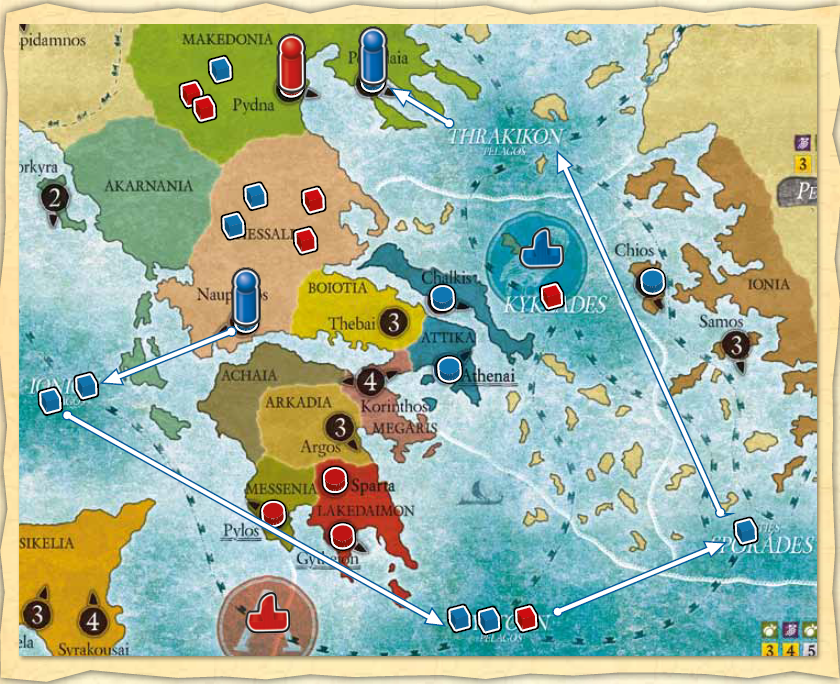
Example 3: During the last round (capacity of 5) the Spartan
player wants to take the polis of Thebai from his opponent. The
polis (Fortification 3) has a current population of 2 (which is
not important at the beginning of the siege), and there are also
2 Athenian hoplites in Boiotia (see image below). He decides to
move 4 hoplites into the territory and besieges the polis, costing
him 2 prestige points in total. The die is rolled and shows a 4 -
the siege is successful. The Spartan player takes the Polis Tile
from his opponent (including all projects) and replaces the two
Population Cubes with two of his own. He also receives 3
Prestige.
Had the siege been unsuccessful, the Spartan player would have
lost one hoplite and the Athenian player would have lost one
Population Cube. During his next turn, the Spartan player could
have besieged the polis again - he still would have had enough
hoplites in the territory, and still would have controlled it (if the
Athenian player would not have moved more units to Boiotia).
However, regardless of whether the siege would have been
successful or not in this subsequent turn, the Athenian player
would inevitably have lost his polis (due to another Population
loss of 1, which would result in the polis becoming neutral).
This Action consists of the following steps:
- Select polis: Green pins mark the selectable poleis. After selection the chosen polis stays marked with a yellow pin.
- Roll Die: The step cannot be undone. The consequences of Success or Failure are automatically handled.
- The action ends automatically with the "Roll".
A player who owns at least one polis in a territory in which
he also has hoplites can demand that the peasants provide
him with some of the resources produced there. The resources
produced in the different territories are shown in
the corresponding Tribute Box. A resource is produced in
a territory, if there is at least one numbered space next to
the resource symbol.
To collect tribute, a player takes any number of his
hoplites from the specified territory and places them onto
the numbered spaces in the corresponding Tribute Box.
He can choose into which (and how many) rows he wants
to place the cubes, but they always have to be placed consecutively,
from left to right. How many of the different
resources the player now collects, depends on the number
of the leftmost occupied space in each row. For example, if
he sent 1/2/3/4/5 hoplites to collect wine in Sikelia, he could
collect 1/3/6/10 or 15 wine.
If any player collects tribute in his home region (Attika for
the Athenian player and Lakedaimon for the Spartan player),
he does not have to pay Prestige to perform the action.
The peasants will gladly provide him with the needed
resources. To remind the players of this exception, both
tribute boxes have a darker background colour. However,
this exception does not take effect if the opposing player
collects tribute in this territory!
After the resources have been collected, all hoplites are
returned to the territory they came from. The player then
places one of his wooden discs in the Tribute Box used,
to signify that no further tribute can be demanded in this
territory for the remainder of the round.
The territory of Achaia does not have a polis. Therefore,
any player who has hoplites in the territory, and is the first
to do so during this round, can collect tribute there!
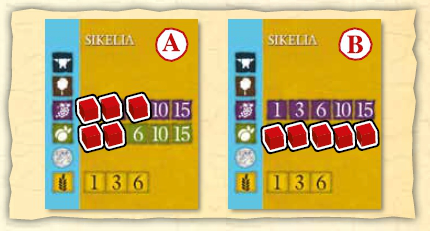
Example: Up to 15 wine or oil and up to 6 wheat can be collected in
Sikelia (see image above). The Spartan player decides to collect
tribute in Sikelia during the third round (capacity of 5). He uses
three of his 5 hoplites to take 6 wine, and the two others to get
3 oil (A). Alternatively, he could also have taken 15 oil, had he
used all 5 hoplites to do so (B).
This Action consists of the following steps:
- Select territory: Green pins mark the selectable territories. After selecting the chosen territory stays marked with a yellow pin. A player's home region can be selected without paying prestige before.
- Select resources: The tribute box corresponding to the territory is displayed in larger size below the game board.
- The action ends automatically as soon as all hoplites of the territory have been placed on the numbered spaces.
Silver and wheat are the two most valuable resources in the
game, but also the scarcest. The different territories do not
produce enough and only by trading can players ensure
sufficient supplies for their poleis.
In order to trade with one of the five Foreign Markets (Euxeinos
Pontos, Persis, Illyria, Thraki, and Aigyptos), a player needs
a free trade route from his Trade Port to the chosen market
space. A trade route is free if none of the sea territories are
controlled (and therefore blocked) by the opponent’s galleys!
The first sea territory the Athenian player has to cross is
always Kyklades. The Spartan player, on the other hand, can
always decide if his trade route starts in Ionio Pelagos or
Myrtöo Pelagos due to his Trade Port being situated between
both areas. If these territories (Kyklades, or both Ionio and
Myrtöo Pelagos) are blocked by the opponent, the player is
cut off from maritime trade as long as his merchants cannot
leave his Trade Port. Additionally, the Spartan player has to
be careful not to lose both of his commercial cities (Pylos
and Gytheion), or he would be unable to trade at all!
Merchants usually move along the trade routes (the dashed
lines), but a player controlling Korinthos is, once again,
allowed to directly move his merchants from Kyklades to
Ionio Pelagos, and vice versa.
The shiploads a Foreign Market has to offer, and which goods
they demand in trade, is depicted in columns in the different
Foreign Market areas. Every column shows the goods that
are offered (wheat or silver, determined by the colour of the
lower space), the size of the shipload (the number in the
lower space), and the goods that are in demand (depicted by
the symbol in the upper space - metal, wood, wine or oil).
However, a player can always decide to purchase a shipload
of wheat instead of exchanging it for the goods in demand.
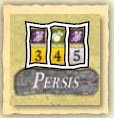
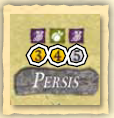
The Persian market offers three different
trades - 3 wheat in exchange for wine,
4 wheat in exchange for oil, or 5 silver
in exchange for wine.
To conduct a trade (only one is allowed per action), a
player moves one of his merchants along the lines of a
free trade route from his Trade Port directly to the chosen
Foreign Market (moving it only part of the way is not
allowed). He then places his merchant on any space that is
still free and available in the current round. Shiploads of 4
goods are only available from the second round on, and
those of 5 goods only in the last two rounds.
During the first round (3), the Persian
market only offers the left shipload. The
middle shipload will be available from
the second round on, and the right
shipload from the third round on.
Any shipload available in the current round and not yet
occupied by another merchant can be chosen by a player
(they do not have to be occupied left to right). However,
it is not possible to block a shipment in order to deny it to
the opposing player. A player choosing the Trade Action
has to be able to trade at the chosen market, and has to
trade!
If a player wants to procure an available shipload of wheat,
he can decide whether to exchange it for goods, or to
purchase it with silver. A shipload of silver, however, may
never be purchased! The amount of goods that have to be
exchanged for a shipload depends on the market value of
the goods in demand, which are shown on the Market
Value Chart on the game board. The intersection space of
the appropriate column (in which the marker of the appropriate
resource is located) and row (corresponding to the
size of the shipload) shows the number of goods that
have to be delivered in order to procure the shipload.
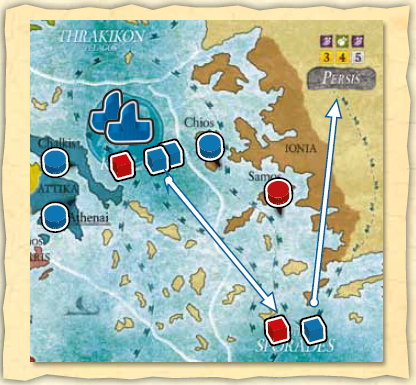
Example: During the second round the Athenian player decides
to exchange some of his oil for a shipload of 4 wheat in
Persia. The space is still free, available in this round, and the
trade routes are free. Neither Kyklades nor Nóties Sporádes
are controlled (i.e., blocked) by the Spartan player (see image
below).
The player now places his merchant on
the middle shipload space and determines
how much oil he has to deliver (since the
player is exchanging goods, as opposed
to purchasing the shipload).
Due to limited space, the used shipload space is marked in the player's color instead of placing the merchant on it.
Consulting the Market Value Chart, he now looks at the
column in which the oil marker is located and the row of the
corresponding shipment size (4). The intersection space tells him
that he has to deliver 5 oil in order to procure his shipment of
4 wheat.
After exchanging goods (for either wheat or silver) the
market value of the delivered goods decreases as the demand
has been met. The player now has to throw the four-sided
die and then moves the corresponding marker the rolled
number of steps to the right (or as many as possible).
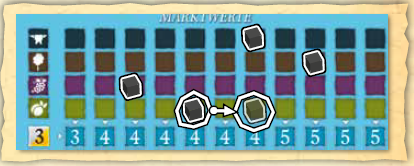
Following the example above, the Athenian player now rolls a
2 on the die. He then moves the oil marker two spaces to the
right.
Instead of exchanging goods for a shipload of wheat a
player can always purchase it with silver. The cost of a
shipload is equal to the size of the shipload (1:1). Market
values are irrelevant for such a transaction. In the example
above the Athenian player would have had to pay 4 silver to
purchase his shipload of 4 wheat.
If the player has purchased wheat (instead of trading for
it), the market value of the goods originally demanded in
the trade rises due to the still existing demand. The player
has to throw the die twice and moves the corresponding
marker a number of steps to the left, equal to the higher
of both die results (or at least as many as possible).
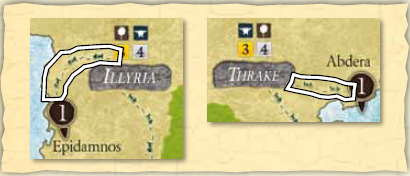
Epidamnos and Abdera both have a special overland trade
route to a Foreign Market (Illyria or Thraki). A player
who controls one of these poleis can always trade with the
connected Foreign Market as long as he also controls a
commercial city. No other free trade routes are required,
and even a blockade of the Trade Port is irrelevant - he
simply takes one of his merchants from the Trade Port and
places it on a chosen shipload.
However, if the Spartan player loses both Gytheion and
Pylos, he also cannot use these overland trade routes.
A merchant will always remain on the shipload space until
the end of the current round. He blocks the space for the
rest of the round - the shipload is not available any more.
This Action consists of the following steps:
- Select market: The desired shipload space must be selected on the game board.
- Give resources: For a trade the demanded resource must be given in sufficient quantity. Alternatively silver can be paid, to purchase wheat.
- Roll die: This step cannot be undone. The change of market values will then be automatically handled.
- The action ends automatically with the "Roll".
In ancient Greece, the Proxenos was a diplomat who served
as a sort of ambassador. Important poleis would appoint
famous citizens to this office in order to gain influence in
other cities, and would provide them with all means
necessary to accomplish their task.
In the game, the Proxenos is represented by the player’s
pawn, which moves directly from one polis to another. He
moves similar to a hoplite, either via land or sea territories,
but is not detained by blockades.
To move the Proxenos, he is first placed in the land territory
surrounding the polis he started in, or in the corresponding
sea territory. He is then moved from territory to territory,
until he ends his movement in the polis of a land territory.
Like a hoplite, however, he can only move through either
sea territories (ending his movement in the polis of the
land territory he disembarks in) or land territories. He is
also entitled to use the diolkos if his player controls the
polis of Korinthos.
The two poleis of Epidamnos and Abdera do not have any
surrounding or connected land territories. Therefore, they
can only be entered by movement via sea territories, and
only by the Proxenos.
On the other hand, Thebai and Sparta do not have
harbours (no arrows) and can therefore be entered only
by movement through land territories.
As has been mentioned, the Proxenos cannot be stopped
by blockades. However, he has to bribe every enemy unit
in every territory he crosses by paying 1 silver. The opposing
player does not get the silver paid in this way - the
bribed units keep it for themselves.
It is important to ensure the Proxenos is always adequately
secured, and to keep an eye out for possible threats. Should
he be present in a polis that is besieged, he risks being
captured. He then would have to be redeemed before he
can once again be put to use. Additionally, the most direct
or obvious way to move a Proxenos to a polis is not always
the best (i.e. cheapest) way.
Example: The Athenian player wants to move his Proxenos
from Naupaktos to Poteidaia. The most obvious way would be
to move through Thessalia and Makedonia (see image), which
would cost the Athenian player 4 silver in bribes. However, he
suddenly realizes that, by moving through sea territories, he only
has to pay 1 silver in bribes - to a galley in Myrtöo Pelagos (see
next image).
This Action consists of the following steps:
- Select territories/destination polis: Beginning in his starting polis, the Proxenos must be moved from territory to territory, until he reaches the desired destination polis. Unlike moving hoplites or galleys, the player must specify the exact route.
- The action ends automatically as soon as the Proxenos has reached the destination polis.
Each player only has one Proxenos, and if he is captured
he has to be redeemed first, in order to be used again. To
do so, a player has to pay a ransom of 2 silver to his
opponent. The Proxenos is then returned to the player’s
capital (Athens or Sparta), and can immediately be used
again.
This Action consists of the following steps:
- Pay ransom: The player must give silver.
- The action ends automatically after paying the ransom.
If the Proxenos is in a neutral polis, or one controlled by
the opponent, he can instigate a civil war (which was
called stasis in ancient Greece). In order to create strife, he
has to bribe several citizens of the polis.
The amount of silver necessary to cause political unrest
depends on the polis itself - whether it is neutral or
controlled by the opponent:
• If the polis is neutral, the player has to pay an
amount of silver equal to twice its Base Population.
• If the opposing player controls the polis, the amount of
silver needed instead equals three times its current Population.
The silver is never paid to the opponent!
A civil war will always result in the polis changing sides. The
player whose Proxenos instigated the unrest will receive the Polis
Tile (including projects), and places his own Population Cubes
(number of Base Population if the Polis was neutral; number of
current Population if it was controlled by the opponent) next to
it. He then takes one of his discs and places it on the polis’
location on the board (replacing the disc of his opponent, if
necessary). Finally, the player will receive Prestige equal to the
Population bribed (not the silver paid).
It is not possible to instigate a civil war in the capital of the
opponent!
This Action consists of the following steps:
- Bribe: The player must give silver.
- The action ends automatically after bribing.
After his turn, a player must check to see if battles occur.
A battle will take place automatically if a territory (land or
sea) holds 8 or more units of both players.
Each battle consists of consecutive combat rounds in which
the Combat Cards are used. These are shuffled into a deck,
and both players receive as many cards for their starting
hands as they have units in the territory fought over. A
player with 5 Hoplites will therefore receive 5 cards.
In every combat round, one player is the attacker and the
other player is the defender. The attacker plays 2 of his
Combat Cards, and the defender tries to match these as
best he can with two of his own cards. Both card pairs are
compared and unit losses and Prestige gains are determined
(see below). If another combat round follows, the
defender of the previous round becomes the attacker, and
vice versa. In a battle on land, the Spartan player is always
the first attacker. In battles at sea, the first attacker is always
the Athenian player!
Each card shows a formation for land battles (Phalanx, Cavalry,
Archers, Peltasts) and sea battles (Elite Trireme, Trireme, Bireme,
Triacontor), or is a special card (Mercenaries, Salpinx Call).
Each formation also performs a manoeuvre (on land: Othismos,
Advance, Hold or Shooting; at sea: Diekplous, Periplous or
Kyklos; special: Hold or Ambush). Some manoeuvres
award Prestige (2 or 1) if successful, some do not, and the
Salpinx Call even costs 1 Prestige (numbers in the upper left
corner). The numbers in the upper right corner indicate the
quantity of a specific formation/manoeuvre combination in
the Combat Card deck. Each formation is paired with only
one, or two different, manoeuvres. The Phalanx can either
perform an Othismos (2 Prestige - this combination exists 3 times)
or an Advance (1 Prestige, 5 times).
On yucata the cards always show only the suitable formations, i.e. for sea battles only the sea formation and for land battles only the land formation.
When both attacker and defender have played their cards,
each pair of cards (one from attacker and defender) is
examined. First, both formations are compared, and then
the manoeuvres they perform. The following results are
possible:
1. If the defender was unable to play a card matching the
formation of the one played by the attacker, he loses 1 of
his units in the territory. Additionally, the attacker receives
the Prestige shown on his card.
2. If the defender managed to play a card with the same
formation, he does not lose a unit. The attacker only receives
Prestige if his card shows a higher (positive) number than
that of the defender. In this case he receives the difference
in points; otherwise he receives nothing.
All cards played are then discarded and both players draw
new cards from the Combat Card deck. The previous
attacker always draws 2 cards, but the defender draws one
card less for every loss he suffered. If he loses 1 unit, he
draws (2-1=) 1 card, and (2-2=) no cards if he loses two units.
On yucata the game flow is sped up as follows: First the defender draws new cards and can then directly play two of his cards for the next combat round. Then it's the opponent's turn. But he sees the played cards only after having drawn his own new cards.
Finally, both attacker and defender switch roles and the
battle continues with another round, until one of the following
conditions is met:
1. There are not enough cards left in the Combat Card deck
for both players.
2. One player decides to retreat and pays 1 Prestige for his
cowardice to his opponent. A retreat has to be declared
before (new) cards are drawn by the retreating player. It is
possible to retreat before the first round of battle.
3. Following a combat round, the defender has less than 2
units left in the territory fought over.
If one of these conditions is met, the battle immediately
ends - even if there are still 8 or more units in the territory
concerned. The earliest possibility for a repeated battle in
this territory will be after the opposing player’s turn - if
there are enough units present!
There are two special formation cards:
• Mercenaries: This single card acts as a joker. It can be played
by the defender against any card and counts as “matching
the formation” (with the exception of Salpinx Call). If it is
played by the attacker, it can be matched with any other
formation and will never create any casualties.
• Salpinx Call: This card can never be matched by the defender
and will always create casualties. However, the player of
this card will always have to pay a penalty of 1 Prestige for
using the card. If played by the defender, it does not create
casualties.
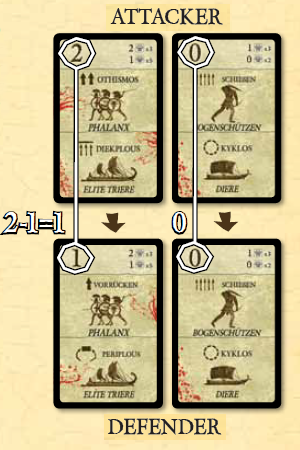
Example 1 (Land battle):
The attacker plays a Phalanx (Othismos) and Archers (Shooting) and
the defender reacts by playing matching formations (Phalanx and Archers).
He therefore suffers no casualties, but due to the Phalanx manoeuvre
of the attacker (Othismos) having a higher Prestige value than that of
the defender (Advance), he receives the difference of (2-1=) 1 Prestige.
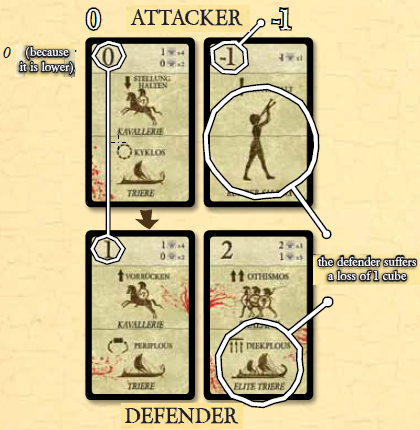
Example 2 (Sea battle):
The attacker plays a Trireme (Kyklos) and a Salpinx Call. The
defender matches the Trireme with his own (Periplous), and his second
card is an Elite Trireme (Diekplous). The Trireme does not create any
casualties, and the attacker receives no Prestige (due to his card’s value
being lower than that of the defender’s card). The Salpinx Call,
however, leads to a loss of 1 unit for the defender, but the attacker has
to pay 1 Prestige as a penalty.
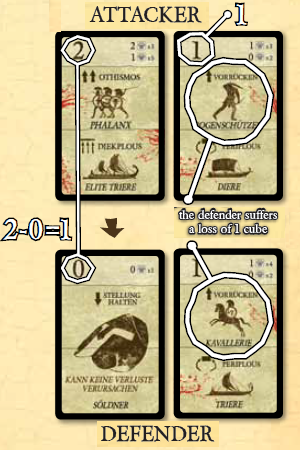
Example 3 (Land battle):
The attacker plays a Phalanx (Othismos) and Archers (Advance) card.
The defender matches the Phalanx with Mercenaries and suffers no
casualty there. However, the attacker receives (2-0=) 2 Prestige for his
manoeuvre. The defender cannot match the Archers, and plays a
Cavalry card instead. He therefore suffers a loss of 1 unit and the
attacker receives 1 additional Prestige.
After the second player has passed, the current
round ends. The players now have to perform the following
6 phases, one after the other, with the player who passed
first beginning each one.
All projects in all poleis (neutral or controlled by a player)
are completed. The Project Tile is placed under the Polis
Tile (aligned normally, see image). Projects finished in his
own poleis will award a player with the Prestige depicted
on them (not those in brackets, however). Prestige of
projects completed in neutral poleis is forfeit.
Using the example of Socrates, the Athenian player
will receive 4 Prestige upon completion of this project at the end
of the round. Afterwards he places the Project Tile under the
Polis Tile. The “Prestige for Posterity†(the 2 points in brackets)
he will receive at the end of the game.
In order to feed his polis league, a player has to pay an
amount of wheat equal to the total number of Population
Cubes in all of his poleis. If he cannot pay in full, he either
has to pay the difference in Prestige (1:1) or he has to
return whole poleis to neutrality (i.e. discarding Polis Tiles
with all their Project Tiles) until he can (or wants to) pay
the cost. Both aspects can also be combined if necessary
(or desired). However, it is not allowed for a player to
discard Population Cubes from his poleis until the cost can
be paid!
In this phase each player can choose to use his remaining
wheat to increase the Population in his poleis. By paying
one wheat a player can place a new Population Cube next
to one of his poleis. However, a polis can only receive as
many new Population Cubes as its Maximum Growth
(middle value on the Polis Tile) allows. This can be
repeated every round, but a polis can never have more
Population Cubes than its Maximum Population (right value
on the Polis Tile).
A player can increase the Population in any and all of his
poleis, as long as he has enough wheat and the Polis Tiles’
restrictions allow it.
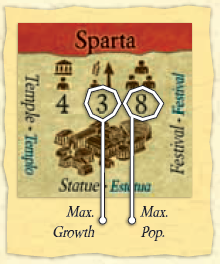
Sparta can grow by 3
Population Cubes each
round (costing 3 wheat, until
its Population Maximum
of 8 is reached).
Any well-managed polis that accommodates a considerable
number of citizens earns the admiration of the Greek
populace. In this phase, both players are rewarded with
1 Prestige for each of their poleis whose number of
Population Cubes exceeds the Base Population value.
If Sparta (see image above) has 5, 6, 7 or 8 Population Cubes,
the Spartan player receives 1 Prestige.
At the end of the fourth round the following two phases
(5 and 6) can be skipped, as they have no impact on the
outcome of the game. In this case, proceed to the End of
the Game section.
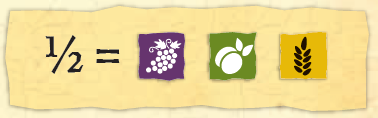
The difficulty to store perishable goods in the ancient
world is also reflected in the game. In this phase each
player loses half of their perishable goods (wine, oil and
wheat) in their storage (rounded up).
The rules are wrong here. On yucata wine, oil and wheat is reduced to half (rounding up). Source: BGG
The phoros was a tax that allied city-states paid periodically
to the polis protecting them. Each player can now decide
if he wants to lose Prestige in order to exact this tax. For
each Prestige point spent a player will receive 1 silver.
• The round track marker is moved one space to the left.
• All discs in the different Tribute Boxes are returned to
their owners.
• Every merchant is returned to its player’s Trade Port - even
if the Spartan player has lost both of his commercial cities.
• Project Tiles that are still on the game board (i.e., have not
been chosen) are removed from the game, and three new
Project Tiles are placed on the empty spaces.
• A new Event Card (corresponding to the following round)
is drawn and resolved, following the same rules as at the
beginning of the game.
• The player who now has less Prestige will begin the new
action round. In case of a draw, the Spartan player
always starts.
The game immediately ends when one of the following
conditions is met:
1. A player who cannot provide enough supplies even for the
capital (paid by wheat and Prestige) would have to discard
the polis and instantly loses the game. This is the only situation
in which a player actually “loses” Athens or Sparta.
2. If, at the end of the round (before the new event card is
resolved), a player has zero Prestige, he is ostracised and
loses the game immediately. Also, he is sentenced to put
the game away!
If none of these conditions apply, the game ends after the
4th phase (Megalopolis) of round 4 (5β). Both players
now tally up their victory points, calculated by adding:
• the sum of Population Cubes in all of their poleis
• their current Prestige
• the sum of all “Prestige for Posterity” (in brackets)
depicted on all projects in their poleis.
The player with the most victory points wins the game. If
there is a tie, the player with more resources (metal, wood,
wine, oil, silver and wheat) left in his storage is the winner.
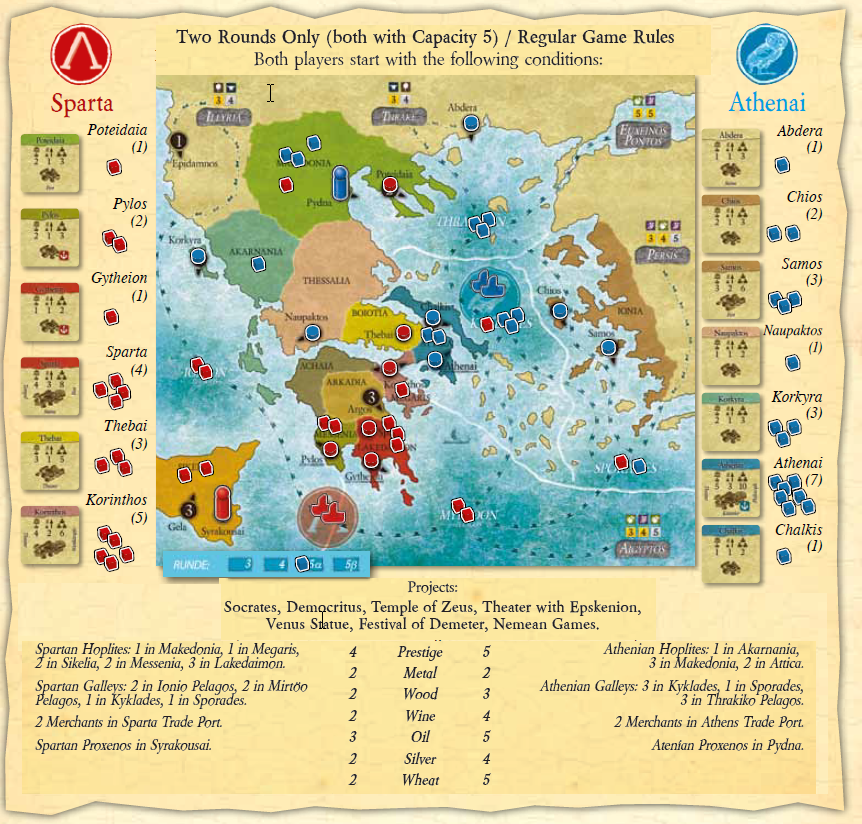
This scenario is designed to help players familiarize themselves with the combat system, the different actions (especially how
trading works) and the value of Prestige in Polis: Fight for the hegemony. The complicating aspects of events and projects are
excluded. On the other hand, the scenario could also be quite interesting for experienced players, as it emphasizes the militant
aspects of the game - movement, blockades, and battles. Only one game round is played (capacity of 5).
During the Peloponnesian Wars, Sparta had secured itself the
support of many Greek poleis as well as the support of the
Persian Empire. However, only Sparta received the glory, the
spoils of war, and the tributes from the defeated Delian League,
which led to discontent amongst its allies. To make things worse,
Sparta embarked on several new campaigns in the following
years (e.g., into the territories of Elis and Ionia) without
considering the interests of its allies. As a result, many of them
turned their back on the polis. And when Sparta attacked the
satrapy of Phrygia Hellespontine (a part of present-day Turkey),
ruled by Pharnabazus II, even the Persian Empire turned against
its former ally. A conflict with Sparta and its remaining ally
Syracuse was inevitable.
The first substantial clash occurred in 395 BC - the battle of
Haliartus. Boiotia had coaxed its ally Locris to attack the Spartan ally
Phocis and had also formed a new alliance with Athens. Corinth
and Argos later joined the alliance, which became known as the
Synhedrion of Corinth.
The Corinthian War lasted 8 years and ended with the Peace of
Antalcidas (287 BC). A treaty was arranged that guaranteed
independence to all Greek poleis under Spartan protection. However,
the peace treaty also reflected the interests of the Persian Empire,
which had (after initially supporting Athens) changed sides and
allied with Sparta, and was now afraid of Athenian retribution.
Thirteen years after the Thirty Years Peace treaty had been
signed at the end of the First Peloponnesian War, it was already
broken due to conflicts between Corinth and Athens, leading to
hostilities at Korkyra and Poteidaia. Sparta took the side of its
ally Corinth, which led to the start of the Second Peloponnesian
War. During the first part of this lengthy conflict, also called the
Archidamian War (after king Archidamus II of Sparta), Sparta
tried to block Athens with its land units. Athens was able to avoid
these due to naval supremacy, but at the same time it suffered
greatly under the plague that ravaged the polis and eventually
even claimed the life of its ruler and talented strategist Pericles.
A short time afterwards, Athens decided to go on the offence,
and after heavy losses on both sides, the Peace of Nikias was
agreed upon in 421 BC.
Once again, peace did not last very long. An Athenian campaign
into Sicily in 415 BC, under the pretence of supporting the polis
of Seliunte in its conflict with Syracuse, but with the actual goal
of establishing control over the whole island (and especially the
Spartan ally Syracuse), sparked hostilities. The campaign ended with
disastrous consequences for Athens and led to the Decelean War.
Sparta began blockading Athens, which was nevertheless able to
recuperate - partly due to the new fleet it had been building, and
which subsequently defeated Sparta in the battles of Kyzikos and
Arginusae. But then Athens made the grave mistake to execute
its two admirals, and Sparta was able to defeat the Athenian
fleet in the battle of Aegospotamos (405 BC) under leadership
of its general Lysander. This success, and the relentless siege of
Athens, then culminated in the final Spartan.
Yucata offers as well this additional scenario published by the author on BGG. However the proposed variants are not implemented.