|
|
|
|
| 2-4 players, 35-40 minutes, 14 years and older |
| Designer | Josh Wood |
| Illustrators | Jeremy Nguyen
Josh Wood |
| Published by | Skellig Games
Alderac Entertainment Group |
| Online since | 2023-02-18 |
| Developed by | Adrian Kügel (ak15) |
| Boardgamegeek | 298065 |
| Weight | 2,12/5 |
| Yucata.de owns a license for the online version of this game. A big "thank you" to the copyright owners (publisher and/or designer and illustrator) who make it possible to have this game for free online here! |
| Note: This online implementation uses slightly changed rules! |
|
|
|
|
If you are reading these rules for the first time, ignore the text along the right hand side. These rules serve as a summary to help you quickly familiarize yourself with the game.
Show
→ summary only
→ detailed version only
→ both summary and detailed version
→ Rules (PDF)

Santa Monica
In Santa Monica, you are trying to create the most appealing oceanfront in Southern California.
You can choose to create a calm, quiet beach focusing on nature, a bustling beach full of tourists,
or something in between to appeal to the locals. Each turn, you will draft a feature card from the
display to build up either your top-row beach or your bottom-row street. These feature cards will work
together with chains and adjacencies to gain you victory points
( ).
The player with the most points at the end of the game wins. ).
The player with the most points at the end of the game wins.
Game Components
78
Feature Cards
These represent the beach and
street locations that may be built
in the game.
4
Reference Cards
Cards given to each player to
remind them of rules.
6
Starting Feature Tiles
Each player will start with one of
these tiles in their city.
They are as large as two feature cards
on top of each other.
4
Sand Dollar Tiles
These double-sided tiles feature
different actions that players may
pay sand dollars to use during
the game.
3
30
Locals

These blue tokens
represent the local
residents of your city.
30
Tourists

These orange tokens
represent the visitors that
come to Santa Monica.
8
VIPs

These green tokens
represent Very Important
Persons who want to visit
certain types of locations.
Each player receives one
or two at the beginning
of the game, as noted on
their Starting Feature Tile.
28
Footprint Tokens

These cardboard tokens are used
to mark the places that your VIP
has visited.
25
Sand Dollars

These wooden tokens are earned
throughout the game and can be
spent to carry out the actions on
the Sand Dollar Tiles.
4
Sand Dollar Multipliers
These cardboard tokens can be
used if the Sand Dollar supply is
running low.
1
Food Truck Token

This token moves beneath the
display and provides bonuses for
choosing cards.
1
Foodie Token

This token moves beneath the
display and provides bonuses for
choosing cards.
1
Start Player Token
This cardboard token is a reminder
of which player started the game. It
stays with that player.
1
Scorepad
This is used at the end of the game
to help total each player’s points
and determine the winner.
1
Rulebook
Setup
Shuffle the Feature Cards to form a face-down deck,
and deal out 2 rows of 4 cards each face-up. These
back and front rows form the display of feature cards
that are available to take during the game. Place the
remaining deck above the back row of the display.
Randomly select and place 2 of the Sand Dollar Tiles
to the left of the display. These will be the 2
Sand Dollar Actions available in this game.
Randomly select 1 of the 3 Scoring Objective Tiles
and place it face-up to the right of the display. For
your first game, we recommend using the blue scoring
objective card.
Place the Locals, Tourists, Sand Dollars, Sand Dollar Multipliers,
and Footprint Tokens in piles somewhere
near the display so that all players can reach them.
The player who has most recently visited a beach
becomes the Starting Player. Give them the
Start Player Token.
The Yucata implementation determines the startplayer randomly.
Randomly draw Starting Feature Tiles equal to the
number of players and place them on the table. In
reverse player order (beginning with the last player in
the turn order and moving counter-clockwise), each
player chooses a starting feature tile.
Give each player their starting feature tile’s
Placement Bonuses, and a Reference Card if they
would like one.
The last player in the turn order places the
Food Truck Token under any of the 4 display columns
of their choice. The Foodie Token begins 2 spaces
(cards) away.
The starting player can now begin the game.
Game Overview
Players’ turns will consist of choosing and placing new feature cards for
their city, then taking placement actions to gain sand dollars, attract
new visitors, and move people around their city. All players will begin
the game with 3 common scoring goals, and a starting tile with 1 or 2
VIPs. The VIPs offer each player a unique scoring objective, and as you
move them around the city, they will drop footprint tokens that will grant
points at the end of the game. In addition, individual feature cards that
are selected by players will expand the range of possibilities for scoring
with activity rings for people to move to, points for adjacent and chained
location symbols, and more.
Turn Order
Play begins with the starting player, and moves clockwise around the
table. The game will continue until one player has placed 14 feature
cards in their city, which triggers the final round. On each player’s turn,
they will take actions in the following order:
-
Select and Place Feature Cards
-
Take Placement Actions
-
Refresh the Display
1. Select and Place Feature Cards
Select 1 (or 2 when using a certain sand dollar action) feature cards and
place them in your city.
To begin your turn, you will either select one feature card from the
display or use a sand dollar action to acquire cards in a different way.
However you acquired the cards, you will place them in your city.
A1. Select a Feature Card From the Display
The display has a front row and a back row. You must select one card
from the front row and place it in your city. The back row shows which
card will slide down and be added to the front row when you refresh
the display, but is not otherwise selectable. Selecting a feature card
may enable you to claim rewards from the foodie or the food truck. An
explanation of these rewards is here.
Or A2. Use a Sand Dollar Actionn
If you have Sand Dollars that you have gained on previous turns, you
may spend these to use a Sand Dollar Action. This is done instead of
normal selection, and may only be done once per turn. To activate a
sand dollar tile, (1) pay the sand dollar cost indicated on the tile, then
(2) follow the action that is written on the tile. If you use a sand dollar
action to take a card that the foodie or food truck is on, you do not gain
their bonuses and they will not move. A detailed explanation of the sand
dollar actions is here.
If the Sand Dollar Action allows you to move or remove people,
this is done in the phase "Take Placement Actions".
When placing feature cards, put beach cards into the top row
and street cards into the bottom row.
Every feature card must be placed with one of its sides aligned to
another feature card or with your starting feature tile.
B. Place the Feature card(s) into your City
There are two types of feature cards:
beach cards which have the ocean at the
top, and street cards, which have a wooden
boardwalk and a street at the bottom.
When placing the feature cards in your city,
2 rules apply:
-
Beach cards must be placed in the
top row of your city, and street cards must be
placed in the bottom row.
-
Every feature card must be placed with one of its sides aligned to
another feature card or with your starting feature tile. Feature cards placed
diagonally are not adjacent to each other, and feature cards cannot be
placed on top of other feature cards.
Some sand dollar actions will let you select and place 2 feature cards.
As long as the 2 placement rules are obeyed, the cards can be placed in
any order.
Some other sand dollar actions give you the option to swap the location
of 2 of your feature cards. This must be done after placing the feature
cards you selected this turn, and must obey the 2 placement rules. If
there are any people or footprints on a feature card that is swapped,
they are moved with the feature card.
Feature Card Breakdown
Each feature card is either a Beach Card or a Street Card, indicated by
the art and the placement of the icons.
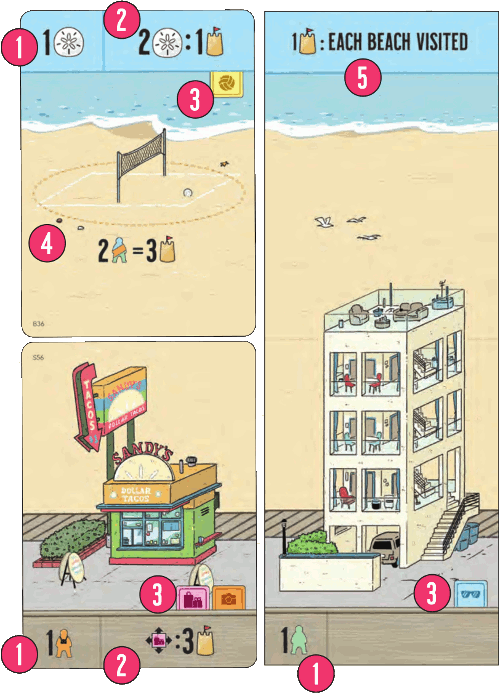
1 Placement Actions
These actions are taken after you place the card, such as gaining
sand dollars and people tokens, or moving previously placed people.
2 Scoring Opportunities
These icons indicate how each card scores at the end of the game.
Though there are several types of scoring opportunities (which are
covered in detail here),
there are two types that are referenced on most of the cards:

Adjacencies grant points for location tags that are on the
feature cards that are adjacent to the feature card. These score only
once, even if there are multiple adjacent cards that fit the criteria.

Chains grant points for groups of same location tags that
this card is part of. Chains only score if the minimum number of
location tags is met in a single group. Some chains score a set number
of points, and some chains score per location tag, allowing you to score
more points if you exceed the minimum number of needed tags.
3 Location Tags
These icons indicate the card’s type, and are e.g. used for gaining points from
your VIP and scoring at the end of the game (depending on the Scoring Objective Tile).
A location tag can appear on a card more than once, and it counts as many times
for chains. The location tags on starting feature tiles only count for the lower
part of the card.
The types of locations are:

Local Spots: These are the places where locals live or the places
they like to gather. Sure, tourists are allowed in these areas—that
is, if they know about them.

Tourist Spots: Locations where tourists like to gather. These
sometimes represent the areas and restaurants that are
recommended by all the travel books, while others represent the
tourist traps that no local would ever go to.

Businesses: Locations where your visitors spend their money on
trinkets, equipment, or food. You know, a business.

Sports: Locations where your visitors can work out, surf, or play
sports. Sometimes this tag also represents places where people
can buy sporting goods .

Nature: Locations that show off the natural beauty of your city or
that simply have beautiful plants or palm trees near them.

Waves: These are the locations that are good for swimming,
surfing, or just admiring the ocean view. These places get some
killer waves that surfers get stoked about.
4 Activity Rings
To score the indicated points, you must fill the activity ring on the card
with the right combination of people by the end of the game. The symbol
shows the type and exact number of people a ring can hold. Any people
not in activity rings are considered to be unplaced.
5 Footprint Scoring
Each starting feature tile has a unique way to score points for footprint
tokens placed during the game. When your VIP visits a location with the
desired attribute(s), you will place a footprint token on that card. At the
end of the game, each feature card with a footprint token on it can be
scored accordingly.
2. Take Placement Actions
The placement action on your feature card may show symbols that will
either add people to your city, give you sand dollars, or allow you to
move people that you placed on previous turns. Not every card will have
a placement action, but many of them do.
If you have bought a sand dollar action, you may get (depending on the action)
additional actions which you can perform in this phase.
The placement action "Gaining Tokens" is always performed first, additional
actions can be performed in any order.
Gaining Tokens
This symbol tells you to take a certain number of sand
dollars from the supply. The number next to the symbol tells you
how many sand dollars you can take.
The sand dollars may be placed anywhere in front of you,
but they are not actually part of your city; they are currency that you
may spend on future turns to take sand dollar actions or possibly turn
into points at the end of the game.
Symbols like this will show you which type of person
and (as specified by the number next to it) how many
people must be added to the card. This
is not optional.
Moving People

This symbol will show you a color, a number, and a
movement number, indicating how many people can
be moved and how far. This is an optional action. In
this example, you would be able to move up to 4 different tourists up to
two spaces each. These people can be moved independently; they do
not need to start or end on the same card. You cannot move the same
person twice.

The multi-colored symbol is a wild, and allows you to
move any person in your city: local, tourist, or even a
VIP. It cannot, however, be used to move the foodie.
In this example you can move any two persons up to
two spaces each. You can also choose two different
kind of persons.
When moving people, you can only move them up, down, left, or right—
diagonal movement is not allowed. Each card counts as one space, and
the starting feature tiles count as two (one beach space and one street
space). People cannot be moved onto empty spaces; they can only move
onto placed feature cards. Activity rings are not a separate space on the
card; if a person is on the card, it can be added to or removed from the
activity ring at any time.
VIPs and Footprints
If you moved a VIP, you may be able to add
a footprint token to your city. Check your
starting feature tile to see which location
attributes your VIP is trying to get to. If you
moved to or through a feature card with one
of those attributes, place a footprint token
on the card. Note that a footprint token will
score for each matching attribute on the feature card,
but there can only be one footprint token per
card, even if the VIPs visit multiple times.
The Foodie and the Food Truck
There is another way that you can gain and
move pieces on your turn. Underneath the
display, there are two wooden tokens: a
Food Truck and a Foodie. If you
made a regular feature card selection, and you chose the
card above one of these tokens, you will get
an additional reward. If you used a sand
dollar action, you do not get the reward.
The rewards are as follows:
Food Truck: The food truck increases the value of a feature.
Take one sand dollar from the supply.
Foodie: The foodie allows you to move any one person
(local, tourist, or VIP) by one space.
Foodie and Food Truck: When the foodie catches up with the food truck,
and you chose the card above these two tokens,
it is a happy day. You may take one sand dollar and move one person,
or you may choose to double either action, taking two sand dollars or
moving up to 2 people by one space each or 1 person twice.
When you gain a reward from the foodie or food truck, the token will move
one space to the right. If you’re at the edge of the display, the movement
wraps around, and you place the token under the leftmost display card.
If the feature card you selected was directly above both the foodie and
the food truck, instead of moving each token one space to the right, only
move the food truck two spaces to the right.
3. Refresh the Display
If the front row has any empty spaces, fill those spaces in with the back
row card immediately above it. Then, deal new cards from the feature
deck into any blank spaces, starting with the front row cards. The next
player may now take their turn.
End of the Game
The game ends at the end of the round in which a player has placed their 14th feature card (not counting the starting feature tile).
Now, each tourist and VIP can be moved 1 space, each local up to 3 spaces.
When one player has placed their 14th feature card, starting feature tile not included, it triggers the end of the game. Continue the round until the last
player in turn order has finished their turn, at which point the game will end.
Players will then take the “final movement” on all of their people. Each tourist and VIP will be able to move 1 space, and each local will be able to move
up to 3 spaces. When all players are done moving their people, players will score their cities and determine the winner.
Scoring the Cards
There are two scoring types that reference location tags and other icons on your cards, and one that lets you score on unspent sand dollars.
Adjacency
The adjacency symbol shows two things, a
point value and a pictured location tag. If
there are one or more cards with this tag
next to this card, you gain the number of points listed. Tags on the
same card as the adjacency do not count.
In this example, you would gain 2 points if it was adjacent to at
least one card with a tourist spot location tag. Adjacencies do not
stack. Even if two adjacent cards have the pictured tag, you still
only score the points once.
Adjacencies are not limited to location tags.
Some adjacencies reference other attributes,
such as a sand dollar or a person.
For all of these, the scoring trigger is the symbol on the adjacent card
from the placement actions, and not the physical pieces that can move around.
Chain
Like adjacencies, a chain symbol pictures
a location tag inside a box with a number,
and how many points it is worth. If this
card is in a chain of tags that meets or exceeds the number on the
left, you get the points.
Chains do not need to be in a straight line. They can weave around
your city, as long as each card in the chain is adjacent to at least
one other card with the tag.
Sometimes, the chains will have a
continuous scoring condition. When this
happens, you will gain the number of
points per tag in the chain.
In the example above, you would need this card to be in a chain of at
least five nature tags to score, and you would gain 1 point per nature
tag, for 5 points. If you had a chain of seven nature tags, it would be
worth 7 points. If you had four nature tags, you would not fulfill the
minimum chain requirement, and would score 0 points.
Unspent Sand Dollars
Cards that have this symbol will give you
points for groups of unspent sand dollars at
the end of the game.
In this example, you would gain 1 point for every 2 remaining sand
dollars. These abilities stack; you can count your remaining sand
dollars for each card that has this ability. So, for example, if you had
four sand dollars, one card with 2:1, and one card with 1:1, then you
would get 2 points from the 2:1 and 4 points from the 1:1, totaling
6 points.
Miscellaneous
Santa Monica is a colorful, lively place, and some of the feature
cards do not easily fit into boxes. Please reference the
Symbol Explanations
section for anything not covered in the main scoring types.
Scoring the activity Rings
Each ring symbol will picture a number of
people and victory points. If, at the end
of the game, the ring contains exactly the
pictured number of people, it will score the
points. The ring may only hold the pictured
number of people, and no more.
In this example, 1 tourist in the ring will
score 3 points. If the icon is multi-colored,
then the ring can be filled by a local, tourist,
or VIP.
Two cards in the game feature the “Any
Number of People” symbol.
For this card, you must have at least 1
person to score, and it will get you 3 points.
After that, you may place as many people
as you like in this ring. However, it still only
scores 3 points.
The implementation does not distinguish in the display which
persons are located inside or outside an activity ring.
You will have to count yourself, how many of the persons
on the card fit into the ring and which ones don't, and count
therefore as unplaced. However the activity ring has a checkmark
if there are enough persons on the card to fill the activity ring.
Scoring the Footprints
Your starting tile will allow you to score on
your footprint tokens. For each card with
a footprint token, count up the number of
matching attributes on that card. You will
get points for each attribute.
Scoring the Objectives
The objective card is chosen during setup, so you will know the
objectives for the whole game. Each objective card will list 3 things:
-
A wave bonus
-
A miscellaneous bonus
-
A penalty for people that end the game outside of a ring
These are detailed in the Scoring Objective Tiles section.
Tally Your Scores
Go around the table tallying up each line on the scorepad. Then add
each player’s score together. The player with the most victory points is
the winner. In the event of a tie, the tied player with the most leftover
sand dollars is the winner. If the players are still tied, the player with the
longest chain of tags is the winner. If players are still tied, the next player
to write “I WIN” into sand is the winner.
Yucata does not use the rule that as last tie-breaker the player wins
who can first write “I WIN” into sand.
In such a case, the tied players share the corresponding place in the ranking list.
Action and Ability Guide
Symbol Explanations
Abilities that show connected
adjacency tags mean that the
card must be adjacent to 2 or
more of that tag. Otherwise, it
scores 0 points.
This card must be adjacent to all
four attributes in order to score.
0 points are gained for one to
three attributes.
When adjacency tags are printed
side-by-side, it means you can
score for either or both. This card
will let you score 2 points for a
nature adjacency and/or 2 points
for a tourist spot adjacency.
This scoring opportunity is an
either/or. Gain 3 points if this is
adjacent to only one wave tag.
Gain 5 points if it is adjacent to
two or more.
If this card is adjacent to any
card with a scoring ring, whether
it is filled or not, you gain points.
If this card is NOT adjacent to
a card with a scoring ring, you gain
points.
To score, this card must be adjacent
to a card that gives a sand dollar
through its placement actions.
This card gives negative points if it
is adjacent to a feature card on any
of its three sides that gives people
through its placement actions.
Gain 1 point for every two Tourist
spot location tags anywhere in
your city.
You may move 3 people of any
type(s) directly onto this space, regardless
of distance.
This card signals the end of your
beach, and must be the leftmost
beach card. When this feature card
is placed, this is considered a third
placement rule for the rest of the
game. Therefore, this card may
never be swapped with another
feature card.
Sand Dollar Actions
To use this action you must pay 4 sand dollars to the
supply. Take 2 feature cards from the front row and place
them into your city. You may also move up to 1 person of
any type 1 space.
To use this action you must pay 4 sand dollars to the
supply. Take 1 feature card from the front row and the
feature card behind it and place them both into your city.
You may also move 1 person of any type 1 space.
To use this action you must pay 2 sand dollars to the
supply. Take a feature card from anywhere in the display
as long as it has a Local Spot or Tourist Spot Tag. You
then may move up to 2 people of any type 1 space each.
To use this action you must pay 2 sand dollars to the
supply. Take a feature card from anywhere in the display
as long as it contains a Business, Nature, or Sports tag.
You may then move up to 2 people of any type 1 space
each.
To use this action you must pay 3 sand dollars to the
supply. Take a feature card from the back row of the
display. You may then move up to 4 people of any type 1
space each.
To use this action you must pay 2 sand dollars to the
supply. Take a feature card from the front row of the
display. Then you may swap any 2 feature cards in your city.
You may then move up to 2 people of any type 1 space each.
To use this action you must pay 2 sand dollars to the
supply. Take a feature card from the front of the display,
then swap 2 feature cards in your city, then finally you
may return up to 2 people in your city back to the supply.
To use this action you must pay 1 sand dollar to the supply.
Take a feature card from the front row of the display.
Then you may move up to 3 tourists 1 space each.
Scoring Objective Tiles
Starting Feature Tiles
Placement Bonus:
Place a VIP on the lower part of this starting feature tile.
Take a sand dollar.
Place a Footprint Token on the lower part of this starting feature tile.
Footprint Scoring:
Each Location Tag "Tourist Spot" and "Local Spot"
on a card visited by the VIP (i.e. a card with a Footprint Token)
scores 1 point.
Placement Bonus:
Place a VIP on the lower part of this starting feature tile.
Footprint Scoring:
Each beach visited by the VIP (i.e. beach cards with Footprint Token)
scores 1 point.
The upper part of the starting feature tile can be scored as well,
if the VIP is moved to this part of the starting feature tile.
Placement Bonus:
Place two VIPs on the lower part of this starting feature tile.
Footprint Scoring:
Each Location Tag "Sport" and "Nature"
on a card visited by a VIP (i.e. a card with a Footprint Token)
scores 1 point.
Placement Bonus:
Place a VIP and two tourists on the lower part of this starting feature tile.
Footprint Scoring:
Each Location Tag "Business" and "Tourist Spot"
on a street card visited by the VIP (i.e. a street card with a Footprint Token)
scores 1 point.
Placement Bonus:
Place a VIP on the lower part of this starting feature tile.
Take a sand dollar.
Place a Footprint Token on the lower part of this starting feature tile.
Footprint Scoring:
Each Location Tag "Business" and "Local Spot"
on a street card visited by the VIP (i.e. a street card with a Footprint Token)
scores 1 point.
Placement Bonus:
Place two VIPs on the lower part of this starting feature tile.
Footprint Scoring:
Each Location Tag "Wave" and "Sports"
on a card visited by a VIP (i.e. a card with a Footprint Token)
scores 1 point.
Player info
The player info shows in the upper right corner the points you would
get if the game ends in this moment.
The numbers inside brackets are the points for the 3 scoring objectives
determined by the scoring objective tile, in the order
Wave bonus / miscellaneous bonus / Penalty for people outside of a ring.
Directly below the points you can see the number of sand dollars which the player
currently owns, and the number of feature cards they have played into
their city. If a player has played 14 or more cards, this number is shown in red
to indicate the coming end of the game.
In the lower left corner of the player info you can see how many persons
the player has standing somewhere on feature cards in their city.
Next to it, you can see how many of those persons are currently outside of a ring.
Note that this is a temporary number that usually changes a lot with the movements
directly before the end of the game, because it happens regularly that only
with these last movements, persons are moved to activity rings.
If a player is awarded movement steps, the number of persons and the number
of persons outside of a ring will be replaced by the still remaining movement steps.
You can click on the arrow in the player info to look at the city
of this player. Initially when loading the window, it will automatically
show the city of the active player. You can see which city is currently selected
by checking which arrow is clearly visible (not faded).
Common display
The common display is to the right of the player infos and shows the feature cards
which are currently available.
Each card has a magnifying glass symbol. If you click on that symbol, you
can see a magnified version of the card in a popup, so that you can better see the details
on the card.
Below the lower row of available feature cards you see the Food truck and the Foodie.
The Food truck is always below the right side of the card to which it is currently assigned.
The Foodie is always below the left side of the card to which it is currently assigned.
Available sand dollar actions
To the right of the common display you can see the two sand dollar actions
which are available in this game. Note that the text on these tiles is in german!
A click on the question mark opens a popup with an extract of the rules
for these sand dollar actions. This explains in english what the action allows you to do.
Scoring objective tile
To the right of the available sand dollar actions you can see which
scoring objective tile is used for this game.
Note that the text on this tile is in german!
A click on the question mark opens a popup with an extract of the rules
for this scoring objective tile. This explains in english what the
three different scoring objectives are.
Reference Card
To the right of the scoring objective tile you see a reference card
that contains explanations of the symbols which are used e.g. on the feature cards.
Note that the text on this card is in german!
A click on the question mark opens a popup with an extract of the rules
that explains in english these symbols and additional symbols for
which there was no space on the reference card. You can also get the
explanation for the only two feature cards here that contain german text.
City display
In the lower half of the window you can see the cards that a player has
played into their city. Only the city of one player is displayed at a time,
it is the one of the player who has a clearly visible (not faded) arrow in
their player info.
On the right and on the left there are small arrows which you can use
to scroll the city display to the left or to the right.
Persons on cards are displayed in a way to save space.
They are shown within a stripe with a background of the same kind as
the one on the bottom of street cards.
The number on the left side of a certain person kind shows
how many persons of this kind are on the card.
Note! This display does not distinguish between persons
inside of an activity ring and outside of an activity ring. The game logic
determines automatically, how many and which persons on the card can be
assigned to the activity ring. If the requirements of the
activity ring are fulfilled, a checkmark is displayed next
to the ring.
If the scoring conditions of a card are met, the points
you will score with this card are displayed in a corner of the card.
However this score does not include the points from activity rings.
These points are already shown separately on the card. If you will
score these points, there is a checkmark next to it.
Whenever you have to play a feature card into your city, there
will be arrows on cards next to possible empty spots for the card.
The direction of the arrow indicates that the new card can
be placed directly next to that card in that direction.
If you click an arrow, the new card will be placed there.
With this selection mechanism you can also choose an empty spot
which is not in the current view, so you may not have to scroll
to the right or to the left.
Moving persons
VIPs are special: each one of their steps matter, because
they can place footprint tokens on a card even if they only pass through it.
Therefore when you move a VIP, you can click on arrows to select
in which direction the VIP should do their next step.
One exception to this is the movement that you get as a placement bonus
of the card "The Turf". If you use one of these movements for a VIP, they
will be moved directly to the card "The Turf", and no path to this card
is determined. This is according to a clarification of the author.
For all other persons, all destinations that can be reached with the
number of available steps will be highlighted, and you select the destination
where the person should end their movement.
Movements at the end of the game (each Local up to 3 steps, all other persons 1 step)
can be performed automatically. The game logic first optimizes the
number of points that you score through activity rings. If there are several
possibilities for this, it also minimizes the number of persons which cannot
be assigned to an activity ring. At the end of the automatic movement action
there are only movements of persons remaining which cannot be moved to
an activity ring that still has room for additional persons of this kind.
If you are playing with the green scoring objective tile, it might be
benefitial to group these people on cards in order to minimize the number
of cards with unplaced persons. This optimization is not done automatically.
In other cases you can just skip the remaining movements by clicking the "Pass" button.
There are special cases where this kind of optimization may not maximize
your final score. For example it could be better to move the VIP to a card in
order to place a footprint token instead of moving them to an activity ring.
Or maybe it is better to optimize first the number of unplaced persons
before optimizing for the maximum score from activity rings.
In such cases you can also move some persons yourself and let the automatic
movement only handle the remaining movements.
Final score
The gamelog shows how your final score is calculated. It starts with the 3
scoring objectives from the scoring objective tile, followed by the points
scored from the cards in your city in the order beach from left to right,
then street from left to right. If you hover over the score from a card,
the corresponding card will be highlighted, provided it is currently visible.
| |